background image

11


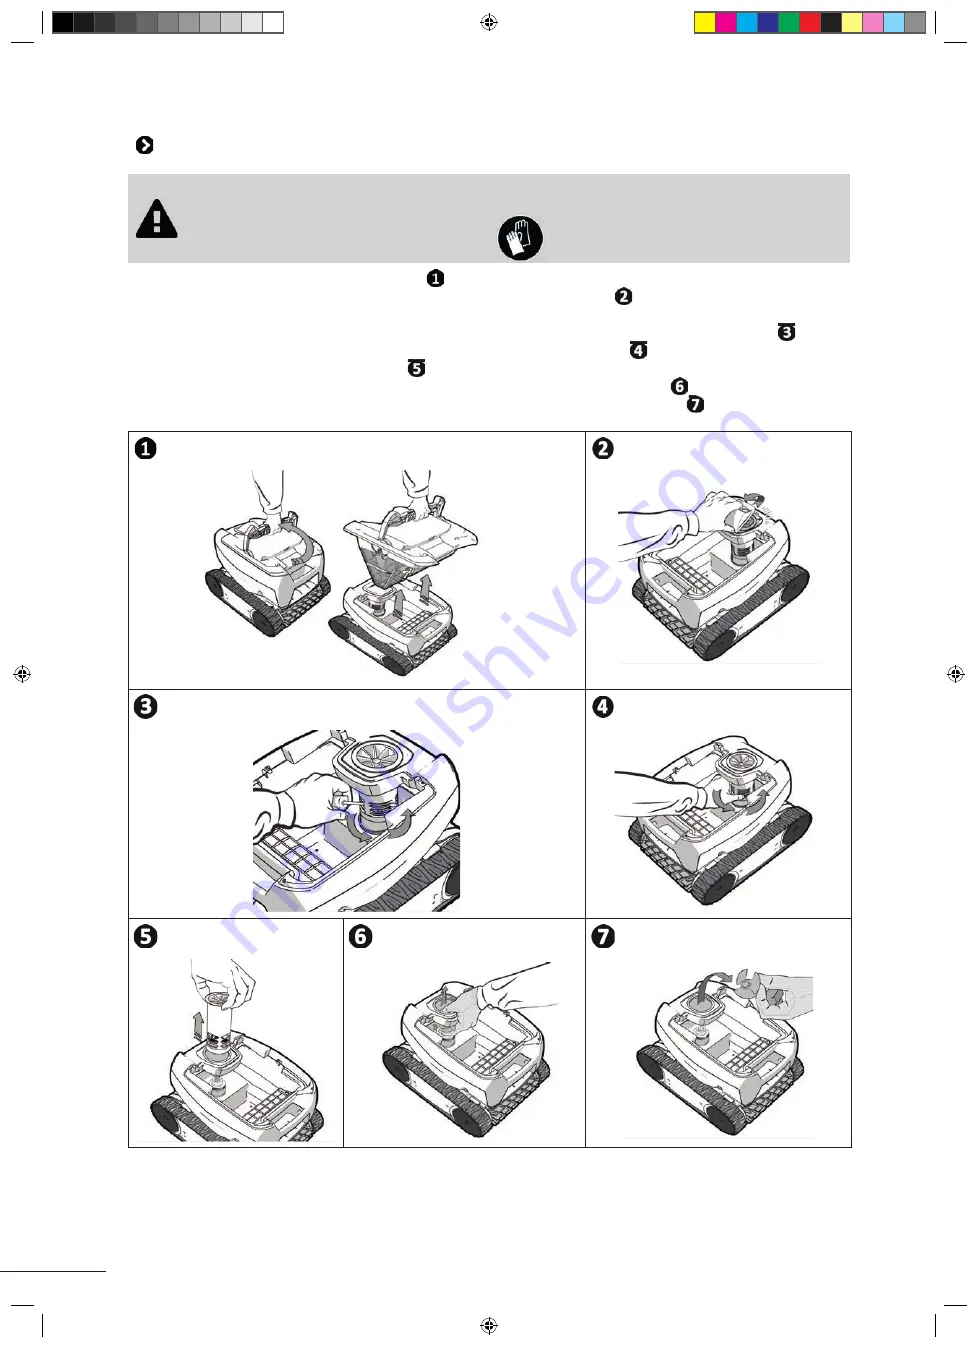
 4.2 I  Cleaning the propeller

To avoid serious injury:
•  Disconnect the cleaner from the power supply.

•  Wear gloves when handling the propeller 

.

• 

Remove the fi lter using the handle (see image  ).

• 

Remove the external fl ow guide


by lift ing it so as to clear the clips (see image  ).

• 

Upon fi rst removal, you will noti ce that the internal fl ow guide is securely ti ghtened, which is why we recommend inserti ng 

a screwdriver into the holes to loosen it by turning the screwdriver in the anti -clockwise directi on (see image  ).

• 

Once the internal fl ow guide has been loosened, unscrew it by hand (see image  ).

• 

Remove the internal fl ow guide (see image  ).

• 

Put on a pair of gloves and pull the propeller, holding it fi rmly to take it out (see image  ). 

• 

Remove any debris (leaves, stones, etc.) which may be blocking the propeller  (see image  ).

www.PiscineHorsSol.com

Содержание GT3220

Страница 1: ...u s Robot el trico Tradu o das instru es originais em franc s IT Manuale di installazione e di uso Italiano Robot elettrico Traduzione delle istruzioni originali in francese PT Manual de instalaci n y...

Страница 2: ...w w w P i s c i n e H o r s S o l c o m...

Страница 3: ...brancher l appareil le brancher directement dans une prise murale adapt e Avant toute op ration v ri er que La tension indiqu e sur la plaque signal tique de l appareil correspond bien celle du r sea...

Страница 4: ...endre connaissance de cette notice d installation et d utilisation ainsi que du livret s curit et garantie livr avec l appareil sous peine de dommages mat riels de blessures graves voire mortelles ain...

Страница 5: ...0 E Brosse lamelles classique Brosse Carrelage selon mod le Brosse Carrelage F Chariot en Kit Fourni Disponible en option Symbole D signation D marrage Arr t de l appareil Nettoyage Fond seul 2h Selon...

Страница 6: ...ransport Fen tre transparente selon mod le C ble ottant Guide ux externe Roues avant Roues arri re Cassettes 1 2 3 Conformit produit Cet appareil a t con u et construit selon les normes suivantes Dire...

Страница 7: ...allation 2 1 I Mise en situation 3 5 m tres Minimum Bo tier de commande Socle Robot C ble ottant Prise de courant C ble d alimentation 2 2 I Fixation sur le socle FR w w w P i s c i n e H o r s S o l...

Страница 8: ...nte est construite dans ou sur le sol et ne peut pas tre facilement d mont e et rang e L appareil doit fonctionner dans une eau de piscine dont la qualit est la suivante Temp rature de l eau Entre 15...

Страница 9: ...la prise de courant D visser le bouchon de protection voir image Brancher le c ble ottant au bo tier de commande et verrouiller la prise en vissant dans le sens des aiguilles d une montre uniquement l...

Страница 10: ...3 5 1 Lancer le cycle de nettoyage Faire un appui court sur la led s allume L appareil d marre le cycle de nettoyage en mode fond seul ou fond parois selon mod le Faire un appui court sur pour choisi...

Страница 11: ...ine Lorsque le robot est port e de main le saisir par la poign e de transport et le sortir doucement du bassin a n que l eau contenue dedans s vacue voir image Placer le robot au sol ou en position ve...

Страница 12: ...rit de l appareil et garantir son niveau de performance optimal 4 1 I Nettoyage du ltre La performance de l appareil peut diminuer si le ltre est plein ou encrass Nettoyer le ltre l eau claire apr s c...

Страница 13: ...ier d montage le guide ux interne est serr fortement c est pourquoi il est recommand d ins rer un Une fois que le guide ux interne est desserr le d visser la main voir image tournevis dans les trous a...

Страница 14: ...languettes des trous dans lesquelles elles sont x es voir image Pour positionner la nouvelle brosse en ler le bord sans languette sous le support brosse voir image Rouler la brosse autour de son supp...

Страница 15: ...henille du robot Pour installer la nouvelle chenille positionner le c t int rieur de la chenille sur les rainures de la premi re roue tirer la chenille autour de la deuxi me roue Appuyer sur la chenil...

Страница 16: ...ri er que la prise de courant sur laquelle le bo tier de commande est raccord est bien aliment e V ri er que le cycle de nettoyage a bien t lanc et que le voyant est allum Si le probl me persiste con...

Страница 17: ...3 I Immersion du robot V ri er l absence de cailloux ou cheveux dans l h lice voir 4 2 I Nettoyage de l h lice Nettoyer ou remplacer le ltre si besoin Sur temp rature dans le co ret de commande Placer...

Страница 18: ...directly into a proper wall socket or outlet Before carrying out any operations check that The voltage indicated on the rating plate of the appliance corresponds to the mains voltage The power grid i...

Страница 19: ...ation and user manual as well as the warnings and warranty booklet delivered with the appliance Failure to do so may result in material damage or serious or fatal injury and will void the warranty Kee...

Страница 20: ...rush Tile brush depending on the model Tile brush F Caddy kit Supplied Available as an option Symbol Designation Starting Stopping the appliance Bottom only cleaning 2h Depending on the model Bottom W...

Страница 21: ...pending on the model Floating cable External ow guide Front wheels Rear wheels Cartridges 1 2 3 Product conformity This appliance has been designed and built according to the following standards Low v...

Страница 22: ...5 Installation 2 1 I Set up 3 5 meters Minimum Control box Base Cleaner Floating cable Plug Power cord 2 2 I Attachment to the base w w w P i s c i n e H o r s S o l c o m...

Страница 23: ...manent pool is built into the ground or on the ground and cannot be easily dismantled and stored The appliance must operate in pool water with the following properties Water temperature Between 15 C a...

Страница 24: ...the control box near the socket Unscrew the protective cap see image Connect the oating cable to the control box and lock it in place by turning the ring only in the clockwise direction to prevent da...

Страница 25: ...cle Press and release the LED lights up The appliance starts the cleaning cycle in bottom only or bottom walls mode depending on the model Press and release to select the bottom only or bottom walls m...

Страница 26: ...er is within arm s reach pick it up by the handle and lift it gently out of the pool so that the water it contains drains into the pool see image Place the cleaner on the ground or vertically at the l...

Страница 27: ...rve the integrity of the appliance and guarantee optimum performance 4 1 I Cleaning the lter The cleaner s performance may be reduced if the lter is full or dirty Clean the lter with fresh water after...

Страница 28: ...ti clockwise direction see image Upon rst removal you will notice that the internal ow guide is securely tightened which is why we recommend inserting Once the internal ow guide has been loosened unsc...

Страница 29: ...shown in image To remove the worn brush remove the tabs from the holes in which they are xed see image To t the new brush start by tting the side without tabs under the brush holder see image Roll the...

Страница 30: ...image Then remove the track from the cleaner To install the new track position the inside of the track on the rst wheel s grooves Stretch the track around the second wheel Press down on the track to...

Страница 31: ...n start up Check that the outlet to which the control box is connected is receiving a power supply Check that the cleaning cycle has been launched and that the light is on If the problem continues con...

Страница 32: ...e 3 3 Immersing the cleaner Check that there are no stones or hair in the propeller see 4 2 I Cleaning the propeller Clean or change the lter if necessary Temperature too high in the control box Prefe...

Страница 33: ...direkt an eine geeignete Steckdose angeschlossen werden Vor jeder Nutzung ist Folgendes zu pr fen Die auf dem Typenschild des Ger tes angegebene Spannung stimmt mit der Netzspannung berein Das Stromne...

Страница 34: ...rheit und Garantie unbedingt gelesen werden sonst kann es zu Sachsch den schweren und sogar t dlichen Verletzungen und zum Erl schen der Garantieanspr che kommen Diese Dokumente m ssen w hrend der ges...

Страница 35: ...60 E Klassische Lamellenb rste Fliesenb rste je nach Modell Fliesenb rste F Transportwagen als Kit Im Lieferumfang enthalten Als Option verf gbar Symbol Bezeichnung Ein Ausschalten des Ger ts Reinigu...

Страница 36: ...Durchsichtiges Fenster je nach Modell Schwimmkabel Externer Str mungsleiter Vorderr der Hinterr der Kassetten 1 2 3 Konformit t des Produktes Das Ger t wurde nach folgenden Normen entwickelt und geba...

Страница 37: ...5 Installation 2 1 I Praktische Bedingungen 3 5 Meter Minimum Bedienger t Sockel Reiniger Schwimmkabel Steckdose Stromkabel 2 2 I Befestigung auf dem Sockel DE w w w P i s c i n e H o r s S o l c o m...

Страница 38: ...er auf dem Boden eingebaut und kann nicht leicht abmontiert und eingelagert werden Das Ger t muss in einem Schwimmbeckenwasser betrieben werden das folgende Eigenschaften aufweist Wassertemperatur Zwi...

Страница 39: ...e der Steckdose auf Schrauben Sie den Schutzstopfen ab siehe Abbildung Schlie en Sie das Schwimmkabel am Bedienger t an und befestigen Sie den Steckverbinder indem Sie nur die H lse im Uhrzeigersinn e...

Страница 40: ...gungszyklus starten Dr cken Sie kurz die Taste die LED geht an Das Ger t startet den Reinigungszyklus im Modus nur Boden oder Boden W nde je nach Modell Dr cken Sie kurz die Taste um den Modus nur Bod...

Страница 41: ...te ist nehmen Sie ihn am Transportgri und ziehen Sie ihn vorsichtig aus dem Becken heraus damit das darin enthaltene Wasser ab ie en kann siehe Abbildung Stellen Sie den Reiniger auf den Boden oder br...

Страница 42: ...tes aufrechtzuerhalten und ein optimales Leistungsniveau zu gew hrleisten 4 1 I Reinigung des Filters Die Leistung des Ger tes kann beeintr chtigt werden wenn der Filter voll oder verschmutzt ist Rein...

Страница 43: ...ndreher in die L cher einzuf hren um ihn durch Drehen gegen den Uhrzeigersinn zu l sen siehe Abbildung Beim ersten Ausbau ist der interne Str mungsleiter stark festgezogen daher wird empfohlen einen S...

Страница 44: ...B rste ziehen Sie die Laschen aus den L chern in denen sie befestigt ist heraus siehe Abbildung Zum Anbringen der neuen B rste schieben Sie den Rand ohne Lasche unter die B rstenhalterung siehe Abbil...

Страница 45: ...e end das Raupenband vom Reiniger Zum Installieren des neuen Raupenbandes legen Sie die Innenseite des Raupenbandes auf die Nut des ersten Rades Ziehen Sie das Raupenband um das zweite Rad Dr cken Sie...

Страница 46: ...achh ndler Beim Starten f hrt der Reiniger keine Bewegung aus Pr fen Sie dass die Steckdose an der das Bedienger t angeschlossen ist Strom f hrt Pr fen Sie dass der Reinigungszyklus gestartet wurde un...

Страница 47: ...ers Pr fen Sie dass keine Steine oder Haare im Propeller vorhanden sind siehe 4 2 I Reinigung des Propellers Reinigen oder ersetzen Sie ggf den Filter berhitzung in der Steuerbox Stellen Sie die Steue...

Страница 48: ...conform de normen van het installatieland Geen verlengsnoer gebruiken om het apparaat aan te sluiten dit moet rechtstreeks aangesloten worden op een geschikte wandcontactdoos Voor elke bewerking naga...

Страница 49: ...nstallatie en gebruik evenals van het boekje Waarschuwingen en garantie dat is meegeleverd met het apparaat om zo schade aan eigendommen ernstige verwondingen of de dood en de annulering van de garant...

Страница 50: ...gelborstel afhankelijk van het model Tegelborstel F Wagentje in kit Geleverd Beschikbaar als accessoire Symbool Benaming Starten Stoppen van het apparaat Schoonmaken Enkel bodem 2u Afhankelijk van het...

Страница 51: ...ant venster afhankelijk van het model Drijvende kabel Externe stroomgeleider Voorwielen Achterwielen Cassettes Conformiteit van het product Dit apparaat werd ontworpen en gebouwd volgens de volgende n...

Страница 52: ...5 Installatie 2 1 I Inwerkingstelling 3 5 meter Minimum Bedieningskast Sokkel Robot Drijvende kabel Stopcontact Voedingskabel 2 2 I Bevestiging op de sokkel w w w P i s c i n e H o r s S o l c o m...

Страница 53: ...n niet gemakkelijk worden gedemonteerd en opgeslagen Het apparaat moet worden gebruikt in zwembadwater met de volgende kwaliteit Watertemperatuur Tussen 15 C en 35 C pH Tussen 6 8 en 7 6 Chloor 3 mg l...

Страница 54: ...kast dichtbij het stopcontact Schroef de beschermdop los zie afbeelding Sluit de drijvende kabel aan op de bedieningskast en vergrendel de stekker uitsluitend door de schroeven met de klok mee aan te...

Страница 55: ...1 Schoonmaakcyclus starten Kort drukken op De led licht op Het apparaat start de schoonmaakcyclus in de modus enkel bodem of bodem wanden afhankelijk van het model Druk kort op om de modus enkel bode...

Страница 56: ...binnen handbereik is pakt u deze voorzichtig via de transportgreep uit het zwembad zodat het water er uit kan lopen zie afbeelding Plaats de robot op de grond of in verticale positie in de ruimte op h...

Страница 57: ...staties van het apparaat te garanderen 4 1 I Reinigen van de lter De prestaties van het apparaat kunnen verminderen als de lter vol zit of verstopt is Reinig de lter met schoon water na elke schoonmaa...

Страница 58: ...montage is de interne stroomgeleiding stevig vastgezet Daarom bevelen we aan een schroevendraaier Wanneer de interne stroomgeleiding los is deze met de hand losdraaien zie afbeelding in de openingen t...

Страница 59: ...rden vervangen Om de versleten borstel te verwijderen haalt u de lippen uit de gaten waarin deze vastzitten zie afbeelding Om de nieuwe borstel te installeren steekt u eerst de rand zonder lippen onde...

Страница 60: ...de rupsband vervolgens van de robot Om een nieuwe rupsband te installeren plaatst u de binnenkant van de rupsband op de groeven van het eerste wiel Trek de rupsband over het tweede wiel Druk de rupsb...

Страница 61: ...beweging Controleer of er spanning aanwezig is op het stopcontact waarop de bedieningskast is aangesloten Controleer of er een schoonmaakcyclus is gestart en dat de led brandt Als het probleem aanhoud...

Страница 62: ...3 I Onderdompeling van de robot Controleer of er geen stenen of haar aanwezig zijn in de schroef zie 4 2 I Reinigen van de schroef Indien nodig de lter reinigen Oververhitting van het bedieningskastje...

Страница 63: ...l residual de 30 mA de acuerdo con las normas vigentes en el pa s de instalaci n No utilice alargaderas para conectar el aparato a la red el ctrica con ctelo directamente a un enchufe mural adaptado A...

Страница 64: ...tamente el manual de instalaci n y de uso y las advertencias y garant a suministrados con el dispositivo para evitar la anulaci n de la garant a as como cualquier da o material y heridas graves inclus...

Страница 65: ...E Cepillo de l minas cl sico Cepillo para baldosas seg n modelo Cepillo para baldosas F Carro en kit suministrado opcional S mbolo Designaci n Arranque Parada del aparato Limpieza Fondo solo 2h Seg n...

Страница 66: ...ntana transparente seg n el modelo cable otante gu a ujo orientado ruedas delanteras ruedas traseras cassettes 1 2 3 Conformidad del producto Este aparato ha sido dise ado y construido seg n las sigui...

Страница 67: ...stalaci n 2 1 I Puesta en marcha 3 5 metros M nimo caja de control base robot cable otante toma de corriente cable de alimentaci n 2 2 I Fijaci n sobre el z calo ES w w w P i s c i n e H o r s S o l c...

Страница 68: ...nstruida en el suelo o sobre el suelo y no puede desmontarse f cilmente y guardarse El robot debe funcionar en un agua de piscina cuya calidad sea la siguiente Temperatura del agua Entre 15 C y 35 C p...

Страница 69: ...trol cerca de la toma de corriente A oje el tap n de protecci n ver imagen Conecte el cable otante a la caja de control y bloquee la toma apretando solo el anillo en sentido horario riesgo de deterior...

Страница 70: ...eza Al pulsar se enciende el piloto El aparato lanza el ciclo de limpieza en modo fondo solo o en modo fondo paredes seg n modelo Pulse brevemente para seleccionar el modo fondo solo o fondo paredes s...

Страница 71: ...de la piscina Cuando el robot est al alcance de la mano ag rrelo por el asa y s quelo suavemente de la piscina para evacuar el agua contenida el robot ver imagen Coloque el robot en posici n vertical...

Страница 72: ...arato y garantizar un nivel de rendimiento ptimo 4 1 I Limpieza del ltro El rendimiento del aparato puede disminuir si el ltro est lleno u obstruido Limpie el ltro con agua clara tras cada limpieza o...

Страница 73: ...troducir un destornillador por los ori cios y girar en sentido antihorario para soltar ver imagen Durante el primer desmontaje la gu a de ujo interna est muy apretada y conviene introducir un destorni...

Страница 74: ...rar los cepillos desgastados saque las leng etas de los agujeros en las que est n jados ver imagen Para poner nuevos cepillos introduzca el borde sin leng eta bajo el soporte del cepillo ver imagen En...

Страница 75: ...ontinuaci n la oruga del robot Para instalar la nueva oruga coloque el lado interior de la oruga en las ranuras de la primera rueda Estire la oruga alrededor de la segunda rueda Pulse la oruga de tal...

Страница 76: ...de control est alimentada Compruebe que se ha iniciado un ciclo de limpieza y que los pilotos est n encendidos Si el problema persiste contacte con su distribuidor El cable se enreda El robot limpiad...

Страница 77: ...I Inmersi n del robot Veri que la ausencia de piedras o de cabellos en la h lice ver apartado 4 2 I Limpieza de la h lice Limpie o cambie el ltro en caso necesario Sobretemperatura en la caja de contr...

Страница 78: ...s em vigor do pa s de instala o N o utilizar uma extens o para ligar o aparelho lig lo diretamente numa tomada mural adaptada Antes de qualquer opera o veri car que A tens o indicada na placa sinal ti...

Страница 79: ...conhecimento deste manual de instala o e utiliza o assim como do documento seguran a e garantia entregue com o aparelho sob pena de danos materiais de les es graves ou mesmo mortais assim como da anu...

Страница 80: ...E Escova l minas cl ssica Escova Ladrilhos segundo o modelo Escova Ladrilhos F Carrinho em kit Fornecido Dispon vel como op o S mbolo Designa o Arranque Desligamento do aparelho Limpeza S fundo 2h Se...

Страница 81: ...rte Janela transparente segundo o modelo Cabo utuante Guia de uxo externa Rodas dianteiras Rodas traseiras Cassetes 1 2 3 Conformidade do produto Este aparelho foi concebido e constru do de acordo com...

Страница 82: ...Instala o 2 1 I Coloca o em situa o 3 5 metros M nimo Caixa de comando Pedestal Robot Cabo utuante Tomada de corrente Cabo de alimenta o 2 2 1 Fixa o no pedestal w w w P i s c i n e H o r s S o l c o...

Страница 83: ...constru da no solo ou sobre o solo e n o pode ser facilmente desmontada e guardada O aparelho deve funcionar numa gua de piscina cuja qualidade seja a seguinte Temperatura da gua Entre 15 C e 35 C pH...

Страница 84: ...arafusar a tampa de prote o ver imagem Conectar o cabo utuante caixa de comando e bloquear a tomada aparafusando somente o anel no sentido hor rio risco de dani car o cabo utuante ver imagem Certi car...

Страница 85: ...5 1 Lan ar o ciclo de limpeza Premir brevemente o led acende se O aparelho inicia o ciclo de limpeza em modo s fundo ou fundo paredes segundo o modelo Premir brevemente para selecionar o modo s fundo...

Страница 86: ...estiver ao alcance da m o segur lo pela pega de transporte e retir lo lentamente da piscina para que a gua contida no seu interior seja evacuada ver imagem Colocar o robot no solo ou na posi o vertic...

Страница 87: ...ade do aparelho e garantir o seu n vel timo de performance 4 1 I Limpeza do ltro A performance do aparelho pode diminuir se o ltro estiver cheio ou sujo Limpar o ltro com gua limpa ap s cada ciclo de...

Страница 88: ...r rodando no sentido anti hor rio ver imagem Na primeira desmontagem a guia de uxo interna est fortemente apertada por isso que recomendado inserir Uma vez a guia de uxo interna desapertada desaparafu...

Страница 89: ...ara retirar a escova usada retirar as linguetas dos furos nos quais est o xadas ver imagem Para posicionar a nova escova introduzir o bordo sem lingueta sob o suporte de escova ver imagem Enrolar a es...

Страница 90: ...seguida a lagarta do robot Para instalar a nova lagarta posicione o lado interior da lagarta nas ranhuras da primeira roda Estender a lagarta em torno da segunda roda Pressionar a lagarta de maneira a...

Страница 91: ...aixa de comando est conectada devidamente alimentada Veri car que o ciclo de limpeza foi devidamente lan ado e o indicador luminoso est aceso Se o problema persistir contatar o revendedor O cabo est e...

Страница 92: ...a gua ver 3 3 I Imers o do robot Veri car a aus ncia de seixos ou cabelos na h lice ver 4 2 I Limpeza da h lice Limpar ou substituir o ltro se necess rio Sobretemperatura na caixa de comando Posiciona...

Страница 93: ...a corrente di erenziale residua di 30 mA dedicato conformemente alle norme vigenti nel paese di installazione Non utilizzare prolunghe per collegare l apparecchio collegarlo direttamente a una presa a...

Страница 94: ...ere il presente manuale di installazione e d uso e il libretto sicurezza e garanzia consegnato con l apparecchio per evitare il rischio di gravi danni materiali o ustioni gravi che possono portare al...

Страница 95: ...azzole per piastrelle a seconda del modello Spazzole per piastrelle F Carrello in kit Fornito Disponibile in opzione Simbolo Denominazione Avvio Arresto dell apparecchio Pulizia Solo fondo 2 ore A sec...

Страница 96: ...pugnatura per il trasporto Finestra trasparente a seconda dei modelli Cavo di comando Guida usso esterno Ruote anteriori Ruote posteriori Scatole 1 2 3 Conformit del prodotto Questo apparecchio stato...

Страница 97: ...allazione 2 1 I Posizionamento 3 5 metri Minimo Quadro comandi Zoccolo Robot Cavo di comando Presa di corrente Cavo di alimentazione 2 2 I Fissaggio sullo zoccolo IT w w w P i s c i n e H o r s S o l...

Страница 98: ...el suolo e non pu essere facilmente smontata e riposta L apparecchio deve funzionare nell acqua della piscina che abbia la seguente qualit Temperatura dell acqua Tra 15 C e 35 C pH Tra 6 8 e 7 6 Cloro...

Страница 99: ...itare il tappo di protezione vedere immagine Collegare il cavo di comando al quadro comandi e bloccare la presa avvitando in senso orario solo l anello rischio di danneggiare il cavo di comando vedere...

Страница 100: ...il ciclo di pulizia Premere brevemente si accende il LED L apparecchio inizia il ciclo di pulizia in modalit solo fondo parete a seconda del modello Premere brevemente per scegliere la modalit solo f...

Страница 101: ...rtata di mano a errarlo per l impugnatura di trasporto e toglierlo delicatamente dalla vasca cos che l acqua contenuta nel robot venga evacuata vedereimmagine Posizionare il robot al suolo in posizion...

Страница 102: ...t dell apparecchio e garantire un livello di performance ottimale 4 1 Pulizia del ltro Le prestazioni del robot possono ridursi se il ltro pieno o ostruito Pulire il ltro con acqua dopo la ne di ogni...

Страница 103: ...ndo viene smontato per la prima volta il guida usso interno stretto fortemente per questa ragione si consiglia Dopo aver allentato il guida usso interno svitarlo manualmente vedere immagine di inserir...

Страница 104: ...estrarre le linguette dai fori nei quali ssata vedere immagine Per inserire la nuova spazzola in lare il bordo senza linguetta sotto il supporto della spazzola vedere immagine Far ruotare la spazzola...

Страница 105: ...rarre poi il cingolo dal robot Per installare il nuovo cingolo posizionare il lato interno del cingolo sulle scanalature della prima ruota Sistemare il cingolo tirandolo sulla seconda ruota Premere su...

Страница 106: ...to il quadro comandi Controllare che stato lanciato un ciclo di pulizia e che la spia accesa Se il problema persiste contattate il rivenditore Il cavo si attorciglia Il robot non pulisce tutta la vasc...

Страница 107: ...3 Immersione del robot Controllare l assenza di ciottoli o capelli nell elica vedere 4 2 I Pulizia dell elica Pulire o sostituire il ltro se necessario Sovratemperatura sul quadro comandi Posizionare...

Страница 108: ...180 St Barth l my d Anjou cedex S A S U au capital de 1 267 140 SIREN 395 068 679 RCS PARIS Votre revendeur Your retailer Mod le appareil Appliance model Num ro de s rie Serial number Trouvez plus d i...

Отзывы: