background image

Product Manual - ZMORPH i500

back to table of content 

>>

41

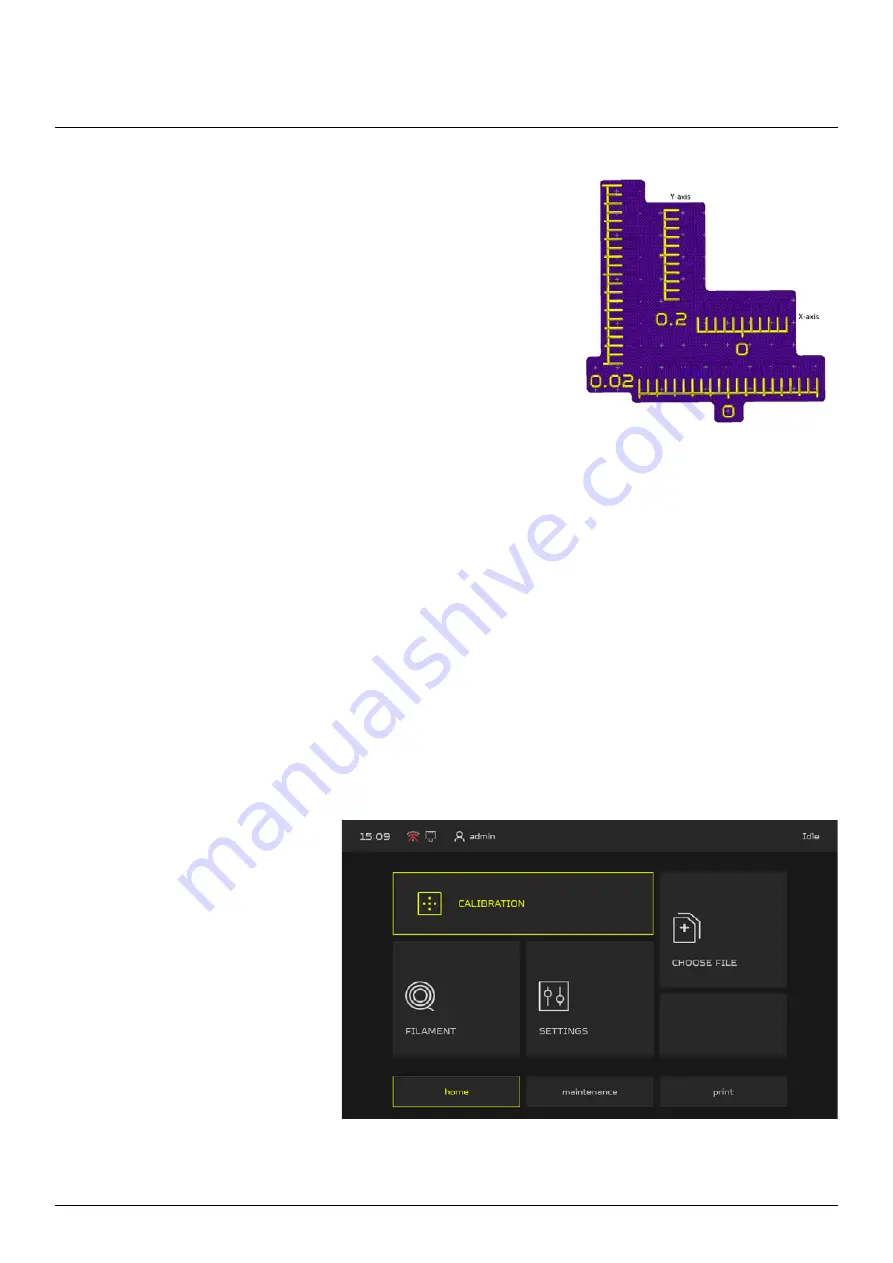
5. After machine finish the print you can now adjust the offsets 
using the print result.

You need to find the matching lines. At first match the lines in 
0.02 range (the external scale), each line represent -+ 0.02mm. 
For example if you find that in X-axis the matching line is the 
3rd line from “0” to the right it means that you need to add the 
0.06mm to X offset value, if it’s the 3rd line to the left it means 
you need to substract 0.06mm from X offset value. Similar for 
the Y-axis.

6. If you don’t find the right value on the external scale, look for it on the inner scale (0.2 range). 

7. Once you set the range you need to print the calibration parttern again

8. If all lines are matching at “0” the XY offset is calibrated.

Maintenance

1. From main menu go to the 
CALIBRATION menu.

10.4.3 Z Offset Calibration

Z offset calibration allows to set the offset between nozzles in Z-axis.
To perform the Z axis calibration:

Содержание i500

Страница 1: ...ZMORPH i500 MANUAL GUIDE zmorph3d com...

Страница 2: ...6 Risk of burns 9 2 7 Instructions for safe storage and transport 9 2 8 Electromagnetic compatibility EMC 10 3 Manufacturer s warranty and liability 11 3 1 Scope of the warranty 11 3 2 Acceptance of w...

Страница 3: ...ery 33 10 2 Loading the filament 35 10 3 Removing the filament 36 10 4 Calibration 38 10 5 Files preparation Voxelizer Industry 43 10 5 1 Installation and system requirements 43 10 5 2 Files maintenan...

Страница 4: ...i500 back to table of content 4 13 Firmware upgrades 62 13 1 General informations 62 13 2 Updating firmware 63 14 Help and support 65 14 1 Support request 65 14 2 Troubleshooting 66 14 2 Handy resourc...

Страница 5: ...f the device therefore he is not liable for injury damage and costs resulting from non compliance with these instructions 2 Health and safety at work 2 1 Markings contained in the instructions guide a...

Страница 6: ...p hands and body parts clear of moving parts and openings while the machine is running Moving parts can crush and cut Keep guards in place Lock out power before servicing Failure to comply may serious...

Страница 7: ...e is operated by handicapped or elderly people the Manufacturer recommends using assistance or supervision of appropriately trained personnel Do not leave the device unattended for long periods during...

Страница 8: ...he Low Voltage Directive In order to ensure max imum safety of use including protection against short circuits overloads overvoltages and overheating of the product the following provisions must be ob...

Страница 9: ...gh as 300 C Do not touch the tool head with bare hands and use caution when operating hot components If it is necessary to hold a hot item use specially adapted pliers and or tweezers The hot componen...

Страница 10: ...evices Recommendations for packing To transport the device it is best to protect it with original protective foams in case of lack of original foams the device should be protected in such a way that f...

Страница 11: ...er 3 1 4 Warranty does not cover defects resulting from other causes than indicated in clause 3 1 2 especially any defects resulting from a improper use or application of the product b improper produc...

Страница 12: ...using online form available at zmorph3d com 3 2 2 Acceptance of warranty claim requires a registration of the product at www zmorph3d com b _ returning a completed warranty claim in accordance with s...

Страница 13: ...ause shall not apply to the Buyer who is a Consumer 3 4 3 The warranty does not waive restrict or suspend any rights of the Buyer who is a Consumer due to the product being non compliant with the cont...

Страница 14: ...Product Manual ZMORPH i500 back to table of content 14 4 Certificates Certificates...

Страница 15: ...c materials such as PLA and ABS and more demanding materials such as PETG PA ASA TPU HIPS BVOH The machine can operate independently or cooperate with an external computer The built in LCD touch panel...

Страница 16: ...ansfer interruption it is recommended to use an USB flash drive The product is intended for indoor use only The device is not protected against moisture Zmorph i500 is equipped in air dust filter and...

Страница 17: ...L key HEX 3 0 mm L key HEX 2 5 mm 0 75 Kg PET G filament 0 35 Kg BVOH filament Adhesive agent Carrying straps Spatula Power cable Garbage collector Ethernet cable printed pads for smaller filament spo...

Страница 18: ...to table of content 18 8 Machine specification Machine specification 8 1 Overview G4 Input Air Filtration Material station Front doors Automatic Filament Loading System Filaments spoolholders Top door...

Страница 19: ...Product Manual ZMORPH i500 back to table of content 19 Power button Power socket USB Slot Ethernet slot HEPA Carbon Output Air Filtration Machine specification...

Страница 20: ...mm Layer resolution 0 05 0 4 mm Maximum extruder temperature 300 C Work area single material 460 x 300 x 500 mm Work area dual material 440 x 300 x 500 mm Maximum bed temperature 130 C Minimum wall t...

Страница 21: ...ass brushes and Teflon scrapers Filament loading Automatic Filament Loading System End of material detection Filament sensors RFID tags X axis Y axis Y axis Y axis X axis single toothed belt system dr...

Страница 22: ...for movement of heated bed in Zmorph i500 machine Must be periodically lubricated to ensure a long life of the machine Zmorph i500 is equipped in drawer specially designed for filament storage during...

Страница 23: ...he left and right nozzle during the work It is equiped with two separate nozzles Zmorph Build Hotend with 0 4 mm nozzle and Zmorph Support Hotend with 0 6 mm nozzle Zmorph Dual Drive Dual Extruder has...

Страница 24: ...utput Air Filtration HEPA and Carbon filters stops most air pollutants released during machine operation AFLS Automatic filament loading system system which controls the filament loading into the Zmor...

Страница 25: ...imum weight capacity of 60kg or higher Do not cover the machine with any materials during operation The machine should not be exposed to moisture The electrical installation of Zmorph i500 requires it...

Страница 26: ...etting up Zmorph i500 The cardboard can be easily opened on one side unhook it and take it off the machine Cut the bonding straps Remove the top cardboard cover Take off the top foam tray and unfasten...

Страница 27: ...way the straps in the event of possible transport of the machine NOTE Place the machine in its final location and pull out the carrying straps from underneath It may be necessary to allow the printer...

Страница 28: ...ick Start Guide The Quick Start Guide is included with the machine box 9 3 First use When the machine is installed it is time to power it on Open the front door and take out the power cable Connect th...

Страница 29: ...ent 29 Setting up Zmorph i500 9 4 Safety features removal Open the front door and remove the two fasteners from inside of the machine Once you remove the belt fasteners go to the SETTINGS menu located...

Страница 30: ...on the holders and the inserts wrapping NOTE NOTE Install the filters in the appropriate holders For the HEPA Carbon filter make sure that the Carbon filter is on the outside FILTRATION INPUT DUST FI...

Страница 31: ...s box and open the front door of the machine In the main menu choose MAINTENANCE screen and select MOVE AXES Choose Z MOVEMENT and move the bed down Make sure the heated bed is not blocking the access...

Страница 32: ...e of content 32 Setting up Zmorph i500 Make sure the worktable is not blocking the accesibility to the garbage collector holder by moving it upwards or downwards Mount the garbage collector on the hol...

Страница 33: ...a file you want to print to on an USB flash drive Insert the USB flash drive into the USB slot near the right top corner of the LCD screen Connect the Ethernet cable to the Zmorph i500 Machine will au...

Страница 34: ...ories The Wi Fi module LED will turn green when its active To connect the Zmorph i500 with the Wi Fi network from the main menu go to the SETTINGS menu located on the HOME screen then open the NETWORK...

Страница 35: ...filament you own by looking at the sticker on the filament roll Zmorph i500 package comes with PET and BVOH filaments Insert the spool inside of the filament drawer You can find there information stic...

Страница 36: ...ns will show replace load unload Choose load button and follow the instructions on the LCD screen machine will guide you in next steps Choose the FILAMENT from the main menu on LCD screen 10 3 Removin...

Страница 37: ...7 Maintenance After you choose the proper extruder the three buttons will show replace load unload Choose the extruder you will be using LEFT or RIGHT Choose load button and follow the instructions on...

Страница 38: ...ar screw shouldn t be adjusted 2 Connect the USB flash drive included with the machine to the front USB slot Before the operation please make sure the bed is empty and the nozzle is clean 3 On the HOM...

Страница 39: ...r the Z probe value visible on the UTILITIES screen will be the base height for the other bed corners write it down 7 Next the extruder will check the front left corner 3 times with an interval of thr...

Страница 40: ...on folder and select the XY calibration gcode file At next start the gcode the XY calibration procedure will start Please note the XY calibration require both filaments loaded 1 The calibration begin...

Страница 41: ...ed to add the 0 06mm to X offset value if it s the 3rd line to the left it means you need to substract 0 06mm from X offset value Similar for the Y axis 6 If you don t find the right value on the exte...

Страница 42: ...libration press the Automatic Z offset calibration button Before that make sure the nozzles are clean and the heated bed is empty 4 _ The extruder will go to the left rear corner to perform the Z offs...

Страница 43: ...n the screen Minimum system requirements Operating system Windows 7 or higher 64 bit or MacOS 10 13 or higher Mac Mini 6 0 Late 2012 or later other Apple devices 2014 or later 4GB RAM GPU with OpenGL...

Страница 44: ...and Support settings and choose the LEFT or RIGHT side for printing It s also possible to adjust more advanced settings in Additional Settings tab Click Next to generate the G code The G code view pro...

Страница 45: ...nce 10 6 Starting the print Choose PRINT button in the main menu Machine will inform you about filament status axis positions and hotend temperature Select CHOOSE FILE machine will show general inform...

Страница 46: ...Product Manual ZMORPH i500 back to table of content 46 Maintenance At next choose START and the print will begin...

Страница 47: ...he printout is complete remove them carefully Pliers are best suited for this purpose In case of problems with removing the support you can use a knife to help you Some of the models can be printed wi...

Страница 48: ...of content 48 Maintenance 10 9 Cleaning garbage collector From main menu go to MAINTENANCE screen and choose MOVE AXES menu Choose Z Movement and the heated bed at the bottom of the machine Park the...

Страница 49: ...ct Manual ZMORPH i500 back to table of content 49 Open the machine front door and disconnect the garbage collector Utilize the material leftover Insert the garbage collector back to the machine Mainte...

Страница 50: ...t such as thermal insulation gloves and safety goggles The machine is supplied with a basic set of tools for maintenance and service The following tables summarize the maintenance and repair guideline...

Страница 51: ...ing the whole spool of material burnt material may begin to settle on the internal walls of the nozzle To avoid clogging clean the nozzle with a drill pushing it inside the nozzle from below in a few...

Страница 52: ...the MAINTENANCE screen choose MOVE AXES menu and press Z Movement park the heated bed at bottom position and then turn off the machine Disconnect the cooling fan wires from extruder module Detach the...

Страница 53: ...der and pull it out Remove the hotend part from extruder Insert a new hotend part and install hotend holder Remember to connect the hotend wires Connect the cooling fan and connect the fan wires After...

Страница 54: ...main menu go to the MAINTENANCE screen choose MOVE AXES menu and press Z movement park the heated bed at bottom posi tion and then turn off the machine Disconnect the cooling fan wires from extruder m...

Страница 55: ...Product Manual ZMORPH i500 back to table of content 55 Service instructions Pull out the left and right cooling fans Insert the new cooling fans and connect the wires...

Страница 56: ...Service instructions 11 3 3 Exchanging the waste remover tip From the main menu go to the MAINTENANCE screen and choose MOVE AXES menu Press Z movement and park the heated bed at the bottom of the ma...

Страница 57: ...wthe waste remover tip holding screws Remove the old waste remover tip and slide a new one Tighten the waste remover tip holding screws Open themachine front door and disconnect the garbage collectort...

Страница 58: ...58 Service instructions 11 3 4 Heating table glass exchange From the main menu go to the MAINTENANCE screen and choose MOVE AXES menu Press Z movement and park the heated bed at the bottom of the mach...

Страница 59: ...3 4 Heating table glass exchange Open the machine front door to get access to the heated bed Loosen the heated bed glass clips After the clips are loosened remove the glass plate from heated bed surf...

Страница 60: ...old HEPA Carbon or G4 filters Install the filters in appropriate holders For more information check the signs on the holders and the inserts wrapping For the HEPA Carbon filter make sure that the Car...

Страница 61: ...otend module HEPA Carbon filter G4 dust filter Borosilicate glass In case of physical damage or failure one of the machine parts do not install spare parts other than the ones recommended by the Manuf...

Страница 62: ...while Zmorph releases a firmware update for its i500 model The current firmware version is available to download at the Zmorph Knowledge Base zmorph3d com support To check the firmware version of the...

Страница 63: ...nowledge Base zmorph3d com support 2 The machine should be turned off Insert the USB flash drive into the USB slot near the right top corner of the LCD screen 4 Select the update file from the list an...

Страница 64: ...Product Manual ZMORPH i500 back to table of content 64 5 The update will take a few minutes After a while the machine will turn on and inform about the successful update procedure Firmware upgrades...

Страница 65: ...machine or contact directly Zmorph Technical Support by submitting the request on the website support Zmorph3d com hc en us requests new Before you submit the request please prepare all of the requir...

Страница 66: ...table Nozzle is too high above the work table Clean the work table Apply the adhesive Adjust the bed temperature to the used material Perform the new calibration The Print is warping There is no adhe...

Страница 67: ...f Zmorph Fab and gives you access to the most advanced 3D printing capabilities Zmorph Blog blog Zmorph3d com Zmorph Blog presents news and stories from the Zmorph world articles on all fabrication me...

Страница 68: ...nvironmental impact of WEEE and to encourage its separate collection subsequent treatment reuse recovery recycling and environmentally sound disposal Electrical and electronic equipment at the end of...

Страница 69: ...zmorph3d com Zmorph sa Zmorph3D Zmorph3D zmorph3d Additional instructions available zmorph3d com support Welcome to the ZMORPH community...

Отзывы: