


13
Designer W
all Hood Installation
DESIGNER WALL HOOD INSTALLATION
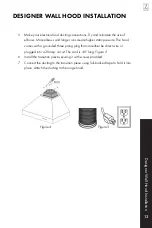
5. Make your electrical and ducting connections. Try and minimize the use of
elbows. More elbows and longer runs create higher static pressure. The hood
comes with a grounded three prong plug that can either be direct wire or
plugged into a 20amp. circuit. The cord is 45” long.
Figure 5
6. Install the transition piece securing it with screws provided.
7. Connect the ducting to the transition piece using foil-backed tape to hold it into
place. Attach the ducting to the range hood.
Figure 4
Figure 5
Содержание RK62342
Страница 1: ...Range Hood Installation Guide and Users Manual...
Страница 7: ......
Страница 12: ...4 Wall Hood Installation WALL HOOD INSTALLATION Installation Tutorial Video...
Страница 18: ...10 Designer Wall Hood Installation DESIGNER WALL HOOD INSTALLATION Installation Tutorial Video...
Страница 25: ...17 Island Hood Installation ISLAND HOOD INSTALLATION Installation Tutorial Video...
Страница 29: ...21 Designer Island Hood Installation DESIGNER ISLAND HOOD INSTALLATION Installation Tutorial Video...
Страница 35: ...27 Under Cabinet Installation UNDER CABINET INSTALLATION Installation Tutorial Video...
Страница 38: ...30 Insert Installation INSERT INSTALLATION Installation Tutorial Video...
Страница 52: ...44 Single Motor Electrical Diagram SINGLE MOTOR ELECTRICAL DIAGRAM CHANGING PARTS...
Страница 53: ...45 Double Motor Electrical Diagram CHANGING PARTS DUAL MOTOR ELECTRICAL DIAGRAM...
Страница 103: ......