background image


VF Series User Manual 


P a g e

 | 

7


3.


User Management 

3.1


Adding User 


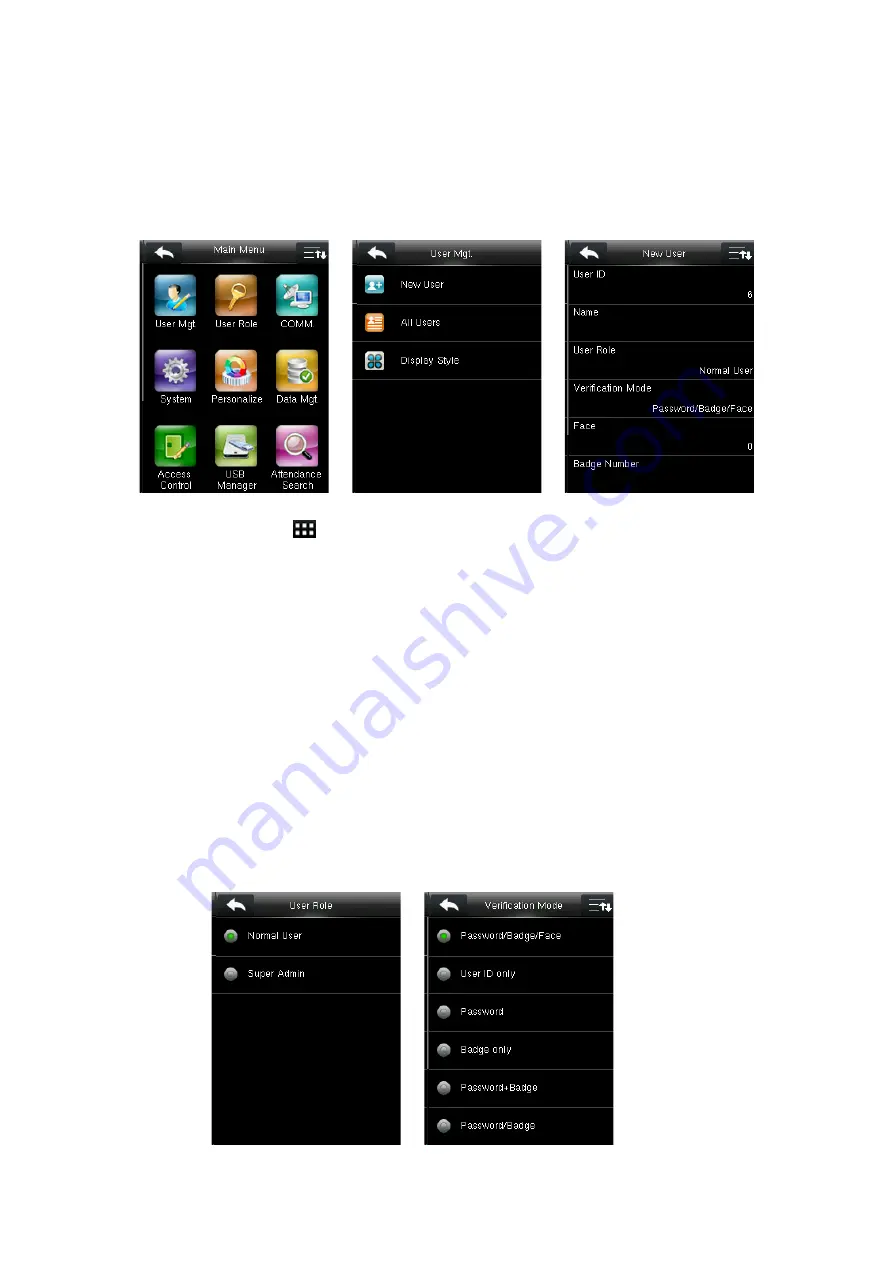
In the initial interface, press 

  > 

User Mgt. 

New User

 to enter 

New User

 setting interface. It 

includes inputting User ID and Name, choosing User Role and Verification Mode, registering Face, 
Badge Number and User Photo, setting Password.


3.1.1


Enter User ID and Name 

Device automatically allocates an ID starting from 1 for every user in sequence. You can also 
manually input an ID. 

Notes: 

1)


The device supports user ID ranging from 1 to 9 digits.   

2)


“Name” field supports maximum of 24 characters. 

3.1.2


Select User Role and Verification Mode 


Содержание VF Series

Страница 1: ...USER MANUAL VF Series Version 1 0 Date March 2018...

Страница 2: ...f user interfaces and menu functions of VF series products Not all the devices have the function with the real product prevails The pictures in this manual may not be exactly consistent with those of...

Страница 3: ...Enroll a Face 8 3 1 4 Enroll a Badge Number 8 3 1 5 Enroll a Password 9 3 1 6 Enroll Photo 9 3 2 Searching for a User 9 3 3 Editing User 10 3 4 Deleting User 10 3 5 User Display Style 11 4 User Role 1...

Страница 4: ...Access Control 29 9 1 Access Control Options Settings 29 10 USB Manager 30 10 1 USB Download 30 10 2 USB Upload 30 10 3 Download Options Settings 31 11 Attendance Search 33 12 Print Settings 34 13 Sho...

Страница 5: ...the face image is comparatively bright please move backwards appropriately when the face image is comparatively dark please move forwards appropriately 1 Instruction for Use 1 1 The distance Facial Ex...

Страница 6: ...green frame It is recommended that the face should be at the middle of the screen and focus eyes inside the green box according to the to the device s voice prompts 1 3 Verification Modes 1 3 1 Passw...

Страница 7: ...registered verification modes are displayed just as the above figure showing that Password and Face have been registered 1 3 2 Badge Verification Swipe your registered badge around the camera area in...

Страница 8: ...cted by the camera with that in relation to the user ID entered through the keyboard Adopt this mode only when it is difficult to recognize the face Tap on the initial face to enter 1 1 verification m...

Страница 9: ...you have registered only your face you will access the face verification interface directly after entering your ID If you have registered multiple verification modes the icons of registered verificat...

Страница 10: ...isplay voice bell punch state key mode and shortcut key settings Data Mgt Manage data in the device such as delete data backup data and restore data Access Control This includes setting the parameters...

Страница 11: ...ing User Role and Verification Mode registering Face Badge Number and User Photo setting Password 3 1 1 Enter User ID and Name Device automatically allocates an ID starting from 1 for every user in se...

Страница 12: ...unctions of the menu 3 1 3 Enroll a Face Press Face on the New User interface Focus eyes inside the green box as the device prompts until enrollment succeeds Notes 1 For the methods of face enrollment...

Страница 13: ...to 8 digits 3 1 6 Enroll Photo If you had enrolled photo the system will display enrolled photo in addition to ID and name after you pass the verification Press User Photo on the New User interface St...

Страница 14: ...h Searching for a User press Edit to enter user editing interface Or in the initial interface press User Mgt All Users Select a user Edit to enter user editing interface The method of editing user is...

Страница 15: ...adge number and user photo the system will show delete option for these separately 3 5 User Display Style In the initial interface press User Mgt Display Style to enter Display Style setting interface...

Страница 16: ...ferent rights to new users To avoid setting rights for each user one by one you can set user roles to categorize different permission levels in user management 4 1 Enabling User Role In the initial in...

Страница 17: ...Manual P a g e 13 In the initial interface press User Role User Defined Role 1 2 3 Define User Role to enter rights allocating interface Select or cancel the operating right to each menu for User Defi...

Страница 18: ...ccording to the actual network situation Subnet Mask The default value is 255 255 255 0 please adjust them according to the actual network situation Gateway The default value is 0 0 0 0 please adjust...

Страница 19: ...lower baudrate would be more reliable 5 3 PC Connection To improve security of data Comm Key for communication between the device and PC needs to be set If a Comm Key is set in the device the correct...

Страница 20: ...connected successfully the initial interface will display the logo Select the connected WIFI signal to view the IP address and other information Adding WIFI Network Manually If you want to connect a...

Страница 21: ...ironment 5 5 Cloud Server Setting This setting is used for connecting with ADMS server Press Cloud Server Setting on the Comm Settings interface When the Webserver is connected successfully the main i...

Страница 22: ...on January 1 2020 after settings are reset the date time will stay at 18 30 on January 1 2020 6 1 1 Daylight Saving Time The Daylight Saving Time is a widely used system of adjusting the official loc...

Страница 23: ...Menu Item Description Duplicate Punch Period m Within a set time period unit minutes the duplicated attendance logs will not be reserved value ranges from 1 to 999999 minutes Camera Mode To set wheth...

Страница 24: ...the maximum storage is attained It can be disabled or set to a value ranging from 1 to 99 Confirm Screen Delay s The display of the verification information interface after verification Value ranges f...

Страница 25: ...of the device Please adjust the Exposure and Quality parameter only under the guidance of after sales service personnel from our company 6 4 Reset to Factory Settings Reset data such as communication...

Страница 26: ...set value the device will automatically exit to the initial interface You can disable it or set the value to 60 99999 seconds Idle Time To Slide Show s When there is no operation in the initial interf...

Страница 27: ...w Bell Schedule to enter the New Bell Schedule adding interface Bell Status ON is to enable the bell while OFF is to disable it Bell Time The bell rings automatically when reaching the specified time...

Страница 28: ...under Shortcut Key Mappings menu will become invalid Manual Mode To switch the punch state key manually and the punch state key will disappear after Punch State Timeout Auto Mode After this mode is c...

Страница 29: ...y when Function is selected as Punch State Options Punch State Value Name Set Switch Time options will appear on the interface If Function is selected as other option there will no Punch State Value N...

Страница 30: ...e 26 2 Select Function of shortcut key as Punch State Options The shortcut key will not take effect if Punch State Mode in Punch State Options interface is set as OFF For detail setting please refer t...

Страница 31: ...d photos in the device which means the photos taken after failed verifications Delete All Data To delete all user information and attendance logs etc Delete Admin Role To make all Administrators as No...

Страница 32: ...VF Series User Manual P a g e 28 8 3 Data Restoration To restore the data in U disk to the device Press Restore Data on the Data Mgt interface...

Страница 33: ...sensor will be checked after a time period if the state of the door sensor is inconsistent with that of the door sensor mode alarm will be triggered The time period is the Door Sensor Delay value ran...

Страница 34: ...ager interface Menu Item Description Attendance Data To download attendance data in specified time period into USB disk User Data To download all user information from the device into USB disk User Po...

Страница 35: ...reen savers from USB disk into the device You can choose Upload selected picture or Upload all pictures The images will be displayed on the device s main interface after upload During uploading you ne...

Страница 36: ...nual P a g e 32 Menu Item Description Encrypt Attendance Data During uploading and downloading the attendance data is encrypted Delete ATT Data After successful downloading the attendance data on the...

Страница 37: ...tendance pictures and blacklist pictures is the same as that of querying attendance records The following is an example of querying attendance records Press Attendance Record on the Attendance Record...

Страница 38: ...In the initial interface press Print to enter print setting interface Press Data Field Setup on the Select the fields needing to be Turn on off the Paper Cut function Print interface printed Note To t...

Страница 39: ...d press OK to save 2 Set the start date and time It is the date and time when the short message becomes valid 3 Set expired time Expired Time m Valid time for the message calculated from the Start Tim...

Страница 40: ...he screen Edit Message Press Edit on the interface above Edit operations are the same as that of adding new Delete Message Press Delete on the interface above Then select YES to delete Note Personal M...

Страница 41: ...eaching Message Show Delay The valid value scope is 1 99999 seconds 13 4 View the Public Messages and Personal Message After a public short message is set the short message icon is displayed on the up...

Страница 42: ...apid understanding of different attendance situations during the handling of attendance data In the initial interface press Work Code to enter work code setting interface 14 1 Add a Work Code Press Ne...

Страница 43: ...meout s After pressing password or other verification modes you must input work code in a certain time If this time is exceeded interface of input work code will go back to initial interface The durat...

Страница 44: ...lack to check whether the screen displays colors properly Test Voice The device automatically tests whether the voice files stored in the device are complete and the voice quality is good Test Face To...

Страница 45: ...otos and user photos also to check the total storage of users faces badges attendance records attendance photos blacklist photos and user photos Device Info It displays the device name serial number M...

Страница 46: ...5 Appendix 15...

Отзывы: