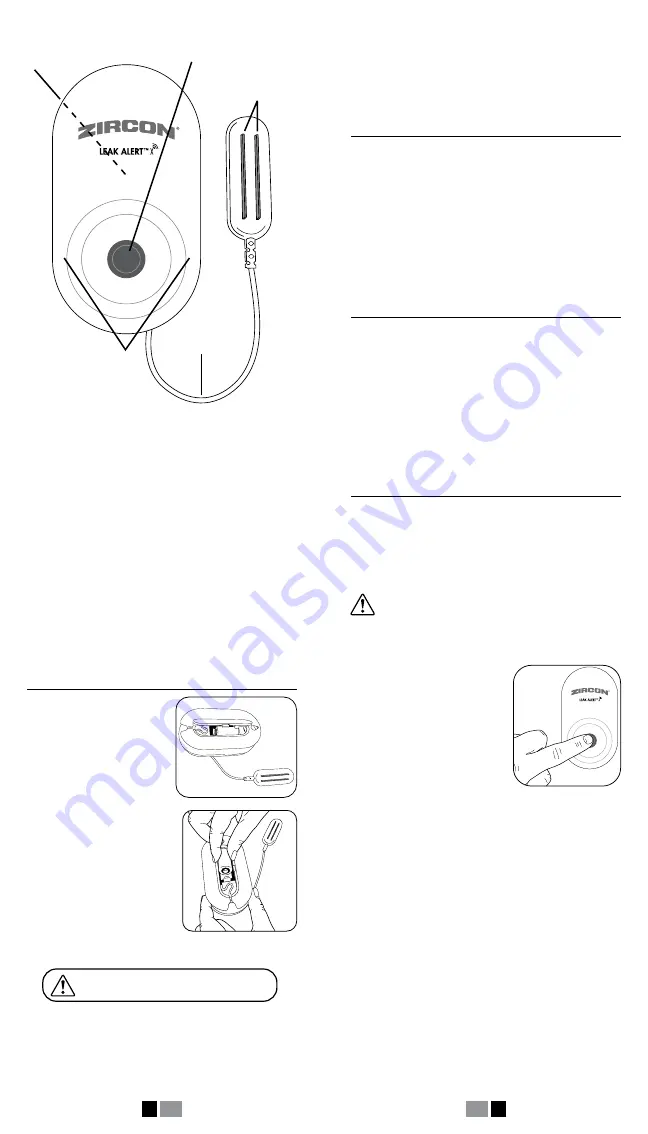
To configure your Leak Alert
™
X Smart Water Detector,
you will need:
• Access to a local Wi-Fi network and the network
password (if applicable)
• A desktop / laptop computer, tablet, or smart phone
with Wi-Fi (wireless) internet access
• A new 3V (CR123A or CR17345) lithium
battery (included)
The following devices are supported:
• iPhone / iPad (iOS version 9.0 and later)
• Android (4.4.x and later)
• Windows (Windows 7 and later)
• Mac (OS 10.11 and later)
INSTALL THE BATTERY
1.
To access the battery
compartment, remove the
battery door on the back of
the unit.
2.
Your detector comes
with a 3V (CR123A or
CR17345) lithium battery,
which is shielded with a
pull tab. Remove the tab
from battery compartment
before use.
Once the pull tab is removed,
or after inserting a new
battery, make sure the battery
is securely positioned and oriented as shown.
CAUTION: Risk of explosion if incorrect battery
type is installed. Dispose of used batteries
according to applicable law.
Sensing
Contacts
LEDs
Reset / Wake Button
3V Lithium
Battery Compartment
(on back)
9.8 ft (3 m) cable
REMOVE PULL TAB FROM BATTERY
COMPARTMENT BEFORE USE!
In the event of a low battery, the detector will chirp
every 30 seconds, from 9:00 A.M. to 5:00 P.M.
local time. One email notification will be sent per
24-hour period. Replace with a new battery as soon
as possible.
HOW IT WORKS
When configured, the Leak Alert X Smart Water
Detector acts as a wireless access point, which means
it can link directly to your router.
Once it has been set up, the detector sits dormant
until one of three events activates it:
• The Reset / Wake Button is pressed
• Water touches the Sensing Contacts
• Optional log is sent to your email (every 6 days)
OVERVIEW
READ THESE INSTRUCTIONS IN THEIR ENTIRETY
BEFORE SETTING UP YOUR DETECTOR.
Several steps are required to set up your detector:
• Link the detector to your Wi-Fi network using a
computer, tablet, or smart phone with Wi-Fi access.
• Use your wireless device to set up the detector.
• Place the detector where it will be used, such as
under a sink or water heater, or in a basement.
CONFIGURE DETECTOR TO WI-FI
You will need to access the network settings on
your chosen device during activation. You may also
need the password to your wireless network.
Depending on your device type, this may be located
in Settings, Utilities, or Control Panel.
If you are not sure how to access network
settings on your device, take a moment to
look at your user manual, or search online for
how to do this before starting the steps below.
LINK DETECTOR TO WI-FI
1.
Press the Reset / Wake
Button. The lower left LED
will flash.
2.
On your device,
access the network settings.
3.
Select
LeakAlertX_XXXXXX_XX
from the list of
displayed networks. (The numbers following the name
will vary.)
It may take several seconds for the
LeakAlertX network to appear on your device.
Once your device has successfully connected to
the detector, the lower left LED will stay on, and the
lower right LED will flash. Your device and detector
must be connected to one another in order to
complete configuration. Immediately move on to the
next step.
The detector will time out after 3 minutes
of inactivity. Short beeps will sound and both
LEDs will turn off. If this happens, repeat the
steps above.
1 EN
2
EN


