WWW.
ZIPPITY
-OUTDOOR.COM
7
ASSEMBLY
INSTRUCTIONS
ZP19038
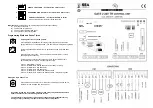
STEP 2.5
STEP 3.1
STEP 3.2
Starting with one inside corner, place (1) L Bracket
(K)
against a gate rail
and gate post as shown. Fasten the L bracket with (4) ¾” white self-drilling
stainless steel screws. Repeat for the three remaining inside corners.
Pressure fit (2) Post Caps
(A)
over the
gate posts. The post caps will lock into
place.
Pre-drill two holes on the face of the gate rails
for each Gate Hinge
(G)
with the ⅟₁₆” Drill Bit
(L)
.
Holes should be about ¼” from the edge of the rail
as shown. Fasten each gate hinge with (2) 1/8” Black
Self-Drilling Stainless Steel Screws
(I)
.
K
A
STEP 3:
INSTALL
POST CAPS, GATE HINGES, AND GATE LATCH
G
I
L
¼”