background image

801910 v3.05 09.20 HT BCS Commercial Instructions 

Page 3 of 32

HydroTap Specifications

Installation check list ....................................................................................................................4

Important Safety Instructions .......................................................................................................5

Warnings and Regulatory Information ..........................................................................................6

Major Components and Accessories ...........................................................................................7 

Technical Specifications ...............................................................................................................8

Before Installation and Site Requirements ...................................................................................9

Installation Instructions

STEP 1 - 

Measure and cut all the tap holes before fitting the taps 

                    (Refer to the Tap installation instructions, supplied with the Tap)

STEP 2 -

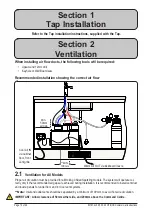
 Check for adequate ventilation

           Section 2 - Ventilation

           2.1 - Ventilation for All Models ..........................................................................................10

STEP 3 

- Install the Command Centre

           Section 3 - Command Centre installation           

           3.1 - Check the external bypass valve setting ...................................................................12

           3.2 - Hose and tube fitting .................................................................................................12

           3.3 - John Guest fittings ....................................................................................................13

           3.4 - Carbonation valve .....................................................................................................13

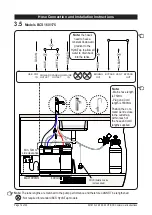
           3.5 - Model BCS 160/175 ..................................................................................................14 


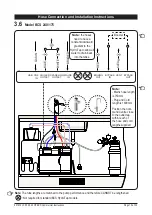
           3.6 - Model BCS 240/175 ..................................................................................................15

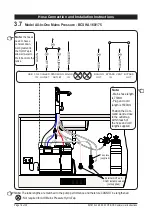
           3.7 - Model AIO Mains 160/175 ........................................................................................16

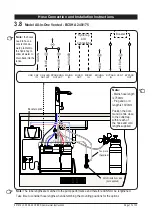
           3.8 - Model AIO Vented 240/175 .......................................................................................17          

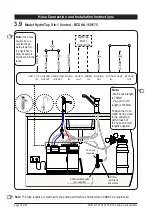
           3.9 - Model 5-In-1 Vented 160/175 ...................................................................................18

           3.10 - Model 5-In-1 with Booster 240/175 .........................................................................19

STEP 4 

- Install the Booster Heater (if required)

           Section 4 - Booster heater Installation        

           4.1 - 4.4 - Booster Heater specifications and installation ..................................................20-22

STEP 5 

- Mount the external filter / softener (if required)

           Section 4- Filter / Softener installation          

           5.1- 5.2 - Mounting the filter head & cartridge installation .................................................23

STEP 6 - 

Fit the CO

2

 Gas cylinder

Section 5 - CO

2

 Cylinder and Regulator

           6.1 - 6.5 - Connect, secure and test the CO

2

 gas cylinder ................................................24

STEP 7

- Commission the HydroTap

           Section 7 - Commissioning

           7.1- CO

 Purge .................................................................................................................26

           7.2- Filter Flush .................................................................................................................26

           7.3- Boiling Calibration ......................................................................................................27

           7.4- Booster .......................................................................................................................27

           7.5- Safety Sensor Calibration ..........................................................................................28

           7.6- Command-Centre Flush .............................................................................................29

           7.7- Carbonation Valve Flow Adjustment ..........................................................................29
Troubleshooting ...........................................................................................................................30

End of Life Disposal .....................................................................................................................31

Contact Details .............................................................................................................................32

    Index

Содержание HydroTap G4 BCS160/175

Страница 1: ...801910 v3 05 09 20 HT BCS Commercial Instructions Page 1 of 32 Affix Model Number Label Here 801910 BCS Models Zip HydroTap G4 Installation and Operating Instructions...

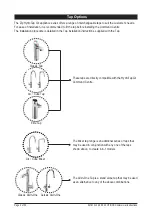
Страница 2: ...rc Cube Tap Arc Cube Mixer Classic Tap Elite Tap The Zip HydroTap G4 appliance series offers a range of interchangeable taps to suit the customer s needs For ease of installation it is recommended to...

Страница 3: ...on valve 13 3 5 Model BCS 160 175 14 3 6 Model BCS 240 175 15 3 7 Model AIO Mains 160 175 16 3 8 Model AIO Vented 240 175 17 3 9 Model 5 In 1 Vented 160 175 18 3 10 Model 5 In 1 with Booster 240 175 1...

Страница 4: ...y 2 Check all plumbing fittings have been tightened 3 Ensure the outlet and vent pipes are positioned to drain correctly 4 Ensure there is adequate ventilation 5 Check all tubes from the Command Centr...

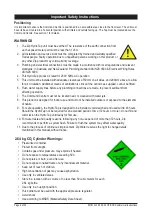
Страница 5: ...is appliance can be used by children aged from 8 years and above and persons with reduced physical sensory or mental capabilities or lack of experience and knowledge if they have been given supervisio...

Страница 6: ...e HydroTap is designed to be installed commissioned and used within 48 hours Should the HydroTap not be required for an extended period of time 72 hours or more do not fill and commission the HydroTap...

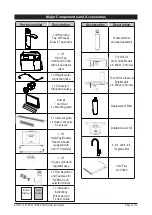
Страница 7: ...vent grille 1 x Outlet vent grille 9 x screws 1 off HydroTap Booster Heater hoses supplied with 240 175 models 1 off CO2 gas cylinder regulator assy 1 x Flow Restrictor and Tee piece for BCSHAV and s...

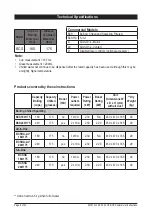
Страница 8: ...st 10A Power outlets required Power Rating kW Boost Rating kW Unit Dimensions W x D x H mm with air duct Dry Weight kg Boiling Chilled Sparkling BCS160 175 160 175 no 1x10A 2 30 NA 450 x 470 x 335 29...

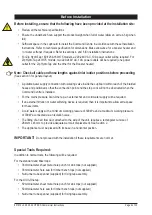
Страница 9: ...d positioned so that the connection point and the stop cock will not be obstructed when the Command Centre is installed For the mains pressure All in One tap an external hot and cold water supply will...

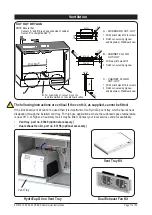
Страница 10: ...Note Inlet and outlet vents should be separated by a minimum of 100mm to avoid hot air recirculation IMPORTANT Allow clearance of 50mm either side and 200mm above the Command Centre When installing ai...

Страница 11: ...56 optional accessory HydroTap G4 on Vent Tray Vent Tray Dual Exhaust Fan Kit Vent Tray Kit max 43 314 00 1 2 0 0 1 2 0 0 285 00 1 2 0 0 5 326 00 CUT OUT DETAILS A A KICKBOARD CUT OUT 1 Drill 4 pilot...

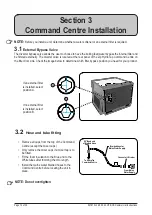
Страница 12: ...ypass position you need for your product Section 3 Command Centre Installation A Rotate 90 only 1 2 3 4 3 2 Hose and tube fitting Remove all caps from the top of the Command Centre except the mixer ca...

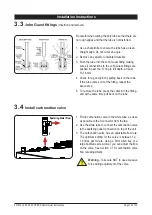
Страница 13: ...excessive force during adjustment of the valve Be careful when cutting the poly tube so that there are no rough edges and that the tube is not distorted 1 Use a sharp knife to ensure the tube has a c...

Страница 14: ...T MAINS IN BOILING OUT BYPASS IN VENT BYPASS OUT SPARKLING OUTLET CO2 IN GAS IN BLUE WHITE Max 1000mm 400mm Note Note the hoses the hoses need to have a need to have a constant downward constant downw...

Страница 15: ...ed to the pump performance and therefore CANNOT be lengthened Not required for standard BCS HydroTap models Note Note the hoses the hoses need to have a need to have a constant downward constant downw...

Страница 16: ...fore CANNOT be lengthened Not required for AIO Mains Pressure HydroTap Note Mains hose length is 750mm Plug and Cord length is 1800mm Position the Com mand Centre close to the outlet tap within reach...

Страница 17: ...ption USB CHILLED OUTLET MAINS IN MIXER OUT MIXER IN BOILING OUT BYPASS IN VENT BYPASS OUT SPARKLING OUTLET GAS IN CO2 IN BLUE WHITE Note Note the hoses the hoses need to have a need to have a constan...

Страница 18: ...S IN VENT BYPASS OUT SPARKLING OUTLET CO2 IN BLUE CLEAR WHITE Note Note the hoses the hoses need to have a need to have a constant down constant down ward gradient to ward gradient to the HydroTap to...

Страница 19: ...OILING OUT BYPASS IN VENT BYPASS OUT SPARKLING OUTLET CO2 IN BLUE Booster CLEAR WHITE Note Note the hoses the hoses need to have a need to have a constant down constant down ward gradient to ward grad...

Страница 20: ...o provide pre heating of water before it enters the Zip HydroTap G4 boiling tank The Booster is supplied as standard equipment with all 240 cup models However it may be later installed as an accessory...

Страница 21: ...with protection class IP25 The 400mm braided hoses supplied with the unit cannot be lengthened The 90 elbow hose ends should be fitted to the inlet and outlet connections on top of the Booster The ho...

Страница 22: ...ed red to the Bypass IN fitting on the Zip HydroTap unit Avoid exerting any mechanical pressure on the appliance This can be achieved by applying a spanner on the flats of the inlet and outlet connect...

Страница 23: ...ilter opening as this may cause bacterial contamination of the cartridge 3 Moisten the O rings with water align the front cartridge label to the left and push the new cartridge into the filter head 4...

Страница 24: ...bottle Do not force the seal to fit Turn the regulator OFF by rotating the regulator knob all the way out in an anti clockwise direction NOTE Two plastic seals are supplied with a new regulator Only o...

Страница 25: ...the joint for leaks 4 If any bubbles appear the joint will need to be resealed CO2 Regulator Leak Test This gauge shows the pressure in the bottle and indicates when the bottle is empty Initial bottl...

Страница 26: ...e section G of the user guide to check and if necessary reset the Date and Time for your time zone OPEN CLOSED Stop cock operation 1 1 2 1 Press Start Stop buttons to start and stop the filter flush 2...

Страница 27: ...ome by pressing the Home button NOTE Failing to make the correct selection for the Booster will affect product performance 1 Press the MENU button for main menu 2 Press the Install button 3 Press the...

Страница 28: ...r 5 The unit will calibrate the safety switch 6 Return the levers to the neutral position 7 To check the calibration dispense Boiling water in normal light conditions with the safety enabled Light int...

Страница 29: ...at the regulator 5 Check that the water is clear and that there are no bubbles or foam present in the dispensed water Commissioning After product commissioning and CO2 purge you are now ready to adju...

Страница 30: ...ll Zip Service Condenser sensor Open Internal fault Check ventilation Call Zip service Heater fuse driver fault Internal fault Call Zip Service Heater driver fault No hot water Call Zip Service Compre...

Страница 31: ...CS Commercial Instructions Page 31 of 32 In order to help preserve our environment we ask that you dispose of this product correctly Please contact your local city council for collection centre detail...

Страница 32: ...TAP 1800 947 827 The terms Zip and HydroTap are registered trade marks of Zip Water Aust Pty Ltd Zip products described in this publication are manufactured under one or more patents and further pate...

Отзывы: