background image

1

51

4.

Aansluiten kabel

-

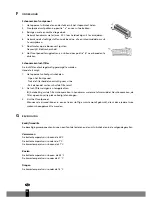
Binnenunit

Sluit de voedingskabel aan op de binnenunit door de kabels

naar de units in de juiste volgorde aan te sluiten op de

klemmen op het klembord. De kleur van de draden en

referentie op de klemmen moeten overeenkomen.

Opmerking: Bij sommige modellen moet de kap verwijderd

worden om de bedrading aan te kunnen sluiten.

-

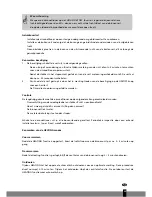
Buitenunit

1.

Verwijder de toegangsklep van de unit door de schroef los

te draaien. Sluit de bedrading op de volgende manier aan

op de klemmen op het klembord:

2.

Klem de voedingskabel op het klembord.

3.

De klep terugplaatsen en vastschroeven.

4.

Plaats een goedgekeurde stroomonderbreker tussen de

voedingsbron en de unit bij het model S1170. Installeer een

geschikte hoofdschakelaar. 

De afbeeldingen zijn gebaseerd op standaardmodellen.

De door u gekochte airconditioner kan een ander model hebben.

Waarschuwing:

1.

De airconditioner altijd aansluiten op een apart voedingscircuit. Voor het aansluiten van de bedrading,

zie schema aan de binnenkant van de toegangsklep 

2. 

Controleer of de kabeldikte conform voorschrift is (zie tabel hieronder).

3.

Controleer of alle bedrading goed vastzit.

4.

Installeer een aardlekschakelaar. 

Opmerking: Alle gebruikte kabels dienen goedgekeurd te zijn volgens de lokaal geldende regels.

Specificaties kabels

Klembord
(binnenkant)

Frontpaneel

Bodemplaat

Toegangsklep
voor klembord
(binnenkant)

Buitenunit

Binnenunit

Behuizing

Type

Dwarsdoor-

snede

Type

Dwarsdoor-

snede

Type

Dwarsdoor-

snede

Voedingskabel

Aansluiting voedingskabel

Aansluiting voedingskabel 1 (warmtepomp)

S1126

S1135

S1153

S1170

Содержание S1126

Страница 1: ...2 22 42 62 OPERATING MANUAL ISTRUZIONI D USO GEBRUIKSAANWIJZING INSTRUKCJA OBS UGI 4 1 S1126 S1135 S1153 S1170...

Страница 2: ...ity product that if used responsibly will give you many years of pleasure Please read these instructions for use first in order to ensure the maximum life span of your airconditioner On behalf of the...

Страница 3: ...ifications page 4 B Parts page 5 C Before use page 6 D Installation instructions page 7 E Instructions for use page 14 F Maintenance page 18 G Protection page 18 H Problem solving page 20 I Guarantee...

Страница 4: ...Air flow nom m3 h 430 530 800 1100 For rooms up to m3 75 100 150 200 Compressor type Fan speeds positions Thermostatic range C Operating range C Remote control Y N Air filter type s Refrigerant type c...

Страница 5: ...inlet Front panel Emergency button Display Air outlet Vertically adjustable vane Horizontally adjustable vane Active carbon filter optional Healthy air filter optional Air filter Remote control Air i...

Страница 6: ...the circuit breaker or plug does not become dirty Connect the plug circuit breaker to the power cable correctly Insufficient contact may cause an electric shock or fire Do not switch the unit off with...

Страница 7: ...d connected in accordance with national regulations Distance to the ceiling must be a minimum of 50 mm Distance to the wall must be a minimum of 50 mm Distance to the wall must be a minimum of 50 mm D...

Страница 8: ...ce any object in the vicinity of the air inlet The air intake may not be blocked The wall must be strong enough to bear the weight of the unit The wall construction may not cause any increase in noise...

Страница 9: ...ine the position of the lead through hole for the wires pipes on the basis of the drilling hole in the mounting plate Drill the hole in the wall The hole must slope a little to the outside Place a pip...

Страница 10: ...ss the clamp to attach it to the mounting plate 4 10 Large pipe Power cable Small pipe Drainage hose Wiring of defrosting regulator heat pump Power cable 1 heat pump Insulating pipe Mounting plate Pip...

Страница 11: ...he unit for model S1170 Install a suitable main switch The illustrations are based on standard models The air conditioner you have purchased may be a different model Warning 1 Always connect the air c...

Страница 12: ...to a level and solid base Ensure that the unit is mounted securely in order to prevent problems caused by strong wind and vibrations 3 Connecting the outdoor unit pipes Remove the covers of the two wa...

Страница 13: ...e way valves to their operating positions Disconnect the hose from the vacuum pump 8 Replace and tighten all covers Note Read these instructions for use before commencing installation Make sure that n...

Страница 14: ...the unit is in operation EMERGENCY BUTTON To operate the unit if the remote control is not operational Adjustment of automatic restart The machine has been programmed by the manufacturer to restart a...

Страница 15: ...nd deactivation Note Each mode and the relevant functions will be specified hereafter Placing the batteries Remove the battery cover in the direction of the arrow Place the new batteries as indicated...

Страница 16: ...perature adjustment Press the g button or the h button When the g button is pressed the value of the preset temperature increases by 1 C When the h button is pressed the value of the preset temperatur...

Страница 17: ...automatically after 10 seconds To switch the air conditioner off at the desired time follow the procedure specified below the remote control and air conditioner are switched off 1 Press the Timer butt...

Страница 18: ...pen the front panel Carefully pull the filter handle towards you Grip the handle and slide the filter out 2 Clean and replace the air filter To remove stubborn dirt clean the filter in lukewarm water...

Страница 19: ...eriod of time Overheating of the power cable and the plug Can you smell burning Is there more noise or vibration than normal Does the indoor unit leak water Is the metal housing live Switch the air co...

Страница 20: ...delay Unusual odour Odour may be caused by another source furniture cigarettes etc The unit expels air that it has sucked in Caused by the refrigerant in the air conditioner this does not indicate a...

Страница 21: ...ine non original parts have been fitted or repairs have been carried out by third parties Components subject to normal wear such as the filter are not covered by the guarantee The guarantee is valid e...

Страница 22: ...o di qualit che Le offrir molti anni di comfort a condizione che venga usato in modo responsabile Per una durata ottimale del condizionatore d aria La invitiamo a leggere le istruzioni d uso A nome de...

Страница 23: ...nenti pagina 25 C Operazioni preliminari pagina 26 D Istruzioni per l installazione pagina 27 E Istruzioni d uso pagina 34 F Manutenzione pagina 38 G Sicurezza pagina 38 H Risoluzione dei problemi pag...

Страница 24: ...nom A 4 0 5 7 7 8 11 8 Flusso aria nom m3 h 430 530 800 1100 Ideale per ambienti fino a m3 75 100 150 200 Velocit ventilatore posizioni Gamma di riscaldamento C Temperatura di esercizio C Refrigerante...

Страница 25: ...l aria Regolazione ver ticale delle lame Regolazione oriz zontale delle lame Filtro anti par ticelle di carbon attivo optional Filtro di sicurez za per la tutela della salute optional Filtro dell aria...

Страница 26: ...di sicurezza Utilizzare il corretto valore di tensione in funzione di quanto indicato sull apposita targhetta per evitare gravi danni all apparecchio o rischi di incendio Tenere costantemente pulito l...

Страница 27: ...tto delle normative nazionali La distanza dal soffitto deve essere superiore a 50 mm La distanza dal muro deve essere superiore a 50 mm La distanza dal muro deve essere superiore a 50 mm La distanza t...

Страница 28: ...on mettere nulla vicino al bocchettone di uscita dell aria in modo tale da garantire la massima circolazione dell aria Il muro deve essere sufficientemente solido per sostenere il peso del condizionat...

Страница 29: ...ro per i tubi nel muro in base al foro nel piano di supporto praticare un foro nel muro Il foro dovrebbe deviare leggermente verso l esterno inserire un manicotto nel foro per proteggere il muro 3 Ins...

Страница 30: ...l tubo al piano di supporto 30 Tubo di grandi dimensioni Cavo di alimentazione Tubo di piccole dimensioni Tubo flessibile di scarico Cavo per regolazione dello sbrinamento per pompa di calore Cavo di...

Страница 31: ...portate nel presente manuale si riferiscono a un modello standard Il vostro condizionatore potrebbe essere un altro modello Attenzione 1 Allacciare sempre il condizionatore a un circuito di alimentazi...

Страница 32: ...n bulloni su una superficie piana e solida Fissare bene il supporto per evitare oscillazioni dovute a forti vibrazioni o vento 3 Collegamento tubi unit esterna Rimuovere i cappucci dalle valvole a due...

Страница 33: ...izione d esercizio Scollegare il tubo flessibile della pompa a vuoto 8 Ricollocare e serrare tutti i cappucci delle valvole NB Si prega di leggere il presente manuale prima di procedere all installazi...

Страница 34: ...postazione funzione riavvio automatico L apparecchio programmato dal fabbricante per il riavvio automati co Dopo un interruzione di corrente l apparecchio riprende a funziona re in base all ultima fun...

Страница 35: ...it di funzionamento con le relative funzioni verr illustrata ulteriormente nelle pagine seguenti Come inserire le batterie Rimuovere il coperchio delle batterie seguendo la direzione della freccia Ins...

Страница 36: ...zione della temperatura Premere il pulsante g oppure il pulsante h Quando si preme il pulsante g la temperatura sale di 1 C Quando si preme il pulsante h la temperatura scende di 1 C NB In modalit fee...

Страница 37: ...mente dopo 10 secondi Affinch il condizionatore si spenga in corrispondenza dell orario desiderato seguire la seguente procedura con apparecchio e telecomando spenti 1 Premere il pulsante Timer 2 Util...

Страница 38: ...etamente l apparecchio Aprire il quadro frontale Tirare verso l esterno la maniglia del filtro con delicatezza Afferrare la maniglia e far scivolare fuori il filtro 2 Pulire il filtro dell aria e rico...

Страница 39: ...bruciato Si sentono rumori o vibrazioni inusuali durante il funzionamento Perdita di acqua dall unit interna Cassa in metallo sotto tensione Qualora si dovesse verificare uno dei casi di cui sopra spe...

Страница 40: ...siva scarica elettrostatica o di tensione di alimentazione non costante l apparecchio non funziona in modo corretto Quindi togliere alimentazione e ricollegare la spina dopo 2 3 secondi Variazione del...

Страница 41: ...ginali o qualora siano state effettuate riparazioni da terzi 4 Nella garanzia non sono comprese le parti sottoposte a normale usura quali il filtro 5 La garanzia vale unicamente dietro presentazione d...

Страница 42: ...aar u nog vele jaren plezier van zult hebben mits u de airconditioner verantwoord gebruikt Lees daarom eerst deze gebruiksaanwijzing voor een optimale levensduur van uw airconditioner Wij geven u name...

Страница 43: ...ties pagina 44 B Onderdelen pagina 45 C Voor ingebruikname pagina 46 D Installatie pagina 47 E Bediening pagina 54 F Onderhoud pagina 58 G Beveiliging pagina 58 H Storingen verhelpen pagina 60 I Garan...

Страница 44: ...ruimtes tot m3 75 100 150 200 Ventilatorsnelheden standen Bereik thermostaat C Werkingstemperatuur C Koudemiddel type hoeveelheid gr R410A 540 R410A 730 R410A 1450 R410A 1900 Druk inlaat uitlaat bar...

Страница 45: ...tinlaat Frontpaneel Noodknop Display Luchtuitlaat Verticaal afstellen lamel Horizontaal afstellen lamellen Actief koolstof filter optioneel Filter voor gezon de lucht optioneel Luchtfilter Afstandsbed...

Страница 46: ...e om ernstige storingen gevaar of brand te voorkomen Zorg dat de stroomonderbreker of stekker niet vies wordt Stekker stroomonderbreker vakkundig aansluiten op de voedingskabel onvoldoende contact kan...

Страница 47: ...nstallateur en aangelegd overeenkomstig nationale voorschriften Afstand tot het plafond moet minimaal 50 mm zijn Afstand tot de muur moet minimaal 50 mm zijn Afstand tot de muur moet minimaal 50 mm zi...

Страница 48: ...de buurt van de luchtinlaat zetten de aangezogen lucht moet vrij baan hebben De muur moet voldoende belastbaar zijn om het gewicht van de unit te kunnen dragen de muurconstructie mag geen geluidstoen...

Страница 49: ...het doorvoergat van de leidingen op de muur aan de hand van het boorgat in de montageplaat Gat in de muur boren Het gat moet naar buiten toe wat aflopen Plaats een schuifmof in het gat om de muur te b...

Страница 50: ...B Druk dan de klem vast op de montageplaat 1 50 Grote pijp Voedingskabel Kleine pijp Afvoerslang Bedrading ontdooiregeling warmtepomp Voedingskabel 1 warmtepomp Isolatieleiding Montageplaat Pijpenkle...

Страница 51: ...l S1170 Installeer een geschikte hoofdschakelaar De afbeeldingen zijn gebaseerd op standaardmodellen De door u gekochte airconditioner kan een ander model hebben Waarschuwing 1 De airconditioner altij...

Страница 52: ...stig de unit met bouten op een vlakke en stevige ondergrond Monteer de unit extra stevig met het oog op sterke wind en trillingen 3 Aansluiten leidingen buitenunit Verwijder de kapjes van de twee en d...

Страница 53: ...de slang van de vacu mpomp los 8 Alle kapjes terugplaatsen en vastdraaien Opmerking Lees eerst deze gebruiksaanwijzing door voor u tot installatie overgaat Zorg dat er geen lucht in het koelsysteem ac...

Страница 54: ...DRIJF INDICATIELAMPJE Brandt als unit in bedrijf is NOODKNOP Om de unit te bedienen als de afstandsbediening niet werkt Instellen automatisch herstarten Het apparaat is door de fabrikant ingesteld op...

Страница 55: ...modus en de relevante functies worden hierna verder gespecificeerd Plaatsen van de batterijen Verwijder de batterijklep in de richting van de pijl Plaats nieuwe batterijen zoals aangegeven let hierbij...

Страница 56: ...tellen Druk op de g knop of op de h knop Als de g knop ingedrukt wordt wordt de waarde van de ingestelde temperatuur 1 C verhoogd Als de h knop ingedrukt wordt wordt de waarde van de ingestelde temper...

Страница 57: ...10 seconden uit Om de airconditioner op het gewenste tijdstip uit te schakelen moet de volgende procedure gevolgd worden de afstandsbediening en de airconditioner zijn uitgeschakeld 1 Druk op de Time...

Страница 58: ...en Open het frontpaneel Trek de filterhendel voorzichtig naar u toe Pak de hendel vast en schuif de filter eruit 2 De luchtfilter reinigen en terugplaatsen Bij hardnekkig vuil de filter schoonmaken in...

Страница 59: ...gecontroleerd worden Oververhitting van de voedingskabel en stekker Ruikt u een brandlucht Hoort u meer geluid of is er meer trilling dan normaal De binnenunit lekt water De metalen behuizing staat o...

Страница 60: ...ucht Geur is mogelijk afkomstig van een andere bron meubels sigaretten etc De unit blaast de aangezogen lucht weer uit Veroorzaakt door het koudemiddel in de airconditioner dit duidt niet op een stori...

Страница 61: ...paraties zijn verricht door derden 4 Onderdelen die aan normale slijtage onderhevig zijn zoals de filter vallen buiten de garantie 5 De garantie geldt uitsluitend als u de originele gedateerde aankoop...

Страница 62: ...nie odwil anie i wentylacj Nabyli Pa stwo produkt wysokiej jako ci kt ry przy prawid owej eksploatacji b dzie Pa stwu dobrze s u y przez wiele lat W celu zapewnienia optymalnej jako ci pracy klimatyza...

Страница 63: ...nstrukcyjne strona 65 C rodki bezpiecze stwa strona 66 D Instrukcje dot instalacji strona 67 E Instrukcje dot eksploatacji strona 74 F Konserwacja strona 78 G Urz dzenie zabezpieczaj ce strona 78 H Wy...

Страница 64: ...ielko pomieszczenia m3 75 100 150 200 Stopnie pr dko ci wentylatora pozycja Zakres dzia ania termostatu C Temperatura dzia ania C Ch odziwo typ waga g R410A 540 R410A 730 R410A 1450 R410A 1900 Ci nien...

Страница 65: ...towa Przycisk awaryjny Wy wietlacz Wylot powietrza Pionowe p ytki wentylacyjne Poziome p ytki wentylacyjne Aktywny filtr w glowy opcjonalnie Filtr do zdrowego powietrza opcjonalnie Filtr powietrza Pil...

Страница 66: ...r du mo e spowodowa usterki niebezpieczne sytuacje albo po ar Zwr uwag aby automatyczny wy cznik lub wtyczka si zbytnio nie zabrudzi a Wy cznik automatyczny wtyczka musi by fachowo pod czony a do kabl...

Страница 67: ...ionego instalatora i wykonana zgodnie z obowi zuj cymi przepisami Odst p od sufitu musi wynosi minimalnie 5 cm Odst p od ciany musi wynosi minimalnie 5 cm Odst p od ciany musi wynosi minimalnie 5 cm O...

Страница 68: ...eg lnych segment w klimatyzatora Konstrukcja muru musi by poza tym na tyle solidna aby nie powodowa a drga i ha asu Miejsce zainstalowania zewn trznego segmentu klimatyzatora Segment zewn trzny umie w...

Страница 69: ...u zaznaczone jest na p ycie monta owej Wywier otw r w murze Wier tak aby otw r przechodzi przez mur troch uko nie w d spadek ok 5 mm W do otworu ko nierz do zabezpieczenia muru 3 Instalacja przewod w...

Страница 70: ...0 Gruby przew d rurowy Przew d kablowy W ski przew d rurowy Przew d odprowadzaj cy Przew d elektryczny regulacji odmra ania do pompy cieplnej Przew d kablowy Przew d kablowy 1 do pompy cieplnej Izolac...

Страница 71: ...acz pr du Zainstaluj odpowiedni wy cznik g wny Rysunki oparte s na modelu standardowym Kupiony przez Ciebie klimatyzator mo e by innego typu UWAGA 1 Klimatyzator musi by pod czony do osobnego obwodu e...

Страница 72: ...o solidnego i p askiego pod o a Ze wzgl du na silne wiatry i drgania segment musi by bardzo mocno przytwierdzony 3 Pod czenie przewod w do segmentu zewn trznego Zdejmij nasadki z zawor w dwu i tr jdro...

Страница 73: ...racyjnej 8 Na z powrotem wszystkie nasadki i je dokr Uwaga Przed przyst pieniem do instalacji klimatyzatora przeczytaj uwa nie niniejsz instrukcj obs ugi Upewnij si e w systemie ch odzenia nie pozosta...

Страница 74: ...YJNY Do obs ugi klimatyzatora kiedy pilot nie dzia a PRZYCISK AWARYJNY Do obs ugi klimatyzatora kiedy pilot nie dzia a LAMPKA KONTROLNA ZASILANIA wieci si kiedy urz dzenie pod czone jest do pr du LAMP...

Страница 75: ...OFF Do w czania i wy czania aparatu Uwaga Ka da podstawowa funkcja klimatyzatora i poszczeg lne funkcje drugorz dne opisane s bardziej szczeg owo w dalszej cz ci Instrukcji W o enie baterii Pokrywk o...

Страница 76: ...ci ni ciu guzika g powoduje e warto programowanej temperatury podnosi si o 1 C Ka dorazowe naci ni ciu guzika h powoduje e warto programowanej temperatury obni a si o 1 C Uwaga W trybie feel mode wska...

Страница 77: ...asownika nie wci niesz adnego guzika po 10 sekundach pilot automatycznie si wy czy Aby klimatyzator si wy czy o okre lonej godzinie musisz wykona nast puj ce czynno ci zar wno pilot jak i klimatyzator...

Страница 78: ...t filtra Trzymaj c za uchwyt wysu filtr z aparatu 2 Wyczy filtr i w go z powrotem W wypadku du ego zabrudzenia wymyj filtr w letniej wodzie z dodatkiem rodka do zmywania naczy Po wymyciu filtra poczek...

Страница 79: ...t puj ce rzeczy Ewentualne przegrzanie kabla i wtyczki Czy czujesz wo spalenizny Czy aparat nie pracuje g o niej albo czy nie zauwa asz wi cej drga ni zwykle Czy z segmentu wewn trznego nie wycieka wo...

Страница 80: ...powietrza Drobna usterka wy adowanie elektryczno ci statycznej zak cenie w dop ywie pr du mo e by przyczyn nieprawid owego dzia ania klimatyzatora Wyjmij w takim wypadku wtyczk z kontaktu i po 2 3 sek...

Страница 81: ...ub te je eli urz dzenie by naprawiany przez osoby nieuprawnione 4 Gwarancja nie obejmuje cz ci kt re w trakcie eksploatacji ulegaj normalnemu zu yciu np filtr 5 Gwarancja jest wa na wy cznie za okazan...

Страница 82: ...SARL 4 Rue Jean Sib lius B P 185 76410 SOTTEVILLE SOUS LE VAL tel 33 2 32 96 07 47 fax 33 0 820 34 64 84 email pvgfrance zibro com 4 UNITED KINGDOM Lister Gases Bridge Street Holloway Bank Wednesbury...

Отзывы: