Zgonc NEW GENERATION Yellow Garden Line YGL N.G.... Скачать руководство пользователя страница 21

21

GB

1. Introduction

MANUFACTURER:

scheppach

Fabrikation von Holzbearbeitungsmaschinen GmbH
Günzburger Straße 69
D-89335 Ichenhausen

DEAR CUSTOMER,

We hope your new tool brings you much enjoyment and 
success.

NOTE:

According to the applicable product liability laws, the 
manufacturer of the device does not assume liability 
for damages to the product or damages caused by the  
product that occurs due to:
•  Improper handling,
•  Non-compliance of the operating instructions,
•  Repairs by third parties, not by authorized service 

technicians,

•  Installation and replacement of non-original spare 

parts,

• 

Application other than specified,

•  A breakdown of the electrical system that occurs due 

to the non-compliance of the electric regulations and 
VDE regulations 0100, DIN 57113 / VDE0113.

WE RECOMMEND:

Read through the complete text in the operating instruc-
tions before installing and commissioning the device. 
The operating instructions are intended to help the user 
to become familiar with the machine and take advan-
tage of its application possibilities in accordance with the 
recommendations. The operating instructions contain 
important information on how to operate the machine 
safely, professionally and economically, how to avoid 
danger, costly repairs, reduce downtimes and how to in-
crease reliability and service life of the machine.
In addition to the safety regulations in the operating in-
structions, you have to meet the applicable regulations 
that apply for the operation of the machine in your coun-
try. Keep the operating instructions package with the ma-
chine at all times and store it in a plastic cover to protect 
it from dirt and moisture. Read the instruction manual 
each time before operating the machine and carefully 
follow its information. The machine can only be operated 
by persons who were instructed concerning the opera-
tion of the machine and who are informed about the as-
sociated dangers. The minimum age requirement must 
be complied with.

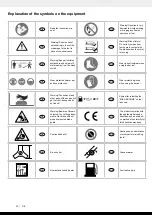
2. Layout (Fig. 1 - 3)

Lieferumfang

1. 

Line spool with cutting line

2. 

Safe guard

3. 

Long handle with drive shaft

4. 

Cutting blade

5. 

Steady grip

6. 

Switch On/Off 

7. 

Throttle lock

8. 

Throttle lever

9. 

Throttle lever “lock”

10. 

Choke lever

11. 

Starter cable

12. 

Spark plug boot

13. 

Air filter housing cover

14. 

Petrol tank

15. 

Housing for engine cooler

16. 

Fuel pump

17. 

Belt

18. 

Combined oil/petrol cylinder

19. 

Spark plug wrench

20. 

Allen key (size 4)

21. 

Allen key (size 6)

22. 

2 x cable ties

23. 

Oil filler neck

3. Scope of delivery

• 

Open the packaging and take out the equipment 
with care.

• 

Remove the packaging material and any packaging 
and/or transportation braces (if available).

• 

Check to see if all items are present.

• 

Inspect the equipment and accessories for transport 
damage. 

In case of complaints the supplier is to be 

informed immediately. Complaints received at a later 
date will not be acknow ledged.

• 

If possible, keep the packaging until the end of the 
guarantee period.

•  Read the operating instructions to make yourself famil-

iar with the device prior to using it.

•  After that, please dispose of it in an environmentally 

friendly way.

• Only use original parts for accessories as well as for 

wearing and spare parts. Spare parts are available from 
your specialized dealer.

•  Specify our part numbers as well as the type and year of 

construction of the device in your orders.

Important!

The equipment and packaging material are not toys. 
Do not let children play with plastic bags, foils or small 
parts. There is a danger of swallowing or suff ocating!

Содержание NEW GENERATION Yellow Garden Line YGL N.G....

Страница 1: ...Originalbetriebsanleitung 8 18 GB Brush Cutter Grass trimmer Translation from the original instruction manual 19 29 ACHTUNG Vor Inbetriebnahme die Bedienungsanleitung genau durchlesen CAUTION Read th...

Страница 2: ......

Страница 3: ...3 18 22 19 20 21 4 5 6 2 17 2 1 7 a b c d 1 1 6 7 8 9 2 3 4 5 12 10 11 13 14 15 5 3 2 4 4a 12 13 10 14 11 15 23 7...

Страница 4: ...14 17 9 10 4 25 24 15 16 A 8 24 11 12 13...

Страница 5: ...18 19 20 21 25 24 26 27 7 8 6 9 23 22...

Страница 6: ...34 37 32 33 35 B C 36 30 31 28 29...

Страница 7: ...WIND CORD 38 39 40 42 41 43 44 Max Min Max Min Motor oil 10W30 SAE30 80 ml 45...

Страница 8: ...0 3 Lieferumfang 10 4 Bestimmungsgem e Verwendung 11 5 Wichtige Hinweise 11 12 6 Technische Daten 12 13 7 Vor Inbetriebnahme 13 8 Aufbau und Bedienung 13 15 9 Arbeitshinweise 15 10 Wartung 16 11 Lager...

Страница 9: ...hau er und Helfer 15m vom Freischneider entfernt DE Schutzhelm Geh rschutz und Schutzbrille verwenden DE Achtung Benzin ist sehr leicht entz ndlich Vermei den Sie das Rauchen offe nes Feuer oder Funke...

Страница 10: ...enen Gefahren unterrichtet sind Das ge for der te Mindestalter ist einzuhalten Neben den in dieser Bedienungsanleitung enthal tenen Si cherheitshinweisen und den besonderen Vorschriften Ih res Landes...

Страница 11: ...ender Erfahrung und Wissen vorgese hen sofern sie nicht von einer f r ihre Sicherheit ver antwortlichen Person beaufsichtigt und in der Benut zung des Ger tes unterwiesen wurden Kinder m ssen beaufsic...

Страница 12: ...den Motor und pr fen Sie ob die Klinge besch digt wurde Ersetzen Sie die Klinge in diesem Fall durch eine neue 6 Falls jemand w hrend der Arbeit nach Ihnen ruft m ssen Sie immer den Motor ausschalten...

Страница 13: ...bit te die angegebenen Montageanweisungen 1 Montieren Sie den Griff an die Maschine Fig 4 6 L sen Sie zun chst die Innensechskantschrauben und bringen Sie dann den rechten und linken Griff in die Mit...

Страница 14: ...h alle Sicherheitsvorrichtungen in einem guten Zustand befinden m Verletzungsgefahr Entfernen Sie vor Beginn der Arbeit immer alle auf dem Boden liegenden Gegenst nde die beim Betrieb der Motorsense w...

Страница 15: ...ie Unterseite der Fadenspule ber dem Boden befindet und der Faden die richtige Schnittstelle trifft Schneiden Sie immer von sich weg Ziehen Sie den Trimmer nicht zu sich hin Schneiden an Zaun Fundamen...

Страница 16: ...chnittmesser an der Schutzhaube befestigt ist Befestigen Sie das Messer in einem Schraubstock Schleifen Sie alle 3 Klingen des Messers mit einer Flachfeile und achten Sie darauf den Winkel der Schnitt...

Страница 17: ...e haben 1 Nehmen Sie die Treibstofftankkappe langsam ab um eventuellen Druck im Tank abzulassen Entleeren Sie vorsichtig den Tank 2 Starten Sie den Motor und lassen Sie ihn laufen bis dieser anh lt um...

Страница 18: ...Starten Z ndkerze reinigen oder durch neue ersetzen Autorisierten Kundendienst aufsuchen Montieren Sie Klinge bzw Fadenspule erneut Pr fen Sie den Treibstoffstand Das Ger t springt an hat aber nicht...

Страница 19: ...cope of delivery 21 4 Intended use 22 5 Important information 22 23 6 Technical data 23 7 Before starting the equipment 23 24 8 Attachment and operation 24 25 9 Working instructions 25 26 10 Maintenan...

Страница 20: ...for this directives was done GB Warning Keep all children bystanders and helpers 15 meters away from the brush cutter GB Wear protective helmet ear and eye protection GB Warning Gasoline is very flamm...

Страница 21: ...ure Read the instruction manual each time before operating the machine and carefully follow its information The machine can only be operated by persons who were instructed concerning the opera tion of...

Страница 22: ...person responsible for their safety Children should be supervised to ensure that they do not play with the appliance 1 Training Read the instructions carefully Be familiar with the controls and the pr...

Страница 23: ...uch the muffler spark plug or other me tallic parts of the engine while the engine is in operation or immediately after shutting down the engine Doing so may result in serious burns 9 When you finish...

Страница 24: ...right down until the stop pin a slots into the hole c in the shaft This is easier to do if you rotate the bottom of the shaft b slightly in both directions The pin a is in place when it is completely...

Страница 25: ...l be released automatically and the knife cut off the excess length Fig 41 10 If meet any problems press the engine switch to off position the machine will stop running If need stop cutting head worki...

Страница 26: ...opposite to the rotation of the tool This can cause you to lose control of the equipment Do not use the blade near fences metal posts boundary stones or foundations 10 Maintenance Before performing a...

Страница 27: ...t in case of sending the equipment to a service station Due to security reasons please see to it that the equipment is sent back free of oil and gas 11 Storage Cleaning Keep handles free of oil so you...

Страница 28: ...d or damp spark plug Incorrect carburetor setting Blade or nylon cutter mounted incorrectly No fuel in the tank Follow the instructions for starting Clean the spark plug or replace it with a new one C...

Страница 29: ...29...

Страница 30: ...satzteilzeichnung Spare parts drawing Pi ces d tach es dessin 38 39 5 40 42 43 36 44 45 46 51 49 50 8 48 47 40 58 57 53 22 21 20 18 17 16 12 1 2 3 4 6 11 10 7 13 15 23 14 26 24 25 27 29 30 31 32 35 33...

Страница 31: ...31...

Страница 32: ...32 B...

Страница 33: ...33...

Страница 34: ...34...

Страница 35: ...t bas un standarti du rakstu NL verklaart hierbij dat het volgende artikel voldoet aan de daarop betrekking hebbende EG richtlijnen en normen RUS PT declara o seguinte conformidade com a Directiva da...

Страница 36: ...s rights of claim due to such defects are invalidated We guarantee for our machines in case of proper treatment for the time of the statutory warranty period from delivery in such a way that we replac...

Отзывы: