background image

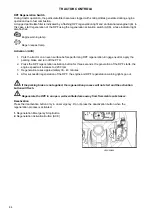
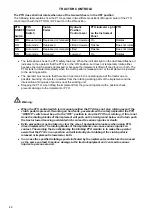
DPF Regeneration Switch

During tractor operation, the particulate filter becomes clogged with solid particles generated during engine 
operation due to fuel combustion. 
A clogged particulate filter is indicated by a flashing DPF regeneration light and an illuminated engine light. In 
this case, start regeneration of the DPF using the regeneration activation switch (ACK), whose indicator light 
also flashes.

 Engine warning lamp 

 Regen request lamp

Activation (ACK) 

1. Park the tractor on an even surface before performing DPF regeneration. Engage neutral, apply the 

parking brake and turn off the PTO. 

2. Press the DPF regeneration activation button for three seconds. If regeneration of the DPF starts, the 

engine speed will increase to 2,200 rpm. 

3. Regeneration takes approximately 30 - 40 minutes. 

4. After successful regeneration of the DPF, the engine and DPF regeneration warning lights go out.

If the parking brake is not applied, the regeneration process will not start and the activation 

button will flash.

Regenerate the DPF in an open, well-ventilated area away from flammable substances.

Deactivation 

Press the deactivation button only in an emergency. Do not press the deactivation button when the 
regeneration process is activated.

1.

 Regeneration Emergency Stop Button 

2.

 Regeneration Activation Button (ACK) 

UCLS5N004

TRACTOR CONTROLS

44

Содержание UTILIX CL

Страница 1: ...OPERATOR S MANUAL UTILIX CL 01 2021 45 Tractor is Zetor Since 1946 55...

Страница 2: ...erfect overview of how to use the tractor with maximum efficiency during various kinds of work If you observe the rules of tractor operation and maintenance and driving safety your new tractor will be...

Страница 3: ...2...

Страница 4: ...intenance 20 Avoid high pressure fluids 20 Prevent battery explosions 20 Prevent acid burns 21 Battery disconnect 21 Service tractor safely 21 Work in ventilated area 22 Tractor runaway 22 Safety star...

Страница 5: ...ulic control valve coupler connecting and disconnecting 60 Connection 60 Disconnection 60 Joystick Lever 61 Joystick lever lock 62 Connecting and Disconnecting Implement 62 Connection 62 Disconnection...

Страница 6: ...f Coolant 85 Antifreeze 86 Check of Radiators for Clogging 86 Engine Oil and Filter Replacement 86 Engine Oil Check 86 Engine Oil Change 87 Engine Oil Filter Replacement 87 Transmission Oil and Filter...

Страница 7: ...ght pillar 108 Wiper control switch 109 Windscreen washer tank 109 Interior lamp 109 Blower control switch 110 Temperature control 110 Air conditioner switch 110 Circulation diffuser 110 Heating syste...

Страница 8: ...ocument After Sales Service The objective of ZETOR TRACTORS a s company is complete customer satisfaction with the purchased product Any problems with your machine will be solved by your dealer distri...

Страница 9: ...NOTES 8...

Страница 10: ...s manual Read this Manual carefully and keep it in a convenient place for future reference If at any time you require advice concerning your Tractor do not hesitate to contact your Authorized ZETOR de...

Страница 11: ...NOTES 10...

Страница 12: ...ey have original spare parts in stock and have full service support from the machine manufacturer In this manual the use of the terms LEFT RIGHT FRONT and REAR must be unified to avoid any confusion w...

Страница 13: ...the transmission gear box has 16 forward 16 revers speds of presently Zetor tractors are fitted with partial synchro mesh type gears Brakes Zetor tractors are equipped with disc brakes controlled by...

Страница 14: ...e top part of the ROPS and be very careful when driving with the ROPS lowered Do not use the seat belt with the ROPS lowered and remember that the folding mechanism is intended for special use only an...

Страница 15: ...ROPS ensure that the correct fasteners are used to replace the ROPS and that the fastening bolts are tightened to the recommended torque values Warning If the tractor is equipped with ROPS always use...

Страница 16: ...ed in its position NOTE Do not use solvents to clean the seat Use warm water with detergent Warning Do not place your hand between the seat and the guide rail when adjusting the seat You may be injure...

Страница 17: ...d after adjustment Seat Suspension Adjustment The seat cushion can be adjusted according to the driver s weight Turning the cushion adjustment knob counterclockwise towards 50 kg position will make th...

Страница 18: ...ions Introduction to safety instructions Protection children Carefully read all safety instructions given in this manual for your safety Tempering with any of the safety devices can cause serious inju...

Страница 19: ...r The seat belt must be worn during machine operation when the machine is equipped with a certified ROPS Failure to do so will reduce or eliminate protection for the operator in the event of a roll ov...

Страница 20: ...nglement in rotating shaft can cause serious injury or death Keep PTO shield in place at all times Wear close fitting clothing Stop the engine and be sure PTO drive is stopped before making adjustment...

Страница 21: ...nstalled Replace worn or damaged parts Replace damaged missing plates Remove any accumulated excess grease or oil from the tractor Disconnect the battery ground cable before making adjustments to elec...

Страница 22: ...released vapors after the electrolyte has been added 4 Do not add water to the electrolyte as it may cause expansion and subsequent severe burns If you get stained with acid 1 Rinse skin with water 2...

Страница 23: ...some models safety starter switch is provided on transmission high low shifter lever and in PTO shifter lever The tractor can be started only if High low shifter lever is in neutral position Caution S...

Страница 24: ...y under the lifted loader or do not approach it Lower the loader boom to the ground before leaving the tractor Failure to do so may result in serious injuries or even death U18N005_3 When mounting or...

Страница 25: ...s etc U18N005_5 Do not allow the boom or attached adapter or equipment to come into contact with electrical lines or other electrical equipment Electric current causes serious injuries or death U18N00...

Страница 26: ...controls in neutral apply the handbrake switch off the engine engage first gear if the tractor has a mechanical transmission and remove the key from the starter switch If the tractor is not parked on...

Страница 27: ...is check all oil levels Water level in the radiator and electrolyte level in the battery and perform services according to the service schedule 2 Ensure tire pressure are even and the correct pressure...

Страница 28: ...nvironment with significantly reduced visibility 9 Never start the tractor unless the transmission is in the neutral position the operator is in the driver s seat and there is no other danger when the...

Страница 29: ...than the operator to ride on the tractor There is no safe seat or approved passenger seat on the tractor 7 Replace any missing illegible or damaged safety signs 8 Keep safety signs clean free of dirt...

Страница 30: ...ift when heavy working implement is attached to the three point hitch install the front ballast weights or front wheel weights Do not operate the tractor with a light front axle 12 Always use the hydr...

Страница 31: ...e explosive than pure gasoline In a closed container such as a fuel tank DO NOT USE THESE BLENDS 3 Never remove the fuel cap or refuel the tractor with the engine running 4 Do not smoke while refuelin...

Страница 32: ...heck immediately for any abnormality YES Make sure the radiator is always filled with clean water and use antifreeze in cold weather Drain the system only in case of emergency and refill before starti...

Страница 33: ...period of time DON T Run the engine when the fuel is not combusted in all cylinders DON T Do not drive with the brake or clutch pedal depressed This will result in excessive wear of the brake linings...

Страница 34: ...ator s seat If the safety start switch is disabled the engine can start with a gear shifted Do not connect the clamp to the starter solenoid Connect the booster cables as shown on the battery plate an...

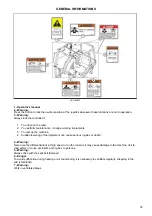
Страница 35: ...fuel the machine while smoking or when near an open flame or sparks Always stop the engine before refuelling 5 Warning Do not use the auxiliary shift lever in the H position when reversing 6 Internal...

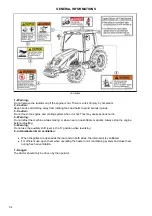
Страница 36: ...4 Sudden lowering of the implement can cause serious injuries or death 4 Warning Never use the differential lock at high speed or on the road as it may cause damage to the machine risk to road safety...

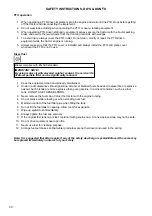
Страница 37: ...drawbar or hitch 2 Danger Contact with the rotating shaft may cause injuries or death Stay away When operating keep all the covers of the shaft tractor and connected implement mounted 3 Warning Keep...

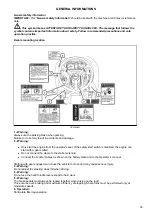
Страница 38: ...imum setting Engine coolant temperature Warning Hare fast or maximum setting Fuel level Hazard warning Transmission oil pressure Engine stop control Neutral Turn signal Lights Fan Transmission oil tem...

Страница 39: ...NOTES 38...

Страница 40: ...urn Signal Light Switch 7 Horn Switch 8 Headlight Switch 9 Steering Wheel Tilt Lever 10 PTO Mode Switch 11 Key Switch 12 DPF Regeneration Switch 13 PTO On Off Button 14 DPF Regeneration Deactivation S...

Страница 41: ...eam lights Beacon Horn Press the red button 5 Warning Lights Switch Tachometer 1 Turn Signal Light Switch Lever 2 Headlight Switch 3 High Beam Lights Beacon Light 4 Low Beam Lights Beacon Light 5 Horn...

Страница 42: ...of fuel in the tank when the ignition switch is the ON position Notice Poor fuel quality can damage the engine To make it easier to start the engine use fuel intended for winter period in winter HODP0...

Страница 43: ...ediately Oil pressure lamp This lamp will go out as soon as the engine starts if the oil pressure is correct If it comes on while the engine is running stop the engine and get expert advice Coolant te...

Страница 44: ...r lights Lamps related to exhaust gas control system MIL lamp comes on when DPF inlet temperature sensor system doesn t function properly Both MIL lamp and NCD lamp come on when either EGR sensor or a...

Страница 45: ...brake and turn off the PTO 2 Press the DPF regeneration activation button for three seconds If regeneration of the DPF starts the engine speed will increase to 2 200 rpm 3 Regeneration takes approxim...

Страница 46: ...rrently in motion but shall be activated when the clutch pedal is released or the implement is lowered 1 OFF The PTO shaft is stopped 2 Auto Automatic When the implement is raised to the preset height...

Страница 47: ...clutch pedal is pressed If working on hard soils pavements with a rotary implement the PTO ON OFF switch must be put to the OFF position to stop the PTO from rotating If this is not done the rotating...

Страница 48: ...nal Directional Control Valve Control Lever 7 3 Point Hitch Position Regulation Lever 8 3 Point Hitch Draft Control Lever 9 Main Shift Lever 10 Differential Lock Pedal 11 Steering Wheel Adjustment Lev...

Страница 49: ...rward or reverse direction can be selected Slowly release the pedal to start driving the tractor Brake pedals control the rear wheel brakes It is used to set the engine speed Pushing away from the ope...

Страница 50: ...ted the warning light is on When the brake pedals are connected the warning light is off A connecting latch is available to connect the left and right brake pedals when driving at high speed or on the...

Страница 51: ...ractor The lever remains secured in the upper position with the latch To release the tractor lift the handbrake lever slightly upwards release the latch by pressing the button 2 at the end of the leve...

Страница 52: ...ctivation of brakes of the trailer or semi trailer can be used by the operator of the tractor with the connected trailer or semi trailer to make sure that the effect of the parking braking system of t...

Страница 53: ...p marked black The coupling head marked black serves both for filling and controlling for the single hose air brake system of the trailer or semi trailer The maximum permitted speed of the unit is giv...

Страница 54: ...erse or reverse to front make sure that the tractor is stopped before changing the direction Failure to do so may result in damage to the machine or serious injury Warning Only use the reverse shift l...

Страница 55: ...taneously with moving hand throttle lever forward the engine is not overloaded When you leave the tractor be sure to apply the parking brake and stop the engine The torque of wheel axle is extremely h...

Страница 56: ...rive Shift Lever 4WD Stop the tractor before shifting the front axle drive If it is not possible to engage the front axle drive do not use excessive force Instead drive the tractor forward or backward...

Страница 57: ...movement lever located on the front of the seat After adjustment make sure that the seat is firmly secured CCL25004 Steering Wheel Adjustment Lever Before starting the tractor make sure that the steer...

Страница 58: ...revent accidental lowering Only move the PTO shift lever with the PTO switched off Always use the clutch when connecting or disconnecting the PTO shaft Operating the hydraulics The hydraulics are powe...

Страница 59: ...d and lowered using the position regulation lever and can be stopped at any position by stopping the lever shift To ensure a constant working depth an adjustable stop can be used to ensure that the im...

Страница 60: ...trol HODP073 To reduce the lowering speed of the three point hitch arms turn the control clockwise To increase the lowering speed of the three point hitch arms turn the control anticlockwise If the lo...

Страница 61: ...g valve forward and backward 4 to 5 times to release the pressure in the tractor s hydraulic lines Otherwise it may be difficult to attach the couplers and hydraulic fluid may splash out of the hoses...

Страница 62: ...ines or performing other work on the hydraulic system To find a leak under pressure use a small piece of cardboard or wood Never use hands To control the front loader and the front three point hitch t...

Страница 63: ...ation and leaks Disconnection 1 Do not forget to stop the engine before disconnecting the implement 2 Release any residual pressure in the hydraulic hoses of the machine and tractor by repeatedly movi...

Страница 64: ...gine running and ensure all safety shields are in place Under no circumstances should the rotational speeds specified by the implement manufacturer be exceeded as this may result in serious damage to...

Страница 65: ...ch Control U18N041 1 Upper Link 2 Link Bracket 3 Stabilizer bar 4 Extendable Type of Lower Link 5 Lower Swinging Hitch 6 Lower Link 7 Length Adjustment Handle of the Vertical Link 8 Vertical Link TRAC...

Страница 66: ...re designed to limit or prevent lateral movement of the implement No clearance is permitted when transporting implements and when working on slopes with rollers mowers seeders drills and similar imple...

Страница 67: ...wheels Danger Only use drawbar to tow and keep the 3 point linkage in raised position when toeing with the drawbar Position can create unbalance causing the tractor to roll over result the death or s...

Страница 68: ...which is adjusted to the height of the lower hitch In order to keep the operation safe and to maintain the traction capability it is essential that the front axle is not lifted Incorrect 3 point hitc...

Страница 69: ...ands or foreign objects in the tail piece with the control lever locked in the upper position There is a risk of serious injury Disassembly of the rear PTO cover After releasing the locking devices re...

Страница 70: ...d the tail piece is freely movable in the grooves of the multi level console Adjust the multi level hitch attachment tail piece to a suitable height so that the locking pins 2 are aligned with the hol...

Страница 71: ...must always be performed on both valves It is forbidden to have one valve open and the other closed during the operation of the tractor If the front three point hitch is not used both valves must be...

Страница 72: ...country s regulatory requirements Fixtion points of loader For detailed information on the assembly and operation of the front loader refer to the documentation supplied with your specific front load...

Страница 73: ...2 Left front UCL18N051 3 Right rear UCL18N052 4 Left rear UCL18N053 SPEC Strength No Remark 1 M16 x 2 0 9T 8 2 M14 x 2 0 9T 4 3 M12 x 1 75 7T 4 TRACTOR CONTROLS 72...

Страница 74: ...he starter terminals or with the safety switch deactivated as the tractor may jump and cause an accident or injury Note The engine will not start unless the clutch pedal is depressed The engine cannot...

Страница 75: ...gine at maximum speed 5 Check all components and replace the prescribed operating fillings after 50 hours of operation see section Maintenance Driving the Tractor Off 1 Make sure the left and right br...

Страница 76: ...dividual pedals To make a tight turn use both the steering wheel and the brake pedal at the same time For a left turns use the left pedal and a right turn the right pedal U18N050 Let the engine come b...

Страница 77: ...or use the diff lock on tight turns as serious damage can result Warning for Driving on the Road When changing the direction of travel on the road always use turn signal lights Always keep the brake...

Страница 78: ...If the alternator indicator light comes on check all connections and make sure the alternator V belt is not damaged If all connections and V belt are OK consult your dealer or an authorized service c...

Страница 79: ...ssive condensation in the fuel tank refill the fuel at the end of each day and ensure that the level during the day does not fall to a level when the fuel system needs to be bled after refueling UCL18...

Страница 80: ...ons are performed as follows The first service inspection at the state of the engine hour counter of 50 EH maximum but not later than 6 months after commissioning of the tractor The second service ins...

Страница 81: ...4 0 0 4 5 0 5 0 0 1 Y e a r 2 Y e a r s Comment Engine Engine oil Cartridge o xx x x x Every 250 hours or 12 months Air cleaner o o o o x Radiator coolant o x Fuel o Fill tank Fuel filter o x Fan belt...

Страница 82: ...nt wheel hub o Check the steering wheel joint o o Wheel nut fastening torque o Loose bolts and nuts o Tighten to proper torque Operation of the instrument o Grease each nipple o o o o o o o o o o Oil...

Страница 83: ...in Plug 4 Sight Gauge 5 Grease Nipple 6 Engine Oil Filler Neck 7 Front Wheel Axle Oil Drain Plug 8 Front Axle Lubrication Point 9 Front Wheel Axle Oil Filler 10 Radiator 11 Engine Oil Drain Plug 12 Tr...

Страница 84: ...Plastic lubricant MOGUL LA 2 No Filling point Fillings Quantity liter gal MODEL UTILIX CL45 55 1 Radiator 50 50 Ethylene glycol Water L L C ASTM D4985 D6210 9 3 l 2 5 US gal 2 Engine API Grade CJ 4 A...

Страница 85: ...d in the front hood may be damaged Opening the side cover After unlocking the hood lift it with your hands The hood is held in the raised position by means of a strut UCL18NN011 To open it grasp the s...

Страница 86: ...ixture is used 1 Radiator Cap 2 Expansion Vessel UCLS5N013 If corrosion of the cooling system is noticeable in the coolant color completely drain the system and fill with the correct mixture of water...

Страница 87: ...t check the radiator fins for clogging If they are clogged clean the radiator fins with compressed air or water Important Water or air under high pressure can distort the cooling fins on the radiator...

Страница 88: ...ng different types of oils or oils with different specifications can cause damage Engine Oil Filter Replacement Do not overfill the crankcase with oil UCLS5N014 1 Engine Oil Filter 2 Engine Oil Dipsti...

Страница 89: ...the prescribed oil as using different types of oils or oils with different specifications can cause damage Only add the prescribed amount of oil At the end of its service life dispose of the oil in ac...

Страница 90: ...turn further to tighten it check for leaks Front Axle Oil Check and Change Check 1 Hydraulic oil filter 2 Hydraulic control valve UCL18N069 Remove the dipstick wipe its end and insert it back Then pul...

Страница 91: ...fications can cause damage Only add the prescribed amount of oil At the end of its service life dispose of the oil in accordance with applicable regulations Important After refilling the prescribed am...

Страница 92: ...filter and rotate quick release collar counterclockwise Removed and discarded Note If the element is equipped with a sediment bowl remove the sediment bowl from the element Thoroughly clean the sedim...

Страница 93: ...ines or in a dusty environment Every 100 hours of operation To remove the dust from the evacuator valve squeeze it between thumb and fingers to let excess dust out and wipe around the valve to keep it...

Страница 94: ...sonnel thoroughly familiarized with operational and safety principles During maintenance of the tractor wear appropriate specified personal protective equipment occupational footwear protective gloves...

Страница 95: ...utch Pedal Brake Pedal 20 30 mm 0 79 1 18 in 30 40 mm 1 18 4 57 in HODP132 Using the clutch over a period of time will increase the free play The correct free play of the pedal is 20 30 mm To adjust l...

Страница 96: ...the left and right pedal will result in one sided braking when the pedals are connected and can cause serious accidents especially at high speeds Double check to ensure free play is the same on both...

Страница 97: ...b If twin belts are installed check and adjust the tension on the both belts V belt Check and Adjustment Regularly check and adjust the fan V belt tension 1 Slightly loosen the alternator mounting scr...

Страница 98: ...ry place before prolonged shutdown If the battery remains in the tractor disconnect the negative terminal If the batteries are not used for a long period of time they will self discharge If the batter...

Страница 99: ...on a bracket to the right of the battery Putting the battery disconnect in safety condition The battery disconnect knob may be removed for safety purposes in the manner described below 1 Switch off a...

Страница 100: ...ic Lines Check Loose wire terminals can cause contact break and damaged wires can lead to poor electrical operation short circuits and fire Replace or repair worn and damaged wires If the insulation o...

Страница 101: ...ing of each fuse is indicated on the fuse box cover Always eliminate the cause of the fuse blowing otherwise a new fuse is likely to blow as well Always use a fuse of the specified rating never replac...

Страница 102: ...UCLS5N016 1 Panel 15A 2 Light Horn 15A 3 Working light 10A 4 Stop lamp 10A 5 Turn signal 10A 6 Controler 15A 7 Engine stop 10A 8 Fuel pump 10A 9 Coupler 15A 10 Auto rolling 10A 11 Quick turn 10A MAINT...

Страница 103: ...e visually before using the tractor see the enclosed picture IMPORTANT We recommend to check the tire pressure with a pressure gauge and not rely solely on a visual tire pressure check Tire inflation...

Страница 104: ...change The front wheel track can be set in 2 positions The rear track can be set in 5 positions as illustrated UCLS5N017 Model Division Tyre Air pressure kgf cm2 Track adjustment Marking is standart U...

Страница 105: ...erform the cleaning as for the short term storage Drain and change the oil Start the engine for approx 5 minutes to refill the engine with new oil Drain the coolant from the radiator and remove the ig...

Страница 106: ...operational performances are highly influenced by the implements mounted the trailers transported and the ballasts applied to the tractor When transporting heavy loads exceeding the weight of the trac...

Страница 107: ...n unlocked depress the push button To open from inside push the lever downwards HODP146 The rear window is fitted with central handle for opening When opened it is held in place by two dampers HODP147...

Страница 108: ...ith rearview mirrors on both sides They can be adjusted and folded whenever necessary to avoid interference with external obstacles The mirror have a telescopic arm to allow positioning for maximum co...

Страница 109: ...r section of the cab roof The fan switch can be operated only after the ignition key is inserted The air flow can be regulated and directed by suitable positioning the air diffusers Air can be taken i...

Страница 110: ...er pump Windscreen washer tank Check the level of windscreen washer fluid in the plastic reservoir located on the rear side of tractor During winter it is advisable to add a suitable antifreeze to the...

Страница 111: ...2 F operate the air conditioner at least once per month for a period of 10 to 15 minutes This will lubricate the seals to prevent them becoming brittle and help prevent the loss of refrigerant from th...

Страница 112: ...er the system at full power for a long period of time never turn it off suddenly but let it first idle for about 20 seconds Compressor belt adjustment Heating system configuration The heating system c...

Страница 113: ...foreign particles from the air Optional ACTIVE CARBON FILTER is informed to parts Catalogue Warning Cab air filters remove dust in the air but are not capable of removing chemicals used in spraying cr...

Страница 114: ...n cabin Cup holder Put the bottles and personal belongings Cigarette lighter Push the button Use that is retune to original position For operation refer to the radio CD player manufacturers instructio...

Страница 115: ...m its efficiency Air is unnecessarily circulated by the compressor as it has practically no cooling effect Moisture tends to rise to obstacles and joints which significantly reduces cooling efficiency...

Страница 116: ...w pressure Abnormal Same bubble appeared occasionally 1 2 sec gap Replenish the refrigerant High pressure pipe is hot and low pressure pipe is a little cool H L pressure of the pressure gauge needle i...

Страница 117: ...s Clutch failure Check Abnormal speed Input cause Damaged parts Check replace Clutch slips Check replace No lubricant Add Output cause Belt loosened Adjust Refrigerant or oil leakage Refrigerant or oi...

Страница 118: ...working Engine operation normal Air supply clogged Remove Evaporator freezes Adjust the minimum pressure Fan switch damaged Replace the switch Compressor Replace Engine operation is not normal Engine...

Страница 119: ...NOTES 118...

Страница 120: ...ealer for repair Refill oil or coolant White smoking from the exhaust Oil level too high Shortage of or faulty fuel Reduce to correct quantity Contact dealer for repair SYMPTOM CAUSE CORRECTIVE MEASSU...

Страница 121: ...ics does not lift Engine speed too low Lack of transmission oil Air leaking from the lines Suction filter plugged Defective pump Defective hydraulic valve Defective cylinder Increase the engine speed...

Страница 122: ...n authorized service Contact an authorized service Replace or adjust First check the electrolyte level in the battery and the connections If necessary refill the electrolyte and clean or re tighten th...

Страница 123: ...way code relative to national legislation regarding towing manoeuvres CAUTION We recommend transporting the tractor on a low loader in the case of longer transport distances Comply with the maximum wi...

Страница 124: ...h suitable notice sign that the tractor is being towed Check and comply with the applicable national legislation Comply with the local safety regulations When driving on the road observe the following...

Страница 125: ...NOTES 124...

Страница 126: ...lternator 12V70A 12V70A Drive Train Transmission Type Sync Shuttle Sync Shuttle Number of Speeds 16 F 16 R 16 F 16 R Brakes Wet Disc Wet Disc Steering Hydrostatic Hydrostatic Clutch Dry Single Plate D...

Страница 127: ...5 9 2 35 Front Axle l 10 5 10 10 5 10 Dimensions Overall length with 3 Point Hitch mm 3590 3590 Overall width mm 1620 1620 Overall height mm 2594 ROPS 2530 Cabin 2594 ROPS 2530 Cabin Wheelbase mm 1935...

Страница 128: ...speed Forward km h Traveling speed Reverse km h LL 1 0 68 0 58 2 0 87 0 76 3 1 33 1 16 4 1 57 1 37 L 1 1 87 1 64 2 2 48 2 17 3 3 79 3 31 4 4 48 3 91 M 1 3 91 3 42 2 5 19 4 53 3 7 93 6 92 4 9 35 8 17...

Страница 129: ...Avoid prolonged operation Reference norms for the measurement of noise levels The maximum driver perceived noise level with the engine at normal operating temperature and measured in accordance with t...

Страница 130: ...ion mater s prescribed The following best practices should be observe to minimize whole body vibration Always use the most appropriate implement for the relevant type of work Adjust the seat to match...

Страница 131: ...NOTES 130...

Страница 132: ...lope 75 Driver s Seat 56 Driving downhill 76 Driving operation 73 Driving the Tractor Off 74 Driving to from the Field 76 Driving with agricultural machines attached to the front three point hitch 71...

Страница 133: ...on Adjustment 16 Service inspections 79 Service Prior to Daily and Short Terms Storage 104 Service tractor safely 21 Side window 106 Signal words 17 Sliding Seat 15 Specification 125 Start with the Ot...

Страница 134: ...133...

Страница 135: ...Operator s manual Utilix CL 45 Utilix CL 55 Edition 1 100 2021 Publication No 222 213 600 03 2021 ZETOR TRACTORS a s Department of Technical Documentation Trnkova 111 628 00 Brno 134...

Страница 136: ...www zetor com zetor zetor com Made in EU...

Отзывы: