

Horizon
1
2
3
4
5
4
B C
A
3
4
9
10
6
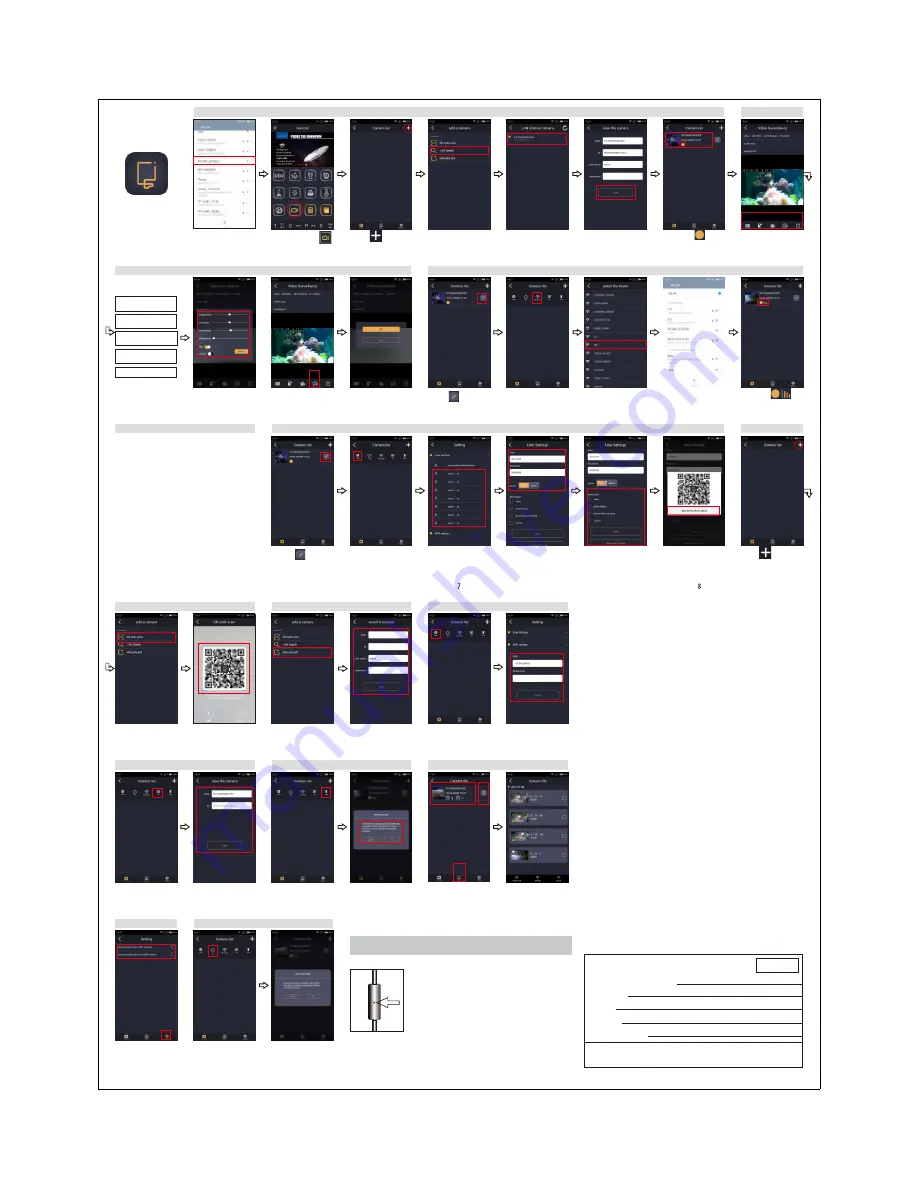
Surveillance Screen
Function
Status 1: AP Mode
Open WIFI setting and
search a device named
“IPCM_XXXXXX”. Click
to connect
Open APP, click
button
Click button
on top right corner
Click “LAN search” to
add the aquarium
surveillance
It will display all the
aquarium surveillance
devices in range of the
LAN. Click the one you
need to add
Click “Save” button
If it shows here ,
it indicates connected
successfully. Click to
enter the surveillance
screen.
1. picture taking
button
2. video recording
button
3. screen setting
button
4. definition switch
button
5. full screen button
Click “Standard” or “HD”
button to switch to the
corresponding definition.
If it shows here ,
it indicates connected
successfully. Click to
enter the surveillance
screen.
Status 2: STA Mode (WIFI setting)
Click button
Click “WIFI” button
Click the router you
need to connect
Open WIFI setting on
the mobile device.
Connect to the router
and back to the APP
Status 3: Could Mode
Click “Album” to save
the QR code to the
album
User Setting & QR Code Generation
Click button
Click “Setting” button
Click any option on
the user list
Set user permission
and click “Save”.
Then you can click
“QR generation” to
generate a QR code.
Click button on
top right corner
Add a QR Code
After setting the aquarium surveillance to
STA mode (indirect connection via router),
users can wirelessly control the aquarium
surveillance away from home with the help
of Could technology (note: the router and
the mobile device must be connected to the
Internet). Users just need to open the APP
and select a aquarium surveillance on the
list. Then, they can observe what's going
on in the tank through the aquarium
surveillance.
Scan the QR code to
add the corresponding
aquarium surveillance
to the list
Click “QR code scan”
to add an aquarium
surveillance
Manually Add
Click “Manually add”
to add a aquarium
surveillance
Enter parameters of the
aquarium surveillance.
Click “Save” to add the
aquarium surveillance.
Click “WIFI settings” to
change the name and
password of the aquarium
surveillance WIFI (only
under AP mode). Click
“Save” after completion.
WIFI Setting
Click “Setting”
To edit the name of the
aquarium surveillance.
Click “Save” after
completion.
Edit Function
Click “edit” button
Click “OK” to delete the
selected aquarium
surveillance
Delete an Aquarium Surveillance
Click “delete” button
To view, share or delete
the photo, video or QR
files of the aquarium
surveillance.
Aquarium Surveillance File Management
A. Click “Album” to enter
the APP album
B. Click to enter the
corresponding aquarium
surveillance album
C. Delete all the files of
the selected aquarium
surveillance
Click “Setting” button
at lower right corner to
set re-connection mode
under different networks.
Network Setting
Click “OK” and wait for
several seconds. Power off
the aquarium surveillance
and power it on again, the
aquarium surveillance will
be reset to factory settings.
Reset to Factory Settings
Click “Reset” button
When you forget the password or cannot
connect the aquarium surveillance directly,
please use a tiny needle to press the reset
button inside the hole and hold for 20 seconds.
Then power off the aquarium surveillance and
power it on again. The aquarium surveillance
will be reset to factory settings and you can
reconnect the aquarium surveillance step by
step.
7. Reset to Factory Settings
Warranty Card
Dear user:
In order to use and enjoy our product, and benefit from
excellent after-sale service, please read the product
instructions carefully, and keep this card in a safe place.
Product Warranty:
This Warranty Card is the only proof of warranty, and it
should be stamped by the company it was purchased
from.Please contact the company you purchased this
unit from with any warranty issues.
Warranty Exclusions:
This warranty is invalid if:
1) you cannot provide the warranty card or a valid sales
document, or it is altered, or is not the correct product.
2) the product has been damaged by misuse, abnormal
use, taking apart by yourself, its appearance has been
altered, and other human factors.
3) the product has been damaged as a result of incorrect
assembly, use or maintenance due to a failure to follow
the instructions and diagrams.
4) it is due to normal wear and tear of consumable parts.
5) it has failed or been damaged by natural disasters or
other force majeure, such as earthquake, fire, typhoon,
thunder etc.
We accept no responsibility for damage to relevant equipment,
animals or furniture from other companies. The service
covered under this warranty is free. We will only charge
for servicing the unit if the warranty card has expired or
the service is not covered under warranty.
The warranty card and sales receipt should be provided
at the time of claim.
Product Model Number
Customer
Phone
Address
Purchase Date
Item Serial Number
Dealer Company Chop


