background image

14

www.zephyronline.com

FCC Caution:

 To assure continued compliance, any changes or modifi cations not expressly approved by the party 

responsible for compliance could void the user’s authority to operate this equipment.  (Example - use only shielded interface 
cables when connecting to computer or peripheral device.  This device complies with Part 15 of the FCC Rules. Operation is 
subject to the following two conditions.  (1) This device may not  cause harmful interference, and (2) This device must accept 
any interference received, including interference that may cause undesired operation.

This remote control may operate in humid environments, but not when placed on a wet surface.

REMOTE CONTROL FEATURES:                                                                                                       

The RF remote control is equipped with a magnet for easy storage.  The remote may be placed on any magnetic surface such 
as a refrigerator or the Zephyr remote holder.  Maximum remote control communication distance from power pack is 15 feet.

REMOTE CONTROL MAINTENANCE:

Clean the remote control using non abrasive detergents

Follow instructions below for replacing battery.

Using a small fl at head screwdriver, raise the cover of the battery door (

A

) in 

order to access the battery compartment.

Remove the battery and replace with Type

 A23 12V

.

Negative end of battery should face the spring inside the remote.

Replace battery door and recycle old battery.

If the remote control does not work after installation (yet the hood works 
correctly):

1.  Place remote control on the counter near the hood (make sure a good battery is installed).
2.  Disconnect power from the hood by turning off circuit breaker.
3.  Reconnect power to the hood.

Follow this procedure whenever the remote control does not work.

Blower On/Speed Selection

By pressing      , the blower is switched On.  Press        again to cycle through all 
three blower speeds. 

Blowers On/Hood Off

By pressing      , the blowers will power on at the last speed setting.  Press 
again and the entire hood will power off, including lights.

Delay Off

Lights On/Dim/Off

Switch lights On by pressing       once, again to dim and again to switch Off.

Blower On/

Speed Selection

1

1

2

3

4

Blower On/
Power Off

2

5 Min Delay Off

3

Lights On/Dim/Off

4

By pressing      , the blower and lights will enter Delay Off mode.  A dot will 
appear in the lower right corner of the power pack display        indicating the 
function is on.  The blower will change to speed 1 and shut down after 5 
minutes.

A

-

+

Features & Controls – 

RF Remote Control

Содержание Tornado II AK8200AS

Страница 1: ...nd Installation Guide www zephyronline com Model number Serial Number Date of Purchase Sales Dealer JAN08 0301 2008 Zephyr Corporation Tornado II AK8200AS Tornado III AK8300ASX READ AND SAVE THESE INS...

Страница 2: ...www zephyronline com...

Страница 3: ...ptions 7 Specifications 8 Electrical 9 Installing the Power Pack 10 Single and Dual Internal Blowers 11 External Blower Preparation 12 FEATURES CONTROLS Touch Controls 13 RF Remote Control 14 MAINTENA...

Страница 4: ...sheet or metal tray then turn off the burner BE CAREFUL TO PREVENT BURNS If the flames do not go out immediately EVACUATE AND CALL THE FIRE DEPARTMENT b NEVER PICK UP A FLAMING PAN You may be burned c...

Страница 5: ...his appliance requires a 120V 60Hz electrical supply and connected to an individual properly grounded branch circuit protected by a 15 or 20 ampere circuit breaker or time delay fuse Wiring must be 2...

Страница 6: ...blower wiring 1 RF remote control with battery 1 RF remote control with battery 1 Hardware package 1 Hardware package NO BLOWER HARDWARE PACKAGE CONTENTS PARTS NOT SUPPLIED Ducting conduit and all in...

Страница 7: ...Ft 6 Round straight 1 Ft x Ft Subtotal column 1 Duct pieces T otal Equivalent number length x used 6 Round wall cap with damper 30 Ft x Ft Round wall cap with damper 30 Ft x Ft 7 10 Round 900 elbow 15...

Страница 8: ...install as far away from hood duct output and as far apart between the two as possible Minimum mount height between range top to hood bottom should be no less than 26 Maximum mount height should be no...

Страница 9: ...l exhaust must be ducted to the outside Use metal ductwork only Fasten all connections with sheet metal screws and tape all joints with certified Silver Tape or Duct Tape Some Ducting Options Installa...

Страница 10: ...lec k o AK8200AS top AK8200AS front AK8200AS AK8300ASX side 5 7 3 4 11 7 16 14 11 16 15 13 16 4 3 8 CL 33 1 8 14 3 4 34 5 8 38 7 16 11 7 16 4 3 4 2 3 8 6 1 2 CL AK8300ASX front AK8300ASX top 7 3 4 2 5...

Страница 11: ...ing local codes and ordinances Electrical Supply This appliance requires a 120V 60Hz electrical supply and connected to an individual properly grounded branch circuit protected by a 15 or 20 ampere ci...

Страница 12: ...t is needed 6 Install duct work and seal with duct tape 7 Install electrical 8 Remove all packing materials before using Power Pack Switch power on and check for leaks around duct tape 9 Install decor...

Страница 13: ...3 16 screws blower pictured is a PBI 1100A 2 Connect 6 pin male connector from blower wiring to 6 pin female connector in the power pack plug is located inside the power pack protruding from the white...

Страница 14: ...ect 6 pin male connector from blower wiring to 6 pin female connector in the power pack plug is located inside the power pack protruding from the white control board box NOTE For instructions on mount...

Страница 15: ...turn it on Delay Off This is used for programmed shut down of blower and lights 5 minutes after the function is activated Press once a dot displays in the lower right hand side of display indicating...

Страница 16: ...raise the cover of the battery door A in order to access the battery compartment Remove the battery and replace with Type A23 12V Negative end of battery should face the spring inside the remote Repl...

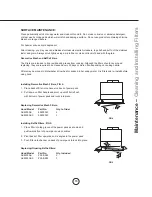
Страница 17: ...ed to be cleaned every 30 days or more often depending on cooking habits Filters may be placed in dishwasher at low heat or soaked in hot soapy water Dry filters and re install before using hood Insta...

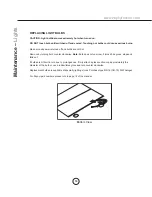
Страница 18: ...ning bulb counter clockwise Note Bulb does not unscrew it turns 60 degrees stops and falls out If bulbs are difficult to turn due to prolonged use firmly attach a glass suction cup approximately the d...

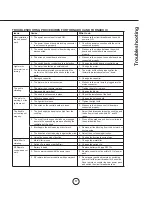
Страница 19: ...is not secured in place 3 Check the installation of the hood The motor is working but the lights are not 1 Defective halogen bulb 1 Change the halogen bulb 2 The light bulb is loose 2 Tighten the lig...

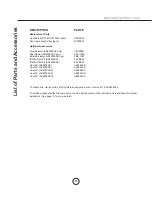
Страница 20: ...ilter Kit AK8200AS Z0F B082 Baffle Filter Kit AK8300ASX Z0F B083 Liner 36 AK8200AS AK0806AS Liner 42 AK8200AS AK0842AS Liner 48 AK8300ASX AK0848AS Liner 54 AK8300ASX AK0854AS Liner 60 AK8300ASX AK0860...

Страница 21: ...abuse accident Improper installation and failure to follow installation instructions When product is used commercially or other than its intended purpose Damaged because of improper connection with e...

Отзывы: