background image


IDAC 

Instalación empotrada en puerta 
ZVIIDAC 

Manual de Instalación


© Zennio Avance y Tecnología S.L. 

Ed. 3 

Para más información 

www.zennio.com


Pág. 

1

 / 

8


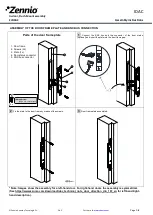
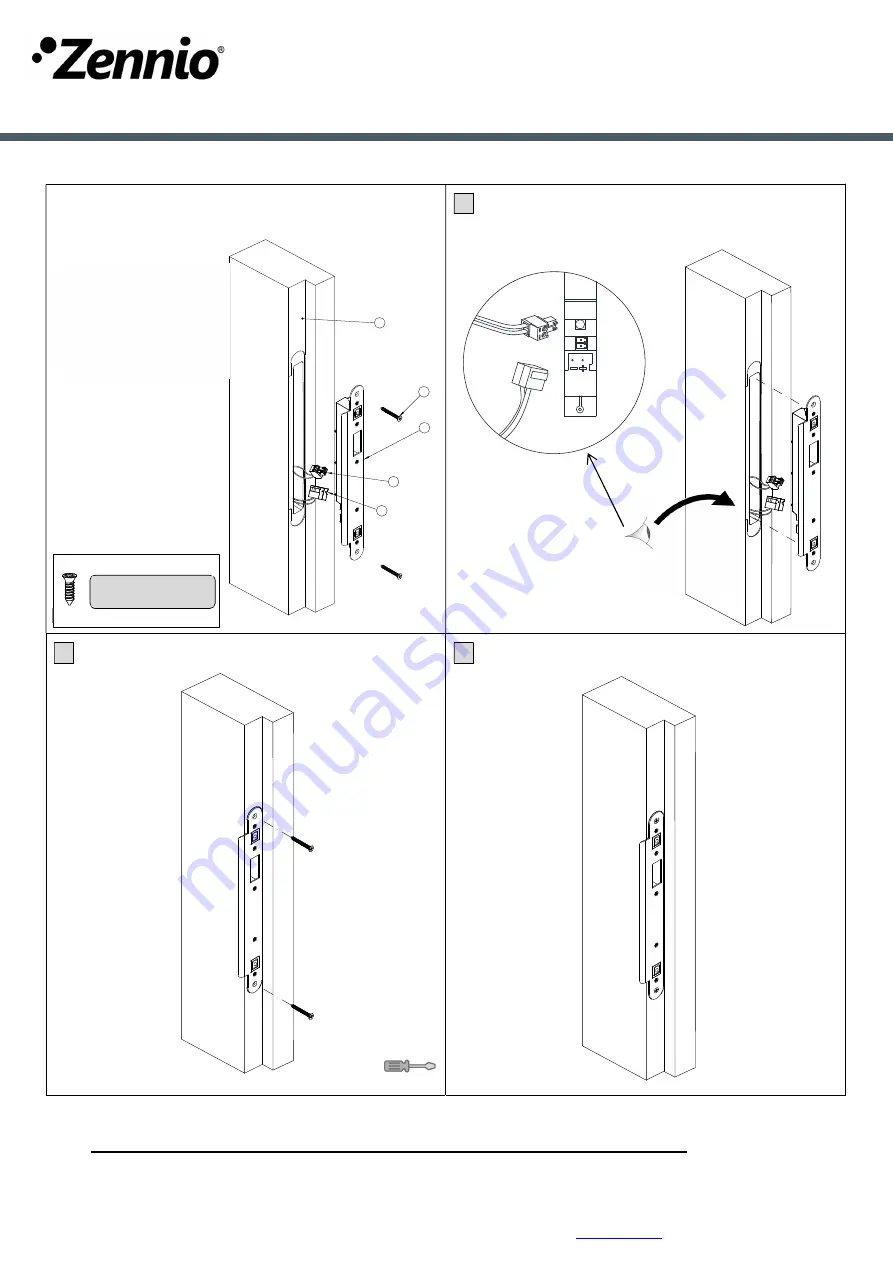
MONTAJE DE LA ARMADURA PARA EL MARCO Y CONEXIÓN AL BUS KNX 

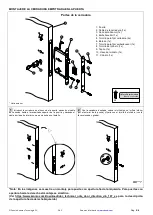
Partes de la armadura para el marco


 1 

 Conectar el cable del bus KNX y la clema del conector del estado 

de la puerta (opcional) e introducir la armadura dentro del marco. 


 2  

Fijar la armadura al marco, ajustando los dos tornillos. 


 3  

Montaje de la armadura finalizado. 


 *Nota: En las imágenes se muestra un montaje para puerta con apertura hacia la izquierda. Para puertas con 
apertura hacia la derecha el montaje es simétrico.  
(Ver  https://www.zennio.com/download/idac_technical_note_door_direction_din_107_es  para  la  descripción 
de la apertura hacia derecha/izquierda). 


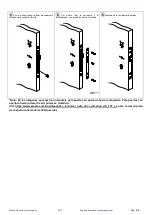
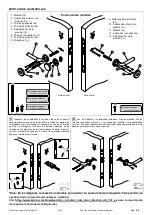
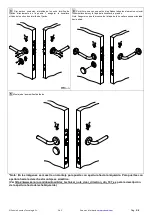
4

5

3

2

1

1. Marco de la puerta


2. Tornillo (2x) 


3. Armadura (1x) 
4. Conector del estado 

de la puerta 

5. Conector del bus KNX


2x


(2)


(2) Tornillo para madera 

Ø3,5 x 16 – avellanado 

Содержание ZVIIDAC

Страница 1: ...del marco 2 Fijar la armadura al marco ajustando los dos tornillos 3 Montaje de la armadura finalizado Nota En las im genes se muestra un montaje para puerta con apertura hacia la izquierda Para puer...

Страница 2: ...rlo con el tornillo del cilindro con la llave colocada y girada Nota En las im genes se muestra un montaje para puerta con apertura hacia la izquierda Para puertas con apertura hacia la derecha el mon...

Страница 3: ...apertura hacia la derecha el montaje es sim trico Ver https www zennio com download idac_technical_note_door_direction_din_107_es para la descripci n de la apertura hacia derecha izquierda 3 Con el ci...

Страница 4: ...longitud al ancho de la puerta Nota En las im genes se muestra un montaje para puerta con apertura hacia la izquierda Para puertas con apertura hacia la derecha el montaje es sim trico Ver https www z...

Страница 5: ...s los elementos colocar los embellecedores y la tapa de la bocallave a presi n Nota Asegurarse que la muesca de la tapa de la bocallave queda orientada hacia abajo 5 Montaje de las manillas finalizado...

Страница 6: ...rlos al ancho de la puerta y utilizarlos para atornillar la chapa de fijaci n al m dulo electr nico exterior previamente insertado en la puerta Nota En las im genes se muestra un montaje para puerta c...

Страница 7: ...ctamente conectados al m dulo interior introducir suavemente la parte superior del m dulo interior en la pesta a de la chapa de fijaci n hasta que haga click es necesario girar levemente el dispositiv...

Страница 8: ...la nueva bater a procurando no da ar las conexiones 4 Por ltimo fijar nuevamente el embellecedor mediante sus tres tornillos Nota En las im genes se muestra un montaje para puerta con apertura hacia...

Страница 9: ...tional and insert the plate into the door frame gap 2 Fix the plate to the door frame by means of the screws 3 Door frame plate assembled Note Images show the assembly for a left hand door For right h...

Страница 10: ...he external part of the door and fix it using the cylinder screw with the key inserted and rotated Note Images show the assembly for a left hand door For right hand doors the assembly is symmetrical S...

Страница 11: ...right hand doors the assembly is symmetrical See https www zennio com download idac_technical_note_door_direction_din_107_en for left hand right hand description 3 Once the cylinder is fixed place th...

Страница 12: ...o the door thickness The isolators should be cut with a chisel 2 Once the screw isolators and square spindles are installed fix the handles with the through screws and the threaded bushings It may be...

Страница 13: ...ote_door_direction_din_107_en for left hand right hand description 3 Fix both handles by screwing the eight fixing screws directly to the door Place the keyhole around the cylinder and fix it with its...

Страница 14: ...wnwards 2 Cut the through screws to adapt their length to the door thickness and use them to tighten the fixing plate to the external electronic module previously inserted into the door Note Images sh...

Страница 15: ...ing plate is tightened and both cables are connected to the internal module insert softly the upper part of the internal module in the upper tab of the fixing plate until it clicks it is necessary to...

Страница 16: ...e battery from its housing 3 Insert the new battery making sure not to damage the connection 4 Finally fix the cover by means of the three screws Note Images show the assembly for a left hand door For...

Страница 17: ...re la t ti re dans le cadre 2 Fixer la t ti re du cadre de porte au montant en ajustant les deux vis 3 Montage de la t ti re du cadre de porte termin Note Sur les images se montre un montage pour port...

Страница 18: ...t rieur de la porte et le fixer avec la vis du cylindre avec la cl dans son logement et la tourner Note Sur les images se montre un montage pour porte avec ouverture vers la gauche Pour portes avec ou...

Страница 19: ...tes avec ouverture vers la droite le montage est sym trique Voir https www zennio com download idac_technical_note_door_direction_din_107_fr pour la description de l ouverture vers la droite gauche 3...

Страница 20: ...let es correspondantes int rieure Il peut tre n cessaire de couper les vis passantes au pr alable pour adapter leur longueur la largeur de la porte Note Sur les images se montre un montage pour porte...

Страница 21: ...es autres vis de fixation 4 Pour terminer une fois que tous les l ments sont bien fix s placer les enjoliveurs et le bouchon pression de la rosace d entr e de la cl Note S assurer que l encoche du bou...

Страница 22: ...ge pour la vis de s curit soit sur la partie inf rieure 2 Couper les vis passantes pour les adapter la largeur de la porte et les utiliser pour visser la plaque de fixation au module lectronique ext r...

Страница 23: ...ue de fixation est bien viss e et les deux c bles se trouvent correctement connect s au module int rieur introduire d licatement la partie sup rieure du module int rieur dans l onglet de la plaque de...

Страница 24: ...velle batterie en procurant de ne pas endommager les connexions 4 Pour terminer fixer nouvellement l enjoliveur au moyen de ses trois vis Note Sur les images se montre un montage pour porte avec ouver...

Страница 25: ...l an und f hren Sie die Platte in den T rrahmenspalt ein 2 Befestigen Sie die Platte mit Hilfe der Schrauben am T rrahmen 3 T rrahmenplatte montiert Wichtig Die Bilder zeigen die Montage f r eine DIN...

Страница 26: ...n Teil der T r aus und befestigen Sie ihn mit der Zylinderschraube mit eingestecktem und gedrehtem Schl ssel Wichtig Die Bilder zeigen die Montage f r eine DIN links T r Bei einer DIN rechts T r ist d...

Страница 27: ...ner DIN rechts T r ist der Aufbau symmetrisch Siehe https www zennio com download idac_technical_note_door_direction_din_107_en f r DIN links rechts 3 Sobald der Zylinder fixiert ist setzen Sie die Ka...

Страница 28: ...berst nde ab um ihre L nge an die T rdicke anzupassen Die Isolatoren sollten mit einem geeigneten Werkzeug geschnitten werden 2 Sobald die Schraubenisolatoren und Vierkantspindeln installiert sind be...

Страница 29: ...DIN links rechts 3 Befestigen Sie beide Griffe indem Sie die acht Befestigungsschrauben direkt auf die T r schrauben Legen Sie das Schl sselloch um den Zylinder und befestigen Sie ihn mit den beiden B...

Страница 30: ...schraube nach unten zeigt 2 Schneiden Sie die Durchgangsschrauben ab um ihre L nge an die T rst rke anzupassen und verwenden Sie sie um die Befestigungsplatte an dem zuvor in die T r eingesetzten exte...

Страница 31: ...d die Befestigungsplatte festgezogen ist und beide Kabel mit dem internen Modul verbunden sind f hren Sie den oberen Teil des internen Moduls vorsichtig in die obere Lasche der Befestigungsplatte ein...

Страница 32: ...aus ihrem Geh use 3 Setzen Sie die neue Batterie ein und achten Sie darauf dass die Verbindung nicht besch digt wird 4 Zum Schluss befestigen Sie den Deckel mit den drei Schrauben Wichtig Die Bilder...

Отзывы: