background image

19

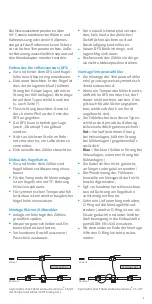
activated as described below. After 

another 2 minutes, the meter programs 

itself automatically to "outlet", if the 

push button hasn't been operated 

meanwhile.

The selection is being activated with the 

door symbol (top right of the display):


 Press and hold the button.


 The door icon disappears and ap-

pears after about 2 seconds again.


 Then release the button immedi-

ately.

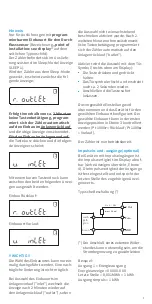
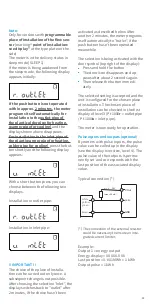
The selected setting is accepted and the 

unit is configured for the chosen place 

of installation. The chosen place of 

installation can be checked in the first 

display of level 3 (Pt 1000

r

 = outlet pipe 

/ Pt 1000

u

 = inlet pipe). 

The meter is now ready for operation.

Pulse inputs and outputs (optional)

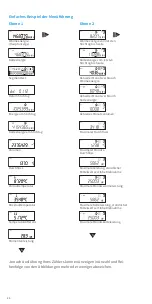
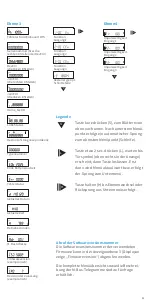
By meters with pulse inputs, the pulse 

value can be called up in the display 

(see the display overview, level 4). The 

pulse value of the outputs is perma-

nently set and corresponds with the 

last position of the associated display 

value.

Typical connection (*)

(*)  The connection of the external resistor 

could be necessary to ensure an inte-
grated current limiter.

Example:

Output 1 = energy output

Energy display = XXXXX.XXX

Last position = 0.001 MWh = 1 kWh

Output pulse = 1 kWh

U = 3 … 30 V 

Imax = 20 mA* 


GND

Pulse

V Out

white

yellow

green

brown

pulse

Note:

Only for versions with 

programmable 

place of installation of the flow sen

-

sor

 (marking 

“point of installation: 

see display” 

at the type plate on the 

side).

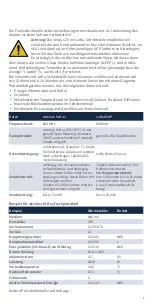
The meter is in the delivery status in 

sleep mode (SLEEP 1).

If the meter is being awakened from 

the sleep mode, the following display 

appears initially: 

If the push button is not operated 

within approx. 2 minutes, the meter 

programs itself automatically for 

installation in the 

outlet pipe of 

the plant (colder pipe for heating, 

warmer pipe for cooling)


and the 

display shown above disappears.

For installation in the inlet pipe of 

the plant (warmer pipe for heating, 

colder pipe for cooling) 

press the but-

ton shortly and the following display 

appears:

With a short button press you can 

choose between the following two 

displays.

Installation in outlet pipe:

Installation in inlet pipe:

!! IMPORTANT !!

The choice of the place of installa-

tion can be carried out only once. A 

subsequent change is not possible. 

After choosing the selection "inlet", the 

display switches back to "outlet" after 

2 minutes, if the choice hasn't been 

Содержание zelsius C5 -IUF

Страница 1: ... optional M Bus wireless M Bus OMS LoRa und 3 Ein Ausgänge qp 0 6 1 5 2 5 3 5 6 10 m h DE zelsius C5 IUF Installation and operating instructions 14 Thermal energy meter for heating and or cooling plants with ultrasonic flow sensor IUF optional with M Bus wireless M Bus OMS LoRa and 3 inputs outputs qp 0 6 1 5 2 5 3 5 6 10 m h EN ...

Страница 2: ...e zur Montage 4 Einbau des Durchflusssensors DFS 5 Einbau des Kugelhahns 5 Montage Wärme Kältezähler 5 Montage Temperaturfühler 5 Einbau in Bestandstauchhülsen 6 Inbetriebnahme 6 Impulsein und ausgänge optional 7 M Bus optional 8 Programmierung der M Bus Adresse optional 8 Funk optional 8 Einfaches Beispiel der Menüführung 10 Legende 11 Statusanzeigen Fehlercodes 12 Entsorgung 13 ...

Страница 3: ...k Geh mit Gewindeanschluss Geh mit Flanschanschluss PS PN PS PN 16 16 25 25 IP Schutzklasse 68 Durchflusssensor 54 Rechenwerk Einbaulage beliebig Wärmeträger Wasser Temperaturbereich Rechenwerk C 0 105 0 150 Temperaturdifferenzbereich K 3 80 3 130 Umgebungsklasse nach EN 1434 A Lagertemperatur C 20 65 Schnittstellen Standard optische Schnittstelle ZVEI IrDA optional 3 Impulsein ausgänge M Bus wire...

Страница 4: ...rfüllt die nationalen und internationalen Anforderungen an die Störsicherheit Um Fehlfunktionen durch darüber hinaus gehende Störun gen zu vermeiden dürfen Leuchtstoff röhren Schaltkästen oder elektrische Verbraucher wie Motoren und Pumpen nicht in unmittelbarer Umgebung des Zählers montiert werden Vom Zähler abgehende Leitungen dürfen nicht par allel zu spannungsführenden Leitungen 230 V verlegt ...

Страница 5: ...en den kein Hanf oder ähnliches Dichtflächen säubern und auf Beschädigung kontrollieren Neuen DFS fließrichtungs und lagerichtig einbauen Rechenwerk des Zählers in die ge wünschte Ableseposition drehen Montage Temperaturfühler Die Montage der Temperaturfühler erfolgt vorzugsweise symmetrisch direkteintauchend Wenn ein Temperaturfühler bereits ab Werk im DFS montiert ist darf dieser nicht entfernt ...

Страница 6: ...n veröffentlicht in den PTB Mitteilungen 119 2009 Heft 4 eingesetzt werden Die Regelung hat nach aktuellem Stand den Geltungszeit raum bis 30 10 2026 Für die Identi fikation und Kennzeichnung der in Verbindung mit C5 IUF einsetzbaren Be standstauchhülsen kann ein Identifika tions und Kennzeichnungsset bezogen werden Artikelnummer 137382 Eine Aufstellung für welche Be standstauchhülsen C5 IUF zugel...

Страница 7: ... kann notwendig sein um die Strombegrenzung zu gewährleisten Beispiel Ausgang 1 Energieausgang Energieanzeige XXXXX XXX Letzte Stelle 0 001 MWh 1 kWh Ausgangsimpuls 1 kWh U 3 30 V Imax 20 mA GND Pulse V Out weiß gelb grün braun Puls Hinweis Nur für Ausführungen mit program mierbarem Einbauort für den Durch flusssensor Bezeichnung point of installation see display auf dem seitlichen Typenschild Der...

Страница 8: ...Hauptanzeige gespei chert Funk optional Allgemeines zelsius Energiezähler die über eine integrierte Funkschnittstelle mit Antenne verfügen sind zur besseren Er kennbarkeit auf der Oberschale je nach Ausführung mit folgenden Symbolen gekennzeichnet wM Bus Farbe Anschluss Bedeutung weiß I O 1 Ein Ausgang 1 gelb I O 2 Ein Ausgang 2 grün I O 3 Ein Ausgang 3 braun GND Gemeinsame Masse für I O 1 3 Techn...

Страница 9: ...nd Durchfluss im Sendeintervall Daten wireless M Bus LoRaWAN Frequenzband 868 MHz 868 MHz Funkprotokoll wireless M Bus EN 13757 4 und gemäß Open Metering Standard OMS unterschiedliche Protokoll inhalte möglich gemäß LoRa Spezifikation Datenübertragung unidirektional Standard T1 Mode bidirektionale Geräte und weitere Modi auf Anfrage 128 Bit AES Verschlüsselung LoRa Device Class A Sendeintervall ab...

Страница 10: ...tichtag Volumen Durchfluss Vorlauftemperatur Rücklauftemperatur Temperaturdifferenz Momentanleistung Wärmeenergie vom letzten Stichtag bis heute Kälteenergie vom letzten Stichtag bis heute Aktueller Monatsverbrauch Wärmeenergie Aktueller Monatsverbrauch Kälteenergie Aktuelles Monatsvolumen Maximaler Durchfluss Maximaler Monats Durchfluss Maximale Leistung stündlicher Mittelwert seit Inbetriebnahme...

Страница 11: ...sionsnummer der verwendeten Firmware kann in der Anzeigenebene 3 Displayan zeige Firmwareversion abgerufen werden Die komplette Menüübersicht sowie die Beschrei bung der M Bus Telegramme sind auf Anfrage erhältlich Ebene 3 Ebene 4 Funktion Ausgang 1 Funktion Ausgang 2 Funktion Ausgang 3 Restenergie opt Schnittstelle Impulswertigkeit Eingang 1 Impulswertigkeit Eingang 2 Impulswertigkeit Eingang 3 S...

Страница 12: ...emperaturfühler prüfen 4 Unterbrechung Rücklauffühler Temperaturfühler prüfen 5 Kurzschluss Vorlauffühler Temperaturfühler prüfen 6 Unterbrechung Vorlauffühler Temperaturfühler prüfen 7 Batteriespannung Gerät austauschen 8 Hardwarefehler Gerät austauschen 9 Hardwarefehler Gerät austauschen 10 Fehler im Messsystem Gerät austauschen 20 Kein Wasser im Messrohr Anlagendruck prüfen 30 Rückfluss erkannt...

Страница 13: ...er Nutzungsdauer wieder mit nehmen und fachgerecht entsorgen Sofern diesbezüglich keine andere ver tragliche Regelung getroffen wurde können alternativ die Altgeräte und Zubehör auch bei unserer Betriebs stätte in D 09619 Mulda Talstraße 2 kostenlos abgegeben werden Zenner stellt in jedem Fall die fachgerechte Entsorgung sicher Achtung Die Geräte dürfen nicht über die kommunalen Abfalltonnen Hausm...

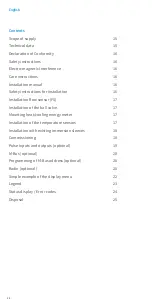
Страница 14: ...ion 16 Installation flow sensor FS 17 Installation of the ball valve 17 Mounting heat cooling energy meter 17 Installation of the temperature sensors 17 Installation with existing immersion sleeves 18 Commissioning 18 Pulse inputs and outputs optional 19 M Bus optional 20 Programming of M Bus address optional 20 Radio optional 20 Simple example of the display menu 22 Legend 23 Status display Error...

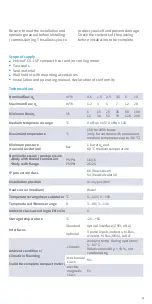
Страница 15: ...ction Body with flange PS PN PS PN 16 16 25 25 IP protection class 68 flow sensor 54 heat calculator Installation position in any position Heat carrier medium Water Temperature range heat calculator C 0 105 0 150 Temperature difference range K 3 80 3 130 Ambient class according to EN 1434 A Storage temperature C 20 65 Interfaces Standard optical interface ZVEI IrDA optional 3 pulse inputs outputs ...

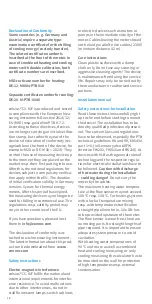
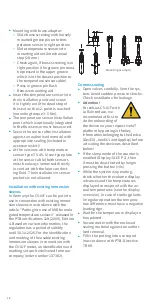
Страница 16: ...ents for interfer ence resistance To avoid malfunctions due to other interferences do not in stall fluorescent lamps switch cabinets or electric devices such as motors or pumps in the immediate vicinity of the meter Cables leaving the meter should not be laid parallel to live cables 230 V minimum distance 0 2 m Care instructions Clean plastic surfaces with a damp cloth only Do not use any scouring...

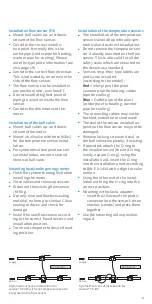
Страница 17: ...rature sensors The installation of the temperature sensors should be preferably sym metrical and as direct installation Do not remove the temperatur sen sor if already mounted on the flow sensor This is also valid for all the safety seals which are mounted on the device as a standard Sensors resp their type labels are partly colour coded according to the model Red Inlet pipe of the plant warmer pi...

Страница 18: ... Putting into use of MID homolo gated temperature sensors released in the PTB notifications 119 2009 Edition 4 Based on current information the regulation has a period of validity until 30 10 2026 For the identification and marking of the usable existing immersion sleeves in connection with the C5 IUF meter an identification and marking set can be delivered from our company order number 137382 Com...

Страница 19: ...put 1 energy output Energy display XXXXX XXX Last position 0 001 MWh 1 kWh Output pulse 1 kWh U 3 30 V Imax 20 mA GND Pulse V Out white yellow green brown pulse Note Only for versions with programmable place of installation of the flow sen sor marking point of installation see display at the type plate on the side The meter is in the delivery status in sleep mode SLEEP 1 If the meter is being awak...

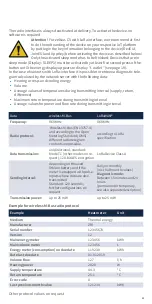
Страница 20: ... to the main display Radio optional General information zelsius energy meters which have an in tegrated radio interface with an antenna are marked for better visibility on the upper cover with one of the following symbols colour connection signification white I O 1 In Output 1 yellow I O 2 In Output 2 green I O 3 In Output 3 brown GND common ground for I O 1 3 Technical data I O Load max 30V DC 20...

Страница 21: ...smitting interval Data wireless M Bus LoRaWAN Frequency 868 MHz 868 MHz Radio protocol Wireless M Bus EN 13757 4 and according to the Open Metering Standard OMS different radio telegram contents are possible according to LoRa specification Data transmission unidirectional standard Mode T1 other modes on re quest 128 bit AES encryption LoRa Device Class A Sending interval depending on the used lith...

Страница 22: ... Supply temperature Return temperature Temperature dif ference Current power Heat energy difference from last due date to now Cooling energy difference from last due date to now Heat energy difference from 1 of this month to now Cooling energy difference from 1 of this month to now Volume difference from 1 of this month to now Maximum flow rate Maximum monthly flow rate Maximum heating power avera...

Страница 23: ...r switches back from the sub menu S L H Recall of software version number The software version of the firmware can be accessed from the display level 3 display level firmware version A detailed display overview including sub menus is available upon request Level 3 Level 4 Pulse value Output 1 Pulse value Output 2 Pulse value Output 3 Opto readout energy Interfaces Pulse value Input 1 Pulse value I...

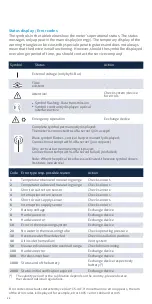
Страница 24: ...n sensor Check sensors 5 Short circuit supply sensor Check sensors 6 Interruption supply sensor Check sensors 7 Battery voltage Exchange device 8 Hardware error Exchange device 9 Hardware error Exchange device 10 Error in the measuring system Exchange device 20 No water in the measuring tube Check operating pressure 30 Reverse water flow detected Check installation position 40 Air inside the mediu...

Страница 25: ...disposal Alter natively a waste disposal via ZENNER is possible Your local or municipal authority or the local waste disposal company can give you information relating the collection points for your used equipment ZENNER will always ensure correct disposal Attention Do not dispose of the devices with domestic waste In this way you will help to protect natural resources and to promote the sustainab...

Страница 26: ...Notice ...

Страница 27: ......

Страница 28: ...rrtümer und Druckfehler übernehmen wir keine Haftung ZRI_SAP155773_210119_DE_EN ZENNER International GmbH Co KG Römerstadt 6 66121 Saarbrücken Germany Telefon 49 681 99 676 30 Telefax 49 681 99 676 3100 E Mail info zenner com Internet www zenner de ...

Отзывы: