background image

Pg 8 of 9

C

C

C

F

7.

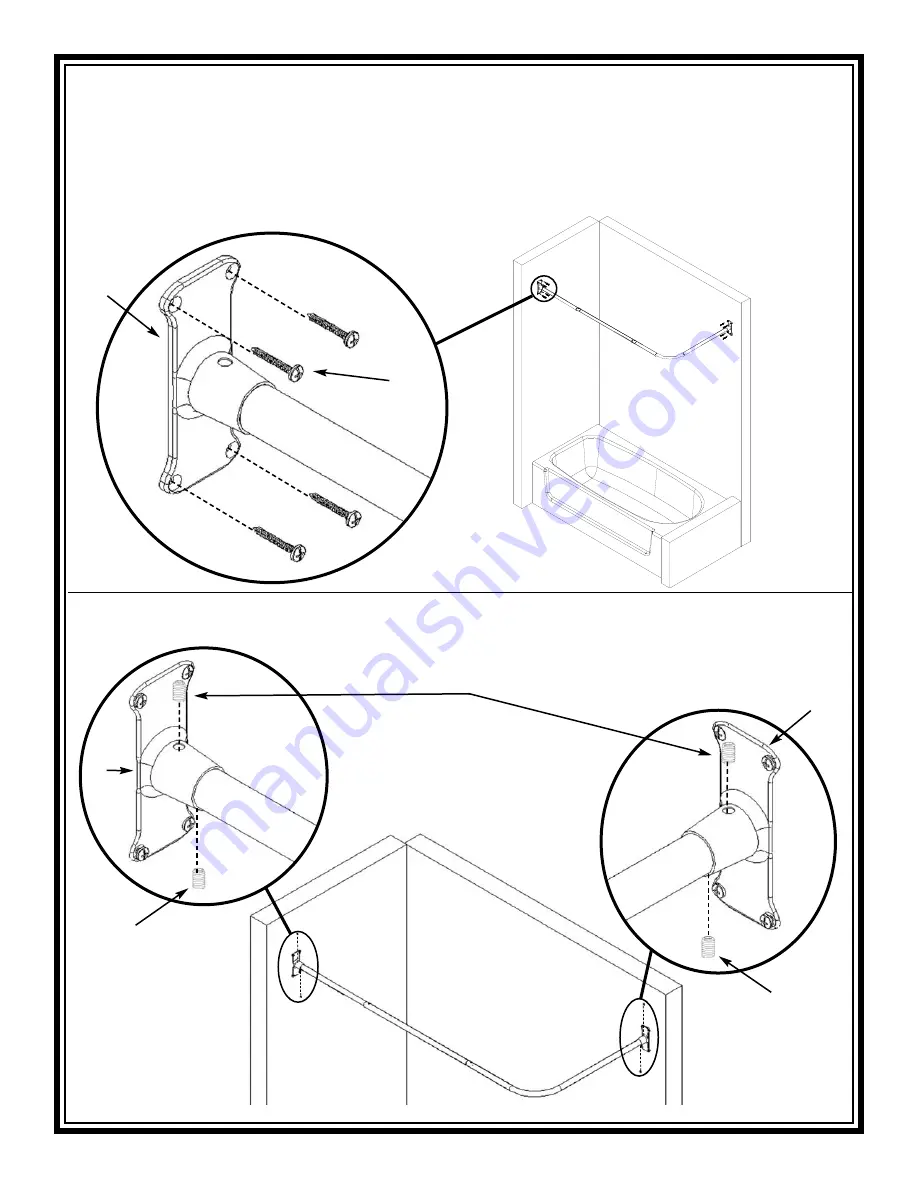
Making sure the end cap (C) is in the
upright position with the screw hole 
closest to the wall (in the neck of the
endcap) is on top, fasten the endcap
(C) to the side wall. 

NOTE:

Screw hole

closest to the wall in the “neck” of the
endcap is on top, as shown. 

Repeat for

the other end cap (C).

Asegurándose de que la cubierta 
terminal (C) esté en la posición vertical
con el orificio del tornillo (en el cuello de
la cubierta terminal) en la parte superior,
fije la cubierta terminal (C) a la pared 
lateral.

NOTA:

El orificio del tornillo más

cercano a la pared en el «cuello» de la
cubierta terminal está en la parte superior,
como se ilustra. 

Repita el mismo paso

para la otra cubierta terminal (C).

En vous assurant que l’embout (C) est en
position verticale, le trou de vis (dans la
gorge de l’embout) se trouvant sur le
dessus, fixez l’embout (C) au mur latéral.

REMARQUE :

le trou de vis dans la « gorge »

de l’embout le plus près du mur se trouve
sur le dessus, comme indiqué. 

Répétez

l’opération pour l’autre embout (C).

Then fasten the tube asembly to the 
endcaps (C) using allen wrench (H), 
as shown.

Asegure el ensamble de tubos a las
cubiertas terminales (C) con una llave
allen (H), del modo ilustrado.

Fixez les tubes assemblés aux embouts (C)
à l’aide de la clé hexagonale (H), comme
indiqué.

8.

E

E

E

www.zennahome.com     IS033941-I7

Содержание 33941WW

Страница 1: ...ficie suave para evitar que se rayen Si faltaran piezas llame a nuestro n mero gratuito 1 800 892 3986 entre las 8 00 a m 5 00 p m hora del este de lunes a viernes o cont ctenos a trav s de nuestro si...

Страница 2: ...ntage G 8 wall anchors 8 Anclas para pared 8 chevilles murales E 4 set screws 4 tornillos de fijaci n 4 vis de r glage C 2 end caps 2 cubiertas terminales 2 embouts H 1 allen wrench for use with set s...

Страница 3: ...8 de profundidad Mida la ba era desde la pared posterior hasta aproxi madamente el centro del labio o borde de la ba era como se muestra Mida la ba era desde la pared lateral hasta aproximadamente el...

Страница 4: ...od Be sure to cut the end of straight tube B that does not have a hole This end of the tube will go into the end cap Si desea acortar el tubo para la ducha Aseg rese de cortar el extremo del tubo rect...

Страница 5: ...shown NOTE Line up the holes by turning one of the tubes Fasten the 3 tubes together DO NOT OVERTIGHTEN Deslice los tubos A y B sobre el tubo con ahusamiento I como se ilustra NOTA Alinee los orificio...

Страница 6: ...terminal orientados hacia el interior de la ba era Alinee la parte inferior de cada cubierta terminal C con la l nea que traz Marque las ubicaciones para los tornillos de montaje F en la pared a trav...

Страница 7: ...for drywall anchor installation Use a 1 8 in 3mm drill bit for direct stud installation If installing into a material other than drywall or into stud consult a professional for proper installation NOT...

Страница 8: ...a la pared en el cuello de la cubierta terminal est en la parte superior como se ilustra Repita el mismo paso para la otra cubierta terminal C En vous assurant que l embout C est en position vertical...

Страница 9: ...ci n y a su exclusiva discreci n proporcionar un reemplazo del mismo o de un producto sustancialmente similar Este reemplazo constituir el nico recurso exclusivo con respecto a reclamos bajo garant a...

Отзывы: