background image

ELECTRICAL REQUIREMENTS 

Before you insert the plug into the wall socket make sure that the voltage and the frequency shown in the 
rating plate inside the appliance corresponds to your electricity supply. 
Rating label is on the left hand side of fridge inner liner. 

WARNING:


When positioning the appliance ensure the supply cord is not trapped or damaged. 
We recommend that this appliance is connected to the mains supply via a suitable switched and fused 
socket in a readily accessible position. 
Should the mains lead of the appliance become damaged or should it need replacing at any time, it must 
be replaced by a special purpose made mains lead which can only be obtained from a 

zenith

 Authorised 

Service Agent. 


WARNING! THIS APPLIANCE MUST BE EARTHED 

If the fitted moulded plug is not suitable for your socket, then the plug should be cut off and an appropriate 
plug fitted. Destroy the old plug which is cut off as a plug with bared cord could cause a shock hazard if 
inserted into a socket elsewhere in the house. 
The moulded plug on this appliance incorporates a 13 A fuse. Should the fuse need to be replaced an 
ASTA approved BS 1362 fuse of the same rating must be used. Do not forget to refit the fuse cover. In the 
event of losing the fuse cover the plug must not be used until a replacement fuse cover has been fitted. 
Colour of the replacement fuse cover must be the same colour as that visible on the pin face of the plug. 
Fuse covers are available from any good electrical store. 

WARNING:

 Do not locate extension sockets or charging transformers/power supplies or Lithium-Iron 

battery operated products adjacent to the compressor as they could overheat. 


IMPORTANT! FITTING A DIFFERENT PLUG 

As the colours of the wires in the mains lead of this appliance  
may not correspond with the coloured markings identifying the  
terminals in your plug proceed as follows: 
(See diagram). 
1. Connect the green-yellow or green (Earth) wire to the  
terminal in the plug marked 'E' or with the symbol        or  
coloured green and yellow or green. 
2. Connect the blue (Neutral) wire to the terminal in the plug 
marked 'N' or coloured black. 
3. Connect the brown (Live) wire to the terminal in the plug  
marked 'L' or coloured red. 
With alternative plugs a 13 A fuse must be fitted either in the plug  
or adaptor or in the main fuse box. If in doubt contact a qualified electrician. 


TRANSPORTATION INSTRUCTIONS 

1. The appliance should be transported only in an upright position. The packing as supplied must be intact 
during transportation. 
2. If transported horizontally, leave to stand upright for at least 

hours before switching on, to allow 

compressor oil to settle. 
3. Failure to comply with the above instructions could result in damage to the appliance, for which the 
manufacturer will not be held liable. 
4. The appliance must be protected against rain, moisture and other atmospheric influences. 
5. When positioning your appliance take care not to damage your flooring, pipes, wall coverings etc. Do 
not move the appliance by pulling by the door or handle. 
6. Empty any water in the drain tray before moving. See section „Defrosting” and „Care & cleaning” for 
further information. 
7. Make sure that the defrost water pipe at the back of the product is fixed to the plastic evaporating pan on 
the top of the compressor, to avoid defrost water spillage on the floor. 

Important! 

•  Care must be taken while cleaning/carrying the appliance not to touch the bottom of the condenser metal 
wires at the back of the appliance, as this could cause injury to fingers and hands. 
 

Содержание ZCS3552W

Страница 1: ...en Instruction Manual ZCS3552W...

Страница 2: ......

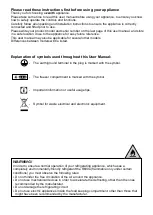
Страница 3: ...xplanation of symbols used throughout this User Manual The earth ground terminal in the plug is marked with the symbol The freezer compartment is marked with the symbol Important information or useful...

Страница 4: ...is appliance in an unheated cold room E g garage conservatory annex shed out house etc See Installation Instructions on page 4 for further information To obtain the best possible performance and troub...

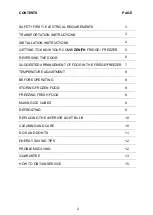
Страница 5: ...ER 5 REVERSING THE DOOR 6 SUGGESTED ARRANGEMENT OF FOOD IN THE FRIDGE FREEZER 7 TEMPERATURE ADJUSTMENT 8 BEFORE OPERATING 8 STORING FROZEN FOOD 8 FREEZING FRESH FOOD 8 MAKING ICE CUBES 9 DEFROSTING 9...

Страница 6: ...erheat IMPORTANT FITTING A DIFFERENT PLUG As the colours of the wires in the mains lead of this appliance may not correspond with the coloured markings identifying the terminals in your plug proceed a...

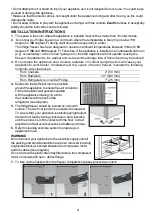
Страница 7: ...diators or in direct sunlight as this will cause your appliance to work harder If installed next to a source of heat or freezer maintain the following minimum side clearances From Cookers 2 50 mm From...

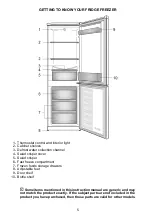
Страница 8: ...cover 5 Salad crisper 6 Fast freeze compartment 7 Frozen foods storage drawers 8 Adjustable feet 9 Door shelf 10 Bottle shelf C Some items mentioned in this instruction manual are generic and may not...

Страница 9: ...and reposition the bottom hinge bushing from freezer door 10 13 Carefully tilt the appliance on its back 11 You may need somebody to help you 14 Take off lower hinge 12 15 Unscrew the screw level 13...

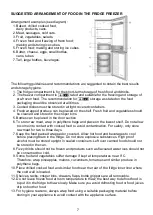
Страница 10: ...e on the lowest shelf Do not allow to come into contact with cooked food to avoid contamination For safety only store raw meat for two to three days 7 Keep the food packed wrapped or covered Allow hot...

Страница 11: ...ot a defect 7 We recommend setting the thermostat knob midway and monitor the temperature to ensure the appliance maintains desired storage temperatures See section Temperature Control and Adjustment...

Страница 12: ...be cleared with a pipe cleaner or pushing the special plastic plunger provided down the drain tube 2 Check that the tube is permanently placed with its end in the collecting tray on the compressor to...

Страница 13: ...f the appliance is not going to be used for a long period of time switch it off remove all food clean it and leave the door ajar 7 Any dust that gathers on the condenser which is located at the back o...

Страница 14: ...minutes before serving Don t Store bananas in your fridge compartment Don t Store melon in your fridge It can be chilled for short periods as long as it is wrapped to prevent it flavouring other food...

Страница 15: ...and ensure they are closed properly after each opening 4 Defrost frozen food in the fridge compartment so that frozen food acts as an ice pack to assist cooling in the fridge PROBLEM SOLVING If the a...

Страница 16: ...Zenith Approved Engineer to carry out the repair What is not covered Transit and delivery damage Cabinet or appearance parts including but not limited to control knobs flaps and handles Accessories a...

Страница 17: ...physical or verbal abuse in the course of carrying out their duties Optional extras where available i e extendable feet are supplied on a chargeable basis only Does Zenith offer replacements This is a...

Страница 18: ...courts of that location will apply HOW TO OBTAIN SERVICE Please keep your purchase receipt or other proof of purchase in a safe place you will need to have it should the product require attention unde...

Страница 19: ...instructions contained within the extended guarantee agreement document otherwise please call the appropriate number above where service can be obtained at a charge Should you experience any difficult...

Страница 20: ...4578338804_AA EN...

Отзывы: