background image

3

595-5679-08

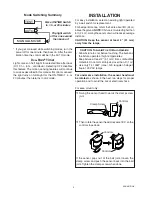
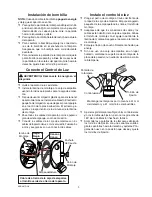
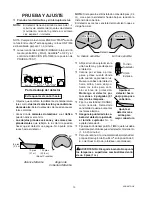
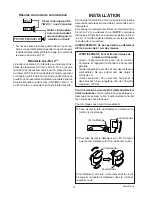
Keep lamps at least 2" (51 mm) from the 

sensor and 2" (51 mm) from combustibles.

Lock Nuts

Mount the Light Control

  Place  the  mounting  bolt  through  the  front  of  the 

junction box cover. Push the small gasket hole over 
the mounting screw.

  Make sure the wire connectors and wires are inside 

the junction box. Align the mounting screw with the 
center hole in the mounting strap. Secure the fixture 
to the mounting strap.

  Push the rubber plug firmly into place.

  If a wet location junction box was not used, caulk 

the wall plate mounting surface with silicone weather 
sealant.

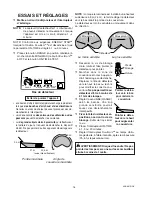
Lamp Shade

Set Screw

Bulb Installation

NOTE: When re-lamping, turn power off and let the 
fixture cool.

  To  remove  lamp  shade,  loosen  set  screw  2  full 

turns with a small flat-head screwdriver. Turn shade 
counterclockwise and remove.

  To remove bulb, pull straight out of fixture.

  To replace bulb, push bulb pins into lamp socket. 

Check that the bulb is seated properly.

  To reinstall lamp shade, place shade on fixture and 

align notches on shade with tabs on fixture. Turn 
clockwise. Tighten set screw firmly.

  Adjust the lamp holders by loosening the lock nuts, 

but do not rotate the lamp holders more than 180° 
from the factory setting.

  Adjust lamp shades by loosening the set screws 

several  turns,  turn  shades  counterclockwise  and 
remove. Reinstall the shades in the desired position 
and tighten set screws.

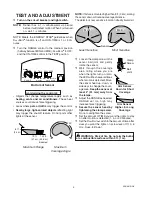
❒ 

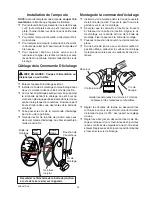
Remove the existing light fixture.

  Install the mounting strap as shown using two screws 

that fit your junction box.

  The plastic hanger can be used to hold the fixture 

while  wiring. The  small  end  of  the  plastic  hanger 
can be threaded through the hole in the center of 
the cover plate. The small end then goes into one 
of the slots on the mounting strap.

❒ 

Route  the  light  control’s  wires  through  the  large 
gasket holes.

   Twist the junction box wires and fixture wires together 

as shown. Secure with wire connectors.

White to 
White

Black to 
Black

Junction box ground wire to 
green ground screw on fixture.

Gasket

Mounting 

Strap

Mounting 

Bolt

Rubber 

Plug

Wire the Light Control

 WARNING: Turn  power  off  at  circuit  breaker 

or fuse.

Содержание SL-5597-BZ-E - Heath - Quartz Halogen Motion-Sensing Twin Security...

Страница 1: ...d on wait about 1 1 2 minutes for the circuitry to calibrate Requirements The light control requires 120 volts AC If you want to use Manual Mode the control must be wired through a switch Some codes r...

Страница 2: ...ue to work as described in this manual If motion is sensed the light turns on full bright for the ON TIME 1 5 or 20 minutes then returns to dim mode INSTALLATION For easy installation select an existi...

Страница 3: ...einstall lamp shade place shade on fixture and align notches on shade with tabs on fixture Turn clockwise Tighten set screw firmly Adjust the lamp holders by loosening the lock nuts but do not rotate...

Страница 4: ...control to the TEST position Motion Motion Loosen the clamp screw in the sensor ball joint and gently rotate the sensor Walk through the coverage area noting where you are when the lights turn on also...

Страница 5: ...ontrol on and off Reposition the lamps away from the sensor 2 Heatbeingreflectedfromotherobjects may be affecting the sensor Reposi tion sensor 3 Light control is in the Test mode and warmingup Flashi...

Страница 6: ...items are not covered by this warranty Unauthorized service or modifica tion of the product or of any furnished component will void this warranty in its entirety This warranty does not include reimbu...

Страница 7: ...MODO AUTOMATICO y MANUAL Elmodomanualfuncionas loconel interruptor ON TIME en la posici n 1 5 20 Nota Cuando lo prenda por primera vez espere 1 1 2 minutos para que el circuito se claibre Requisitos E...

Страница 8: ...es que detectan movimiento continuar n funcionando como se descri ben en este manual Si detecta movimiento la luz se prendecontodosuresplandorporeltiempodeduraci n o de ON TIME 1 5 20 minutos y luego...

Страница 9: ...ntalla de la l mpara afloje el tornillo prisionerodando2giroscompletosconunpeque o destornillador de cabeza plana Gire la pantalla hacia la izquierda y qu tela Para quitar la bombilla h lela derecho h...

Страница 10: ...alefacci n y acondiciona dores de aire Estas fuentes de calor pueden causar falsas alarmas Areas donde animales dom sticos o el tr fico puedan activar el control Los objetos grandes cercanos y de colo...

Страница 11: ...uego permanece apagada en la fase Manual SINTOMA La luz no se enciende La luz se prende durante el d a La luz se prende sin ninguna raz n aparente La luz se apaga muy tarde en la calibraci n del Anoch...

Страница 12: ...LIDAD O QUE LOS PRODUCTOS SE ADAPTEN PARA CUALQUIER PROP SITO O USO EN PARTICULAR Y ESPECIFICAMENTE EN LUGAR DE TODOS LOS DA OS ESPECIALES INDIREC TOS INCIDENTALES Y CONSECUENTES LA REPARACI N O EL RE...

Страница 13: ...ENT Revient au mode automatique au lever du soleil ON TIME TEST 1 5 20 nouveau en circuit hors circuit pendant 1 seconde puis Amener l interrupteur de temps en circuit ON TIME la position cor responda...

Страница 14: ...toutefoisdefonctionnertelqued critdansce guide Si un mouvement est d tect la lumi re s allume pleine intensit pour le temps ON TIME choisi 1 5 ou 20 minutes puis revient en mode faible intensit INSTAL...

Страница 15: ...l appareil refroidisse Pour enlever l abat jour desserrer la vis de blocage sur 2 tours complets avec un petit tournevis t te plate Tourner l abat jour dans le sens antihoraire et l enlever Pourretire...

Страница 16: ...leur peuvent provoquer des d clenchements intempestifs vers des endroits o des animaux des v hicules ou des passants peuvent d clencher la commande sur de grands objets clairs proximit qui r fl chisse...

Страница 17: ...e manuel SYMPT ME Les lampes ne s allument pas Les lampes s allu ment le jour Les lampes s allu ment sans raison apparente L clairage s al lume trop tard sous le r glage cr pus cule aube CAUSE POSSIBL...

Страница 18: ...TION DE CONVENANCE LA COMMERCIALISATION OU L EFFET QUE LES PRODUITS CONVIENNENT UN BUTOU UNEUTILISATIONPARTICULI RE ETSP CIFIQUEMENTDETOUSDOMMAGESSP CIAUX DIRECTS INDIRECTS OU SECONDAIRES LE REMPLACEM...

Страница 19: ...__ _____________________________ _____________________________ _____________________________ _____________________________ _____________________________ _____________________________ _________________...

Страница 20: ...favor guarde su recibo de venta fechado se lo requiere para cualquier solicitud de garant a Veuillez conserver le re u portant la date d achat vous en aurez besoin pour toutes vos demandes li es la ga...

Отзывы: