background image

- 9 -

ADJUSTMENT INSTRUCTIONS

1. Application Object

These instructions are applied to MC-021B chassis.

2. Notes

(1) Because this is not a hot chassis, it is not necessary to use

an isolation transformer. However, the use of isolation
transformer will help protect test instrument.

(2) Adjustment must be done in the correct order.
(3) The adjustment must be performed in the circumstance of

25±5°C of temperature and 65±10% of relative humidity if
there is no specific designation.

(4) The input voltage of the receiver must keep 120V±10%,

50/60Hz in adjusting.

(5) The receiver must be operated for about 15 minutes prior

to the adjustment. But adjusting on the board can be done
in jig state right away.

(6) Signal : The standard color signal is approved in

65±1dBµV.
The standard color signal means digital pattern signal.

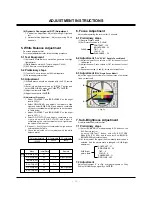
3. Screen voltage Adjustment

3.1 Preliminary steps

(1) Turn the power supply of the set on.
(2) The set must be operated for about 15 minutes prior to the

adjustment.

3.2 Adjustment

(1) Adjust in the condition of no RF signal.
(2) Press “ADJ” or “SVC” button on the remote control to make

one horizontal line.

(3) Turn the Screen volume not to see one horizontal line and

turn oppositely until it starts to display.

4. Purity and Convergence Adjustment

4.1 Purity Adjustment 

(1) Preliminary steps

1. Receive Red Raster Pattern.
2. Degauss CPT and Cabinet with a degaussing coil

(2) Horizontal Line Adjustment

1. Pre-adjust Static Convergence(STC) with 4-pole & 6-

pole magnet.

2. Check if the beam lands at mask hole by setting two 2-

Pole magnets in opposite direction repectively.

3. If not, adjust 2-Pole magnet so the beam lands at mask

hole accurately.

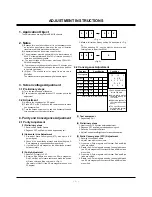
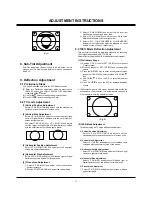
(3) Purity Adjustment

1. Adhere DY closely to CRT.
2. Receive Red Pattern and adjust the 2-Pole magnet so

Red Color Bar as to locate center and make the portion
of Green color and Blue color same. <Fig. 1>
(Be careful of HALO if two 2-Pole magnet are open over
30 degree)

3. Make a full screen Red by pulling DY back slowly. <Fig.

2>
(When adhering DY, use the electric driver of which
turning force is lower than 22Lb)

4.2 Convergence Adjustment

(1) Test equipment

1. Degaussing Coil

(2) Preliminary steps

1. Heat run over 15 minutes before adjustment.
2. Degauss CPT and Cabinet with degaussing coil.
3. Rececive Cross Hatch Pattern.
4. Adjust Contrast and Brightness for easy observation.

(3) Static Convergence (STC) Adjustment

1. Receive Crosshatch Pattern.
2. Adjust Focus with focus volume.
3. Open two 4-Pole magnets until vertical Red and Blue

lines are unified.

4. Rotate the 4-Pole magnets keeping the angle between

two 4-Pole magnets until horizontal Red and Blue lines
are unified.

5. Open two 6-Pole magnets until vertical Red and Blue

lines are unified.

6. Rotate the 6-Pole magnets keeping the angle between

two 6-Pole magnets until horizontal Red and Blue lines
are unified.

G

R

B

G

R

B

R

G

R

B

<Fig. 1>

<Fig. 2>

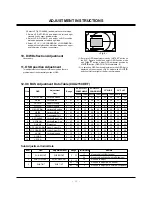
Location

C

L,R,X,Y

A,B,D,E

3,6,9,12 

2,4,8,10

Convergence

Colors : R/B, R/G, B/G <Unit : mm>

*

Each indicator stands

for the 30ø circle.

O

Adjust after warming

the Braun tube up for

15 minutes.

O

Adjustment position is

the center of the circle

above.

O

The specification of

horizontal and vertical

direction is equal

10       12        2

A   X   B

9    L   C   R   3

D  Y   E

8        6         4

Condition

Specification

Content

Colors

Colors

Colors

Colors

Colors

29"

0/0.8

0.8 

0.8

1.0

1.4

Содержание C30W46

Страница 1: ...Series CONTENTS Description of Controls 5 Specifications 8 Adjustment Instructions 9 Diagrams 26 Parts List 29 Schematics Published Oct 2003 by Technical Publications LG Electronics USA Inc 201 James...

Страница 2: ...ical evidence of damage or deterioration to parts and components for frayed leads or damaged insulation including the AC cord and replace if necessary 5 No lead or component should touch a receiving t...

Страница 3: ...To verify the Shutdown Circuit is operating properly proceed with the following procedure Supply 7 5V DC between R446 and R448 on the High Voltage Deflection PCB If there is no raster and set goes int...

Страница 4: ...FICATIONS 8 ADJUSTMENT INSTRUCTION 9 FEATURE OF MICOM FUNCTION 13 TROUBLESHOOTING 17 PRINTED CIRCUIT BOARDS 21 BLOCK DIAGRAM 26 EXPLODED VIEW 28 EXPLODED VIEW PARTS LIST 29 REPLACEMENT PARTS LIST 30 S...

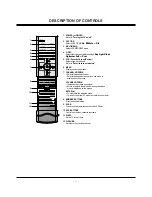
Страница 5: ...vorite channels Refer to Favorite channel memory 6 MENU Displays on screen menus 7 CHANNEL UP DOWN Selects the desired channel Selects the desired menu option when menu is displayed on the screen VOLU...

Страница 6: ...ach channel 17 MTS Selects MTS sound Mono Stereo or SAP 18 MUTE Press to remove sound Press again to restore sound 19 MEMORY ERASE To memorize or erase a channel 20 PIP Picture in Picture PIP DW Selec...

Страница 7: ...luminates red bright when the TV is in standby mode Refer to Turning the TV on off 22 REMOTE CONTROL SENSOR This is a simplified representation of the front panel on off tv video menu vol ch 1 21 22 1...

Страница 8: ...W46 Power requirements AC 120 V Television system NTSC Television channels VHF 2 13 UHF 14 69 Cable 01 125 Power consumption See the back of the TV External antenna impedance 75 Audio output 7W 7W SPE...

Страница 9: ...pposite direction repectively 3 If not adjust 2 Pole magnet so the beam lands at mask hole accurately 3 Purity Adjustment 1 Adhere DY closely to CRT 2 Receive Red Pattern and adjust the 2 Pole magnet...

Страница 10: ...oordinates in High and Low color satisfies the Table 6 Check the adjusted color coordinates with the white balance meter 6 Focus Adjustment Adjust after operating the receiver for 15 minuets 6 1 Preli...

Страница 11: ...Select VP 9 PIN AMP and adjust until Pincushion distortion disspears on left and right side 5 Select VP 10 11 UP CORNERPIN LO CORNERPIN and adjust until pincushion distortion dispears on upper and lo...

Страница 12: ...11 12 13 14 3 1 2 SUB TINT SUB BRIGHT SUB CONTRAST SUB TINT 24 39 23 40 SUB BRIGHT 0 63 SUB CONTRAST 0 15 V POSITION V SIZE UP VLIN LO VLIN H POSITION H SIZE PIN PH AFC ANGLE AFC BOW PIN AMP UP CORNER...

Страница 13: ...4 63 62 61 60 59 58 57 56 55 54 53 52 51 50 49 48 47 46 45 44 43 42 41 40 39 38 37 36 35 34 33 Hsync Vsync P40 AD4 P41 INT2 P42 TIM2 P43 TIM3 P24 AD3 P25 AD2 P26 AD1 P27 AD5 P00 PWM4 P50 PWM7 P01 PWM5...

Страница 14: ...ut Polarity Active L O Vertical Sync Signal Input O Input Polarity Active L O Inputs C Data of Chroma picture Data is input by A D O For remote control input uses external interupt O Detects Power of...

Страница 15: ...IC related to controlling every IIC O 480I P at the time of signal one High 1080I at the time of signal one Low O Sound Mute O Easy_Link Rx Input Terminal O For adjusting IIC Active Low MICOM doesn t...

Страница 16: ...e sub TILT 1 TILT 2 N C SCREEN N C Ys OSD B OSD G OSD R O Outputs sound data of sub picture Using PWM O Indicates for degaussing High Low O Degaussing Output Terminal PWM N C O Horizontal Line regulat...

Страница 17: ...17 TROUBLE SHOOTING...

Страница 18: ...18 TROUBLE SHOOTING...

Страница 19: ...19 TROUBLE SHOOTING...

Страница 20: ...20 TROUBLE SHOOTING...

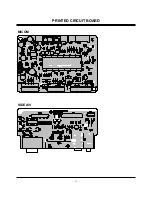
Страница 21: ...21 PRINTED CIRCUIT BOARD MAIN...

Страница 22: ...22 PRINTED CIRCUIT BOARD PROGRESSIVE TOP PROGRESSIVE BOTTOM...

Страница 23: ...23 MICOM PRINTED CIRCUIT BOARD SIDE A V...

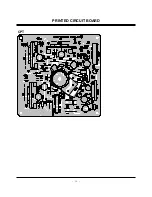
Страница 24: ...24 CPT PRINTED CIRCUIT BOARD...

Страница 25: ...25 CONTROL PRINTED CIRCUIT BOARD...

Страница 26: ...26 BLOCK DIAGRAM MAIN SUB MSP3440 L R TDA7297 MICOM M37280 CPT VM TDA6111 FRONT END SRC VSP9427 144pin QFP 4H COMB...

Страница 27: ...27 Option BLOCK DIAGRAM...

Страница 28: ...28 EXPLODED VIEW 510 150 170 112 912 943 400 300 120 123 122 124 121 320 600 330 310 501 560 503 550 520 580 504...

Страница 29: ...CONTROL 32XF70 ABS HF 380 6KEY 102 320 320 062G SPRING COIL STSC 304 D15 20 NON 330 5020V00506A BUTTON 400 3809V00256Z BACK COVER ASSEMBLY RU 32FZ13 NON MC021B 501 4810V00379K BRACKET MAIN 28FZ10RX MC...

Страница 30: ...O DESCRIPTION D850 HIC951 IC01 IC02 IC03 IC04 IC101S IC1601 IC190 IC201S IC202S IC203S IC204S IC205S IC206S IC207S IC301 IC401 IC401S IC501S IC601 IC650 IC652 IC801 IC802 IC851 IC853 IC854 IC856 IC901...

Страница 31: ...SEC GSIB660 5S 600V 6A 180A LED ASSY MC51A M 8 9 ZENERS GDZ5 1B ZENERS HZT33 ZENERS MTZJ6 2B ZENERS MTZJ6 2B ZENERS MTZJ6 2B LOCA NO PART NO DESCRIPTION ZD1206 ZD1601 ZD351 ZD403 ZD447 ZD601 ZD650 ZD9...

Страница 32: ...M 2 2UF STD 50V 20 1UF STD 50V M 1UF STD 50V M 0 0015UF D 100V 10 2 2UF STD 50V 20 LOCA NO PART NO DESCRIPTION C333 C338 C339 C340 C348 C350 C401 C402 C403 C404 C405 C406 C408 C409 C411 C412 C413 C414...

Страница 33: ...0 33UF J 470UF STD 25V M R 680PF 2KV 10 10 LOCA NO PART NO DESCRIPTION C806 C807 C808 C809 C812 C813 C814 C815 C816 C817 C818 C821 C841 C842 C851 C852 C853 C854 C855 C856 C857 C858 C859 C861 C862 C863...

Страница 34: ...O PART NO DESCRIPTION P602B P902B F851 F853 F855 F856 FB854 FR359 FR360 FR441 FR442 FR443 FR448 J111 J315 J625 J625 J918 L008 L1203 L1204 R009 R010 R013 R031 R033 R034 R035 R036 R037 R038 R039 R041 R0...

Страница 35: ...1K OHM 1 6 W 1 00 3 9K OHM 1 6 W 5 10K OHM 1 6 W 5 LOCA NO PART NO DESCRIPTION R403 R403 R404 R405 R406 R407 R408 R409 R410 R412 R413 R414 R415 R416 R417 R418 R419 R420 R421 R422 R423 R424 R425 R426 R...

Страница 36: ...3K OHM 1 6 W 5 00 910 OHM 1 6 W 5 00 1 0M OHM 1 2 W 5 LOCA NO PART NO DESCRIPTION R917 R918 R921 R929 R930 R938 R946 R947 R950 R951 R952 R953 R954 R955 ZD851 SG904 SG905 SG906 SG907 SG908 SW1101 SW115...

Страница 37: ...501NT FILTER EMC FBMH3216 HM501NT FILTER EMC FBMH3216 HM501NT FILTER EMC SQE2930 10MH FILTER EMC SQE3535 20MH RESONATOR CRYSTAL HC49U 8 000MHZ RESONATOR CRYSTAL HC49U 20 250MHZ RESONATOR CRYSTAL HC49U...

Страница 38: ......

Страница 39: ......

Страница 40: ......

Отзывы: