background image

3368-O

O P E R AT I O N         T V   F U N DA M E N TA L S

P A G E   1 3

Introducing
you to the
basics of your
Entertainment
Machine.

Basic Television Operation

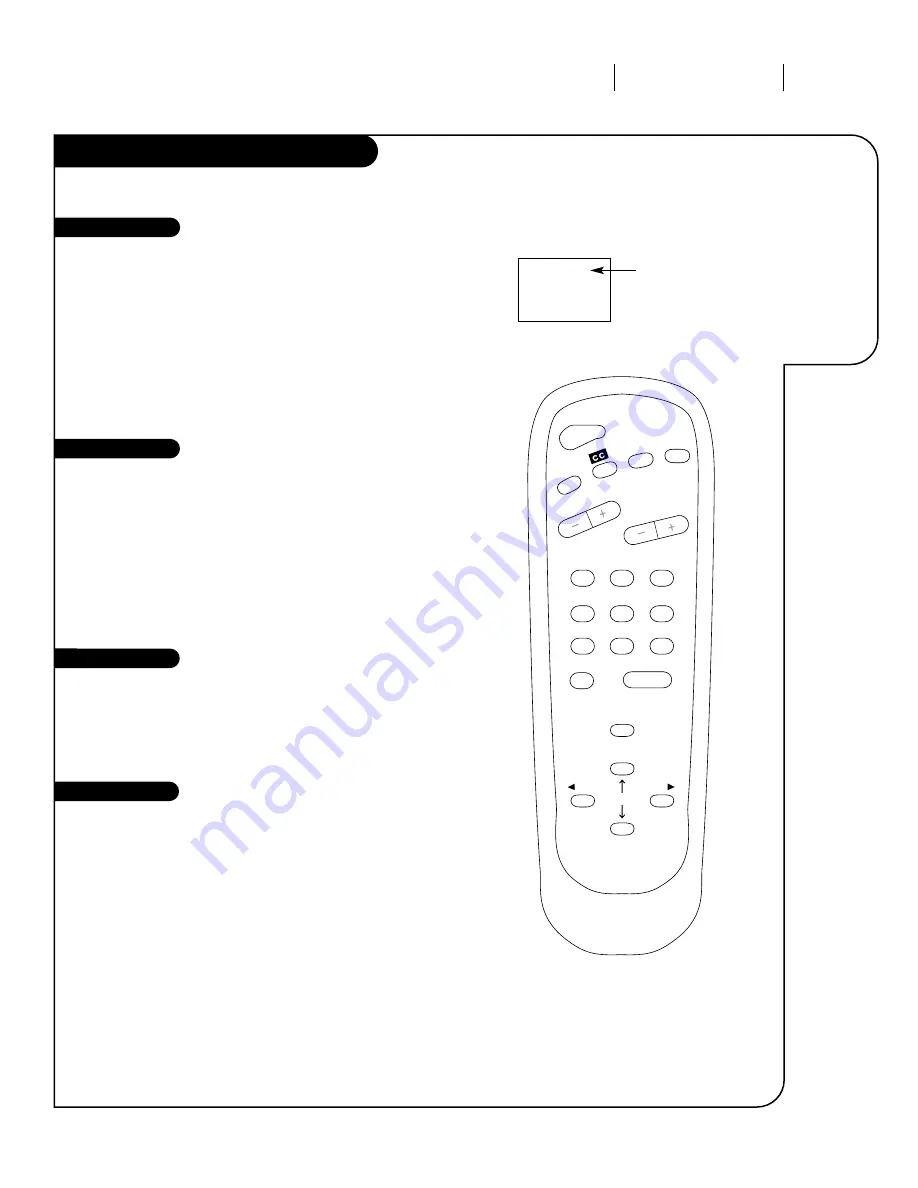
Pressing the ENTER key will show the Channel display; the currently
selected channel.

To view the current input source, press ENTER on your remote.
The Channel display should appear in the upper-right hand cor-
ner of the screen.  If the display reads ‘Video,’ then the source
is an A/V input.  If the display reads a channel number, then
the source is your Cable or Antenna. 

CHANNEL UP/DOWN arrows: Use these arrows to change the channels.
Auto Program will have found all channels available to you.

NUMBER Key Pad: To skip to any channel, enter the number of the 
channel using the NUMBER key pad, then press ENTER. Press “0” first
for channel numbers under 10.

FLASHBACK: To instantly return to the last channel viewed, 
press FLASHBACK.

Volume Right/Left: To adjust the volume level, use the volume
Right/Left arrows.  To silence your TV instantly, press MUTE. To get the
sound back, press MUTE again.  

Use the Source menu to choose either Ant/Cable or Video as the
“Source” of the TV picture and sound.

Channel/Time

Channel Changing

Source

02

Channel or Video
(Indicates Source)

1

2

3

4

5

6

7

0

8

ENTER

9

POWER

TIMER

FLSHBK

MUTE

VOLUME

CHANNEL

MENU

ADJ

ADJ

  SELECT

Audio

Содержание A13P02D

Страница 1: ...machine numbers A13P02D Thanks for choosing Zenith h o o k u p d i r e c t o r y i n d e x y o u r o n s c r e e n m e n u s p a g e 26 p a g e 14 p a g e 3...

Страница 2: ...o p e r a t i n g g u i d e w a r r a n t y Thanks for choosing Zenith p a g e 26 p a g e 14 p a g e 3...

Страница 3: ...und shall be connected to the grounding system of the building as close to the point of the cable entry as practical This equipment has been tested and found to comply with the limits for a Class B di...

Страница 4: ...COVER OR BACK NO USER SERVICEABLE PARTS INSIDE REFER SERVICING TO QUALIFIED SERVICE PERSONNEL WARNING TO PREVENT FIRE OR SHOCK HAZARDS DO NOT EXPOSE THIS PRODUCT TO RAIN OR MOISTURE POWER CORD POLARI...

Страница 5: ...cribes what you want to do then go to that page number Note Design and specifications are subject to change without prior notice Cable TV wall jack Cable box In Out Cable TV wall jack Cable box In Out...

Страница 6: ...to which page to go to for proper hook up of your Entertainment Machine Hook Up Directory IMPORTANT Cable TV wall jack Cable box In Out Cable TV wall jack Cable box In Out Antenna only Cable only Ante...

Страница 7: ...rough the middle and it screws onto the threaded jack on the back of your TV 300 TO 75 OHM ADAPTER A small device that connects a two wire 300 ohm antenna to a 75 ohm RF jack They are usually about an...

Страница 8: ...5 ohm Adapter TV back panel expanded view Antenna Typical TV back Typical TV back If you have a 75 ohm RF cable then you don t need any adapters Remember when screwing RF cables onto jacks clockwise t...

Страница 9: ...our cable box to change channels Remember when screwing RF cables onto jacks clockwise tightens and counterclockwise loosens If you re using a cable box Auto Program page 8 might only find the channel...

Страница 10: ...pical TV back Typical TV back If you re using a cable box leave your TV on channel 3 or 4 and use your cable box to change channels Remember when screwing RF cables onto jacks clockwise tightens and c...

Страница 11: ...nna and VCR to the TV Remember when screwing RF cables onto jacks clockwise tightens and counterclockwise loosens A V cables or adapters are not included with your Zenith Entertainment Machine Flat Wi...

Страница 12: ...Audio Video 3 4 VCR back VCR back AV panel Output switch Typical TV back Video Audio In In Connect your off air antenna and VCR to your Entertainment Machine Hook Up Antenna and VCR to the TV Remembe...

Страница 13: ...ur television tuned to channel three and use the cable box to change channels Remember when screwing in RF cables onto jacks clockwise tight ens and counterclockwise loosens No A V cables are included...

Страница 14: ...ck AV panel Output switch Typical TV back Video Audio In In Connect your VCR and Cable to your Entertainment Machine Hook Up Your Cable CATV and VCR Leave your VCR and your television tuned to channel...

Страница 15: ...nna Select Air or Cable Service 1 2 3 4 5 6 1 2 3 4 5 6 7 0 8 ENTER 9 POWER TIMER FLSHBK MUTE VOLUME CHANNEL MENU ADJ ADJ SELECT 1 2 4 3 5 Press MENU to access the feature selection Menu Using the UP...

Страница 16: ...ct the type of signal your Entertainment Machine will receive Antenna Select Air or Cable Service 1 2 3 4 5 6 1 2 3 4 5 6 7 0 8 ENTER 9 POWER TIMER FLSHBK MUTE VOLUME CHANNEL MENU ADJ ADJ SELECT 1 2 4...

Страница 17: ...the UP DOWN Select arrows choose Setup Press the RIGHT Adj arrow to access the Setup Menu Using the UP DOWN Select arrows choose Auto Program Press the RIGHT Adj arrow to begin the channel search Whe...

Страница 18: ...to Program to automatically find and store all of the stations available in your area Auto Program 1 2 3 4 5 6 1 2 3 4 5 6 7 0 8 ENTER 9 POWER TIMER FLSHBK MUTE VOLUME CHANNEL MENU ADJ ADJ SELECT 1 2...

Страница 19: ...ct as an adjustment Left Right func tion Use the VOLUME buttons to make changes or adjustments Menus disappear after five seconds To get them back push the MENU button again Your front panel may diffe...

Страница 20: ...us Front Panel Controls Menus disappear after five seconds To get them back push the MENU button again Your front panel may differ from this one but its functions are the same Lost remote You ll want...

Страница 21: ...und off and on Volume Up Down Adjusts the sound on your Entertainment Machine Channel Up Down Cycles through available channels Number Key Pad Use for direct channel entry or for on screen programming...

Страница 22: ...y do 1 2 3 4 5 6 7 0 8 ENTER 9 POWER TIMER FLSHBK MUTE VOLUME CHANNEL MENU ADJ ADJ SELECT Power Timer CC Flashback Mute Volume Up Down Channel Up Down Number Key Pad Enter Menu Select Up Down Arrows A...

Страница 23: ...EL LANGUAGE SOURCE SEL ADJ CAPTION OFF CAPTION 1 CAPTION2 TEXT 1 TEXT 2 SEL ADJ CAPTION OFF CAPTION 1 CAPTION2 TEXT 1 TEXT 2 SEL ADJ PICTURE PICTURE PREF CONTRAST BRIGHTNESS SHARPNESS COLOR TINT SEL A...

Страница 24: ...A AUTO PROGRAM CH ADD DEL LANGUAGE SOURCE SEL ADJ CAPTION OFF CAPTION 1 CAPTION2 TEXT 1 TEXT 2 SEL ADJ CAPTION OFF CAPTION 1 CAPTION2 TEXT 1 TEXT 2 SEL ADJ PICTURE PICTURE PREF CONTRAST BRIGHTNESS SHA...

Страница 25: ...s to change the channels Auto Program will have found all channels available to you NUMBER Key Pad To skip to any channel enter the number of the channel using the NUMBER key pad then press ENTER Pres...

Страница 26: ...The Channel display should appear in the upper right hand cor ner of the screen If the display reads Video then the source is an A V input If the display reads a channel number then the source is you...

Страница 27: ...r Entertainment Machine T I M E R Programs a time for your Entertainment Machine to turn itself on or off or to turn itself off after a certain amount of time Sleep Timer Automatically turns TV off af...

Страница 28: ...rview SETUP PICTURE TIMER CAPTION Descriptions of the menus on your Entertainment Machine Using the Menu key Select Up and Down arrows Adj Adjust Left and Right arrows on your remote you can access al...

Страница 29: ...e control Please refer to page 10 on work ing the menus with the buttons on the front of your Entertainment Machine If you delete a channel it isn t gone for good Just select it using the NUMBER keypa...

Страница 30: ...MENU ADJ ADJ SELECT 7 3 5 4 6 2 You can add or delete a channel without the remote control Please refer to page 10 on work ing the menus with the buttons on the front of your Entertainment Machine If...

Страница 31: ...UME CHANNEL MENU ADJ ADJ SELECT 3 5 1 2 4 6 3368 O Press MENU to access the feature selection Menu Using the UP DOWN Select arrows choose Setup Press the RIGHT Adj arrow to access the Setup Menu Using...

Страница 32: ...Choose the language you want all the menus to appear in Language Menu 1 2 3 4 1 2 3 4 5 6 7 0 8 ENTER 9 POWER TIMER FLSHBK MUTE VOLUME CHANNEL MENU ADJ ADJ SELECT 3 5 1 2 4 6 5 6...

Страница 33: ...o source s picture and sound will not appear unless it is connected and turned on 5 6 Press MENU to access the feature selection Menu Using the UP DOWN Select arrows choose Setup Press the RIGHT Adj a...

Страница 34: ...8 ENTER 9 POWER TIMER FLSHBK MUTE VOLUME CHANNEL MENU ADJ ADJ SELECT Select your viewing source Source 1 2 3 4 6 2 4 3 5 1 The video source s picture and sound will not appear unless it is connected a...

Страница 35: ...n the TV picture The more contrast the brighter the picture appears Brightness Increases or decreases amount of white in the TV picture Sharpness Raise or lower the definition of the TV picture The lo...

Страница 36: ...MUTE VOLUME CHANNEL MENU ADJ ADJ SELECT Customize the way your picture looks using the Picture menu Picture 3 1 2 4 1 2 3 4 Someone left the picture looking terrible Just choose the Preset option in P...

Страница 37: ...er Press MENU then use the DOWN Select arrow to choose TIMER Press the RIGHT Adj arrow to access the Timer menu Use the DOWN Select arrow to choose Sleep Timer Press the RIGHT LEFT Adj arrow repeatedl...

Страница 38: ...1 2 3 4 5 6 7 0 8 ENTER 9 POWER TIMER FLSHBK MUTE VOLUME CHANNEL MENU ADJ ADJ SELECT Automatically turns your Entertainment Machine off Sleep Timer 1 2 3 4 5 3 2 4 1 5...

Страница 39: ...TIMER FLSHBK MUTE VOLUME CHANNEL MENU ADJ ADJ SELECT 1 2 4 3 6 7 1 Press MENU Use the DOWN Select arrow to choose TIMER Press the RIGHT Adj arrow to access the Timer menu Use the DOWN Select arrow to...

Страница 40: ...Machine Clock Set 2 3 4 5 You can use the NUMBER keypad to simply type in the time AM or PM is still selected with the Timer key 1 2 3 4 5 6 7 0 8 ENTER 9 POWER TIMER FLSHBK MUTE VOLUME CHANNEL MENU...

Страница 41: ...U Use the DOWN Select arrow to choose TIMER Press the RIGHT Adj arrow to access the Timer menu Use the DOWN Select arrow to choose On Time Press and hold down the LEFT Adj arrow to set the hours and A...

Страница 42: ...will automatically turn on and off On Off Timer 1 2 3 4 5 6 7 0 8 ENTER 9 POWER TIMER FLSHBK MUTE VOLUME CHANNEL MENU ADJ ADJ SELECT 1 2 3 4 7 2 4 3 6 1 The On Off timer will not work until the Clock...

Страница 43: ...on Not all programming has closed captioning or text available 1 2 3 4 1 2 3 4 5 6 7 0 8 ENTER 9 POWER TIMER FLSHBK MUTE VOLUME CHANNEL MENU ADJ ADJ SELECT 3 2 4 1 5 Press MENU Use the DOWN Select arr...

Страница 44: ...Captions and Text Captions come in handy when the television is on mute Standard Closed Captioning is available using the Caption 1 option Not all programming has closed captioning or text available 1...

Страница 45: ...the Entertainment Machine on Use a quality wood cleaner and polish This will protect the Entertainment Machine from dirt and dust as well as keep the cabinet looking new If you leave your Entertainmen...

Страница 46: ...may have to reset the clock using the Clock Set menu described earlier Cabinet Cleaning Wood Cabinets Early malfunctions can be prevented Careful and regular cleaning can extend the amount of time you...

Страница 47: ...he TV is not muted Try another channel The problem may be the broadcast not your Entertainment Machine Are the Audio A V cables properly installed Are you in TV or cable tuning mode See Antenna Auto P...

Страница 48: ...ooting If all else fails unplug the TV for 5 minutes If that doesn t work call 1 847 391 8752 extension 5 between 8 30 am and 4 30 pm Central Standard Time Some quick and easy tips to fixing problems...

Страница 49: ...n external machine that amplifies sound from a television CD player VCR DVD or other A V device ANTENNA The physical receiver of television signals sent over the air A large metal piece of equipment d...

Страница 50: ...A list of definitions for words found in this guide Glossary...

Страница 51: ...Hook ups 5 7 Captions and Text Menu 22 Ch Channel Add Del 15 Clock Set 20 Front Panel Controls 10 Glossary 25 Hook Up Directory for VCRs Cable Service and Accessories 3 Language Menu 16 Maintenance 2...

Страница 52: ...Find what you want quickly Index FEATURE PAGE...

Страница 53: ...und compatible TV These speakers create a sound so real it s as if you were part of the action The convenient space saving shelf design make these speakers an ideal addition to any Home Theater System...

Страница 54: ...hat you will understand the operation of your set and how to adjust the customer controls Carry In Service Models under 21 diagonal U S A screen size must be taken to a Zenith authorized service cente...

Страница 55: ...S RESPONSIBILITY Be sure to send in the Product Registration Card We will send you an application for the Protection Plan near the expiration of the two year manufacturer s warranty on the picture tu...

Отзывы: