background image

17

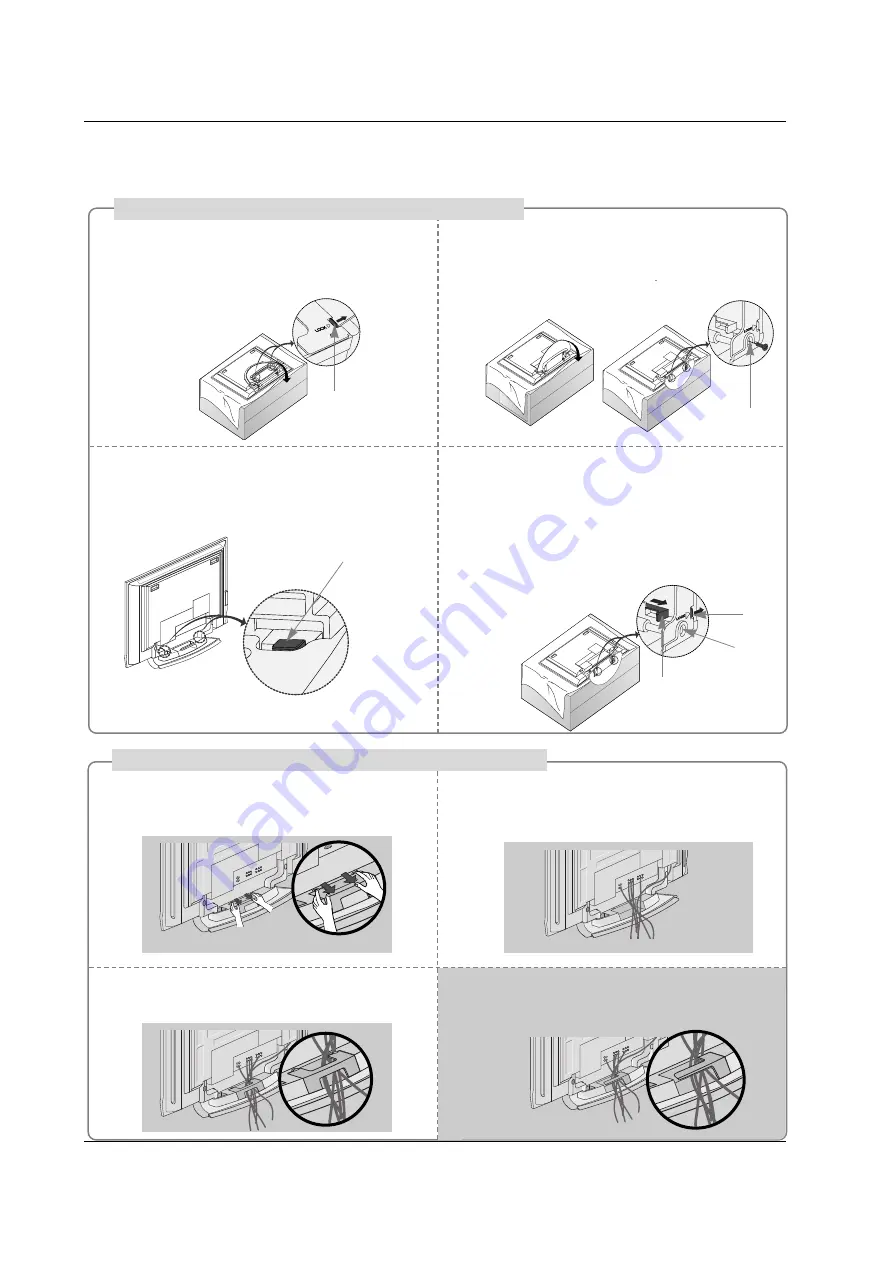
Place the set with the screen facing down on
a cushion or soft cloth as shown.
Before unfolding the stand, please make sure
two locks (A) on the bottom of the stand push
outward.

Pull the stand out as shown.
After unfolding the stand, please insert and
tighten the screws (provided as parts of the
product) in the holes (B) on the bottom of the
stand.

1

2

When connecting cables to the set, Do not
disengage the lock (C).
This may cause the set to fall, causing serious
bodily injury and serious damage to the set.

3

Basic Connection

Basic Connection

(C)

Hold the 

CABLE MANAGEMENT 

with both

hands and push it as shown.

Connect the cables as necessary.
To connect an additional equipment, see the

External equipment Connections 

section.

Reinstall the 

CABLE MANAGEMENT

as

shown.

1

2

3

* Image shown here may be slightly different from

your set.

When closing the stand for storage

- First remove the screws in the holes (B) on the bottom

of the stand. And then pull two Hooks (D) of the stand
bottom and fold the stand  into the back of the set.

- After folding, push the two Locks (A) of the stand

bottom outward.

(A)

(B)

(D)

(A)

(B)

How to use stand (For 42PC3DU/3DVU)

How to arrange the cable (For 50PC3DU)

For 60PC1D, 42PC3DU/3DVU

Arrange the cable as shown.

Содержание 42PC3DU

Страница 1: ...Basic Connection Basic Connection C Hold the CABLE MANAGEMENT with both hands and push it as shown Connect the cables as necessary To connect an additional equipment see the External equipment Connect...

Страница 2: ...eparate antennas Cable TV Wall Jack RF Coaxial Wire 75 ohm Bronze Wire Bronze Wire Turn clockwise to tighten Antenna RF Coaxial Wire 75 ohm In a poor signal area to improve picture quality purchase an...

Страница 3: ...OUTPUT SWITCH ANT OUT ANT IN HDMI DVI IN ANTENNA CABLE IN REMOTE CONTROLIN RS 232C IN CONTROL SERVICE RGB IN PC AUDIO IN RGB DVI VIDEO VIDEO AUDIO AUDIO VIDEO VIDEO AUDIO AUDIO MONO S VIDEO S VIDEO A...

Страница 4: ...to the VCR owner s manual Select AV1 input source with using the INPUT button on the remote control If connected to AV IN2 select AV2 input source Do not connect to both Video and S Video at the same...

Страница 5: ...s manual for operating instructions When connecting with a HDMI cable 1 2 3 Connect the HDMI output of the DVD to the HDMI IN 1 DVI or 2 jack on the set Select HDMI1 DVI or HDMI2 input source with usi...

Страница 6: ...he remote control If connected to COMPONENT 2 select Component 2 input source Refer to the DVD player s manual for operating instructions Component Input ports To get better picture quality connect a...

Страница 7: ...ROL SERVICE RGB IN PC AUDIO IN RGB DVI HDMI DTV OUTPUT REMOTE CONTROLIN RS 232C IN CONTROL SERVICE RGB IN PC AUDIO IN RGB DVI REMOTE REMOTE CONTROLIN CONTROLIN RS 232C IN RS 232C IN CONTROL CONTROL SE...

Страница 8: ...2C IN RS 232C IN CONTROL CONTROL SER SERVICE VICE RGB IN RGB IN PC PC AUDIO IN AUDIO IN RGB DVI RGB DVI RS 232C IN CONTROL SERVICE VIDEO AUDIO VIDEO AUDIO S VIDEO AV IN 1 AV OUT COMPONENT IN DIGITALAU...

Страница 9: ...o equipment stereo system via the Digital Audio Output Optical port CAUTION Do not look into the optical output port Looking at the laser beam may damage your vision 1 2 AV Out Setup 1 2 Connect the s...

Страница 10: ...PC When connecting with a HDMI to DVI cable 1 2 3 4 Connect the DVI output of the PC to the HDMI IN 1 DVI jack on the set Connect the audio outputs of the PC to the AUDIO IN RGB DVI jack on the set T...

Страница 11: ...attern contrast or brightness in PC HDMI DVI mode If noise is present change the PC or HDMI DVI mode to another resolution change the refresh rate to another rate or adjust the brightness and contrast...

Страница 12: ...nput this function is used After connecting RGB PC or HDMI DVI to PC input and checking the screen quality Press the ADJUST button and then use D D E E button to select Resolution POSITION SIZE or PHA...

Страница 13: ...e MUTE or VOL D D E E button Press the CH D D E E or NUMBER buttons to select a channel number The menus can be shown on the screen in the selected language First select your language On Screen Menus...

Страница 14: ...differ slightly from what is shown in this manual How to adjust the OSD screen EZ Scan Manual Scan Channel Edit DTV Signal Input Source Input Label Set ID EZ Picture Color Temperature XD Advanced Vid...

Страница 15: ...to add or delete for the channel number Press EXIT button to return to TV viewing or press MENU button to return to the previous menu 1 2 3 4 5 6 Automatically finds all channels available through an...

Отзывы: