background image

40

2-CH UND 6-CH AUDIOWIEDERGABE
2-CH (Down Mix) Audiowiedergabe für CD, SD-Karte, Aux-In und DVD

  Verwenden  Sie  die  2-CH  Audiowiedergabe  für  die  Wiedergabe  von  LPCM  und  PCM 

Signalen von CD, SD-Karte oder DVD. 

6-CH Audiowiedergabe für CD, SD-Karte und DVD

  Verwenden Sie Surround 1, um analoge, bzw. digitale 2-CH (Down Mixed) Audiosignale 

zu dekodieren. 

  Verwenden Sie Surround 2, um digitale Bitstream Audiosignale zu dekodieren. 
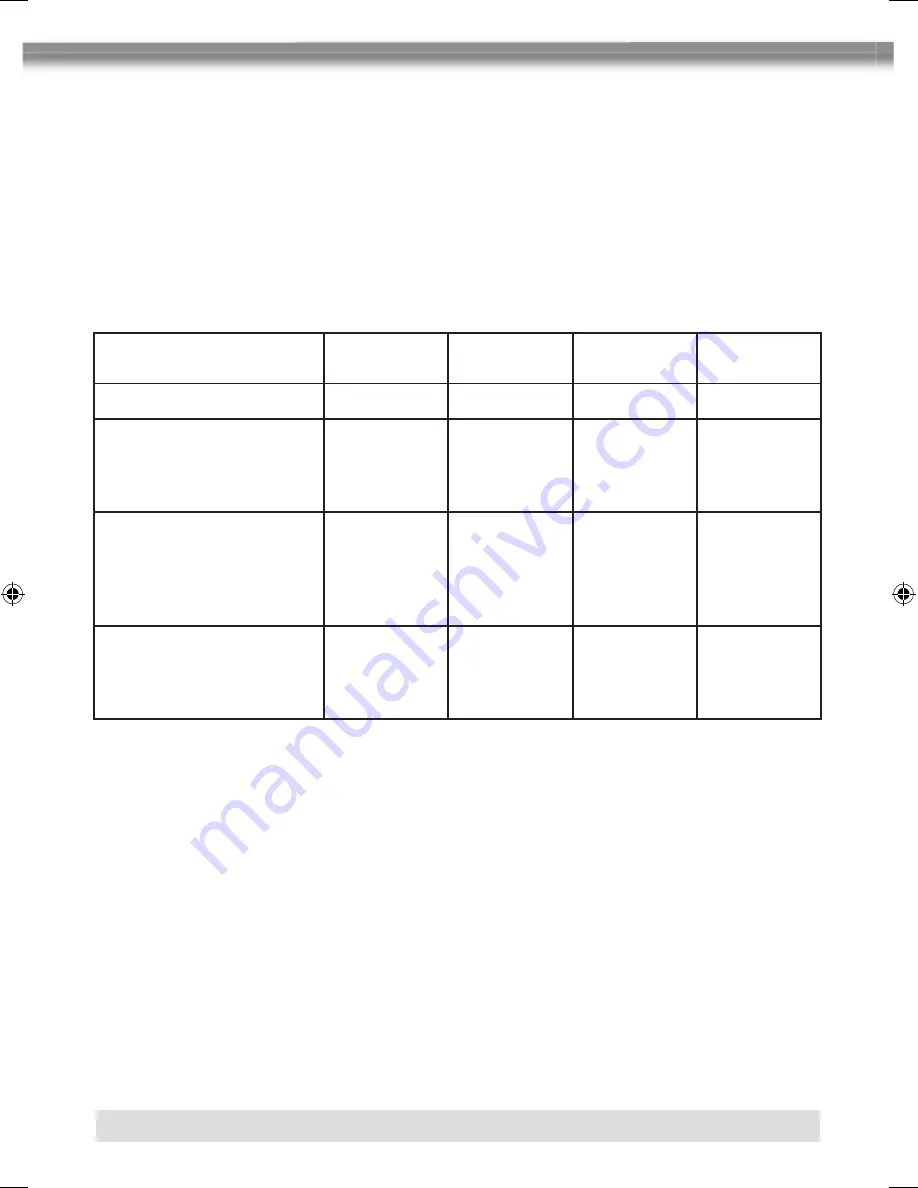
Lautsprecher 

Einstellung

Front

Lautsprecher

Rear 

Lautsprecher

Center 

Lautsprecher

Sub- 

woofer

2-CH Modus

*

*

*

Wiedergabe einer 2-CH 
Audioquelle im 6-CH 
Modus mit deaktivierter
”Surround” Funktion.

*

Wiedergabe einer 2-CH 
Audioquelle (Downmix) 
im 6-CH Modus mit 
aktivierter ”Surround” 
Funktion.

*

*

*

*

Wiedergabe einer 2-CH 
Audioquelle ) im 6-CH 
Modus mit aktivierter 
”Surround” Funktion.

*

*

*

*

ZE-MC192 Manual D+E def.indd   40

13.09.2007   17:32:25 Uhr

Содержание ZE-MC192

Страница 1: ...1 DIN DVD MONICEIVER WITH MOTORIZED 7 LCD DISPLAY ZE MC192 MODEL NO INSTRUCTION MANUAL ...

Страница 2: ...21 ALLGEMEINE AUDIOEINSTELLUNGEN 21 22 AUDIOEINSTELLUNGEN 6 CH 22 EINGABE DES SICHERHEITSCODE 23 RESET 23 STUMMSCHALTUNG MUTE 23 6 SYSTEMEINSTELLUNGEN 24 32 HAUPTMENÜ 24 BILDSCHIRMEINSTELLUNGEN 25 26 SETUP 27 28 ASP SETUP 29 31 MULTI ZONE 32 7 UKW MW TUNER 33 35 AUSWAHL DES TUNERMODUS 33 BENUTZEROBERFLÄCHE 33 34 AUSWAHL DES FREQUENZBANDES FM AM 34 AUTOMATISCHER SUCHLAUF 34 MANUELLER SUCHLAUF 34 MA...

Страница 3: ...PEG DATEIEN 55 11 BEDIENUNG DES SD KARTENLESERS 56 AUSWAHL DES SD KARTEN MODUS 56 BENUTZEROBERFLÄCHE 56 12 DAS iPOD INTERFACE 57 58 AUSWAHL DES iPOD MODUS 57 BENUTZEROBERFLÄCHE 57 58 HAUPTMENU 58 VIDEO WIEDERGABE 58 13 DAS BLUETOOTH INTERFACE 59 62 AUSWAHL DES BLUETOOTH MODUS 59 BENUTZEROBERFLÄCHE 59 60 VOR DER INBETRIEBNAHME DER BLUETOOTH FUNKTION 59 DER BLUETOOTH INDIKATOR 60 TELEFONBUCH 60 VERB...

Страница 4: ...s iPod ermöglicht verfügt der ZE MC192 zusätzlich über die Möglichkeit die separat erhältlichen Geräte ZE DVBT25 DVB T Tuner ZE NA100 Navigationsrechner und ZE NA150 Portables Navigationssystem direkt anzuschließen und über den Touchscreen des ZE MC192 zu steuern Ferner können Sie mit der Bluetooth Funktion ihre Telefongespräche entgegen nehmen oder selbst einen Anruf tätigen GrößterWertwurdebeide...

Страница 5: ...nsspeicherplätze 18 FM 12 AM Radio Daten System RDS A V ANSCHLÜSSE 2 x Videoausgänge NTSC 1 x Videoeingang 1 x Videoeingang für eine Rückfahrkamera mit automatischer Umschaltfunktion Analoge 5 1 Vorverstärkerausgänge Front Rear Subwoofer und Center 1 x 2 CH Vorverstärkerausgänge ohne Lautstärkeregelung 1 x Aux In Stereo SONSTIGE MERKMALE Integrierte iPod Schnittstelle iPod Control Integrierter SD ...

Страница 6: ... des Gerätes eindringen können Ein Kurzschluss mit Brandfolge könnte daraus resultieren 6 Bevor Sie eine defekte Sicherung austauschen sollten Sie erst einmal überprüfen was der Grund für den Kurzschluss war Achten Sie dabei besonders auf die Kabel der Spannungsversorgung Wenn der Kurzschluss nicht durch einen Fehler in der Spannungsversorgung resultiert müssen Sie die defekte Sicherung gegen ein ...

Страница 7: ... Reinigungsbenzin Alkohol Verdünner oder ähnliches da dies zu einer Beschädigung des Monitors bzw des Gehäuses führen kann 13 Sollte es während der Bedienung des Gerätes zu Störungen oder Problemen kommen empfehlen wir Ihnen erst einmal das Kapitel Fehlersuche genau durchzulesen um auszuschließen dass es sich nur um einen Bedienungsfehler handelt 14 Um das Gerät vor einem Diebstahl und der darauff...

Страница 8: ...8 2 BEDIENELEMENTE BEDIENTEIL bq 1 2 4 3 5 6 7 8 bl bp bn bo 9 cm cl co br bu cn bs bt bm ...

Страница 9: ...e Drücken Sie die NEXT Taste um den nächsten Track bzw das nächste Kapitel einer CD DVD auszuwählen Drücken Sie die NEXT Taste um durch Erhöhen der Empfangsfrequenz nach einem Radiosender zu suchen 6 PLAY PAUSE Taste Drücken Sie die PLAY PAUSE Taste um die Wiedergabe einer Disc zu pausieren Drücken Sie die Taste erneut um die Wiedergabe wieder fortzusetzen 7 SD Kartenleser Einschubslot für eine SD...

Страница 10: ...enung 18 OPEN Taste Drücken Sie die OPEN Taste um den Bildschirm herauszufahren Drücken Sie die Taste erneut um den Bildschirm wieder einzufahren 19 DISP Taste Drücken Sie mehrmals hintereinander die DISP Taste um verschiedene System informationen auf dem LCD Display anzuzeigen 20 Bildschirm 21 AS PS Taste Drücken Sie die AS PS Taste um die 6 stärksten Sender im gerade ausgewählten Frequenzband zu...

Страница 11: ...ptmenü des Gerätes aufzurufen Bereich B Berühren Sie Bereich B um die Wiedergabeinformationen einer DVD aufzurufen Bereich C Berühren Sie Bereich C um das vorherige Kapitel einer DVD auszuwählen Bereich D Berühren Sie Bereich D um das nächste Kapitel einer DVD auszuwählen Bereich E Berühren Sie Bereich E um die verschiedenen Wiedergabeoptionen anzuzeigen Bereich F Berühren Sie Bereich F um die GOT...

Страница 12: ... 2 6 7 8 10 11 13 14 15 19 20 23 24 27 28 9 3 4 5 12 16 18 21 22 25 26 17 2 1 6 7 8 bl bm bo bp bq bu cl co cp cs ct 3 4 5 9 bn br bs bt cm cn cq cr 3 DIE FERNBEDIENUNG DIE FERNBEDIENUNG FÜR DEN VORDEREN BEREICH DIE EINZELNEN TASTEN 1 POWER Taste Drücken Sie die POWER Taste um das Gerät ein bzw auszuschalten 2 OPEN Taste Drücken Sie die OPEN Taste um den Bildschirm herauszufahren bzw einzufahren 3...

Страница 13: ...aste um das Hauptmenü des Gerätes aufzurufen 14 PICTURE Taste Drücken Sie die PICTURE Taste um die Bildparameter des Bildschirms einzustellen 15 REPEAT A B Taste Drücken Sie die REPEAT A B Taste um einen bestimmten Zeitrahmen A B einer Disc zu wiederholen 16 OK Taste Drücken Sie die OK Taste um die Wiedergabe einer CD DVD zu starten zu pausieren oder Ihre Auswahl Menü zu bestätigen 17 Pfeiltasten ...

Страница 14: ...AST FORWARD Taste um den schnellen Vorlauf zu starten 25 AUDIO Taste Drücken Sie die AUDIO Taste um zwischen den verschiedenen Tonspuren einer DVD zu wechseln Beachten Sie dabei dass die gerade wiedergegebene DVD dieses Ausstattungsmerkmal unterstützen muss 26 SLOWER PLAY Taste Drücken Sie die SLOWER PLAY Taste um die Wiedergabe in Zeitlupe fortzusetzen 27 ANGLE Taste Drücken Sie die ANGLE Taste u...

Страница 15: ...ung wieder zu deaktivieren 4 GOTO Taste Drücken Sie die GOTO Taste um die GOTO Suchfunktion für VCD DVD aufzurufen 5 TITLE Taste Drücken Sie die TITLE Taste um das Titelmenü einer DVD aufzurufen 1 Reverse Fast Forward 24 Fast forward the disc content Audio 25 Change the audio language for disc playback Slower Play 26 Slow forward playback Angle 27 Plays back disc in different angel for a scene SUB...

Страница 16: ...um nächsten Kapitel Track einer Disc zu springen Drücken Sie die NEXT Taste um einen empfangbaren Sender eines Frequenzbandes durch erhöhen der Frequenz auszuwählen 11 STOP Taste Drücken Sie die STOP Taste um die Wiedergabe einer CD DVD zu stoppen 12 PLAY PAUSE Taste Drücken Sie die PLAY PAUSE Taste um die Wiedergabe einer CD DVD zu starten oder zu pausieren 13 ZOOM Taste Drücken Sie die ZOOM Tast...

Страница 17: ...en den verschiedenen Sprachen des Untertitels zu wechseln Beachten Sie dabei dass die gerade wiedergegebene DVD dieses Ausstattungsmerkmal unterstützen muss 20 ANGLE Taste Drücken Sie die ANGLE Taste um eine Szene aus verschiedenen Kamerapositionen wiederzugeben Beachten Sie dabei dass die gerade wiedergegebene DVD dieses Ausstattungsmerkmal unterstützen muss 21 REPEAT A B Taste Drücken Sie die RE...

Страница 18: ...knopf um das Hauptmenü aufzurufen Betätigen Sie den SMART DIAL Drehknopf um einen Menüpunkt auszuwählen und ihn entsprechend zu verändern Durch erneutes drücken der Taste können Sie Ihre Auswahl bestätigen 3 Name Ref Signal Function VOL down 1 Decrease volume VOL up 2 Increase volume Smart Dial 3 Press this encoder to access system set up Rotate clockwise anticlockwise to select desired item and p...

Страница 19: ...Sie im Kapitel Generelle Bedienung VERTIKALE EINSTELLUNG DES NEIGUNGSWINKELS Um einen optimalen Blickwinkel zu garantieren lässt sich der Neigungswinkel des Bildschirms schrittweise bzw stufenlos verändern DrückenSieeineder TastenaufdemBedienteilgedrückt umdenNeigungswinkel des Bildschirms schrittweise einzustellen Halten Sie eine der Tasten auf dem Bedienteil gedrückt um den Neigungswinkel des Bi...

Страница 20: ...er nen Monitore bzw die Videoausgänge im hinteren Bereich sind davon nicht betroffen und funktionieren unabhängig von der Stellung der Handbremse DER AUTOMATISCHE MONITORMECHANISMUS Wenn ein Hindernis das Ausfahren des Bildschirms behindert wird der Vorgang automatisch abgebrochen um den Monitor vor einer Beschädigung des Mechanismus zu schützen Drücken Sie anschließend noch einmal die OPEN Taste ...

Страница 21: ...40 Die eingestellte Lautstärke wird nach dem verändern der Lautstärke kurz angezeigt Halten Sie nach dem Einstellen der Lautstärke den POWER VOL Drehregler für 2 Sekunden gedrückt bis ein kurzer Signalton zu hören ist um die von Ihnen eingestellte Lautstärke zu speichern ALLGEMEINE AUDIOEINSTELLUNGEN Die verschiedenen Einstellungen des Audio Menüs erlauben es Ihnen das Gerät an die akustische Char...

Страница 22: ...ässe und Höhen lassen sich nur manuell einstellen wenn im EQ Modus die Einstellung User gewählt wurde Die Funktion Loudness gleicht die Schwäche des menschlichen Gehörs bei der Wahrnehmung von leisen Tönen im Tiefen und Höhenbereich aus Der Pegel lässt sich zusätzlich in 4 verschiedenen Stufen anpassen oder komplett deaktivieren Wenn Sie das Gerät für einige Sekunden nicht bedienen wird das Menü a...

Страница 23: ...rke automatisch stummgeschaltet sobald die Freisprecheinrich tung aktiviert wird oder eine Durchsage der angeschlossenen Navigationsbox erfolgt EINGABE EINES SICHERHEITSCODE Um das Gerät vor einem Diebstahl und der darauf folgenden unbefugten Verwendung zu schützen besteht die Möglichkeit einen vierstelligen Sicherheitscode selbst festzulegen und einzugeben Wird das Gerät dann länger als 40 Sekund...

Страница 24: ...m in den iPod Modus zu gelangen 4 Berühren Sie das Icon um in den DVB T Modus zu gelangen 5 Berühren Sie das Icon um in den Kamera Modus zu gelangen 6 Berühren Sie das Icon um in den AV IN Modus zu gelangen 7 Berühren Sie das Icon um das jeweilige Menü zu verlassen 8 Berühren Sie das Icon um in den SD Karten Modus zu gelangen 9 Berühren Sie das Icon um das Hauptmenü aufzurufen bl Berühren Sie das ...

Страница 25: ...Verändern des Wertes eines Menüpunktes 1 Drücken Sie die OK Taste auf der Fernbedienung den SMART DIAL Drehknopf auf dem Bedienteil oder berühren Sie das entsprechende Icon auf dem Bildschirm um das Untermenü zur Veränderung des Menüpunktes aufzurufen 2 Betätigen Sie den POWER VOL Drehknopf drücken Sie eine der Tasten auf der Fernbedienung oder berühren Sie das entsprechende Icon auf dem Bildschir...

Страница 26: ... Fernbedienung betätigen Sie den POWER VOL Drehregler auf dem Bedienteil oder berühren das entsprechende Icon auf dem Bildschirm um den Neigungswinkel des Bildschirms einzustellen Bildschirmschoner Ein Ohne Funktion Aus Kalibrieren des Touchscreens Ja Kalibrieren bzw einstellen der Empfindlichkeit des Touchscreens Es besteht die Möglichkeit das Sie den Touchscreen nach der Erstinstalla tion des Ge...

Страница 27: ...uszuwählen dessen Wert Sie verändern möchten 3 Berühren Sie direkt das Icon des Menüpunktes dessen Wert Sie verändern möchten 3 Verändern des Wertes eines Menüpunktes 1 Drücken Sie die OK Taste auf der Fernbedienung den SMART DIAL Drehknopf auf dem Bedienteil oder berühren Sie das entsprechende Icon auf dem Bildschirm um das Untermenü zur Veränderung des Menüpunktes aufzurufen 2 Betätigen Sie den ...

Страница 28: ...eitung des Videosignals erfolgt in PAL Automatisches Öffnen des Bildschirms Ein Der Bildschirm fährt automatisch aus wenn das Gerät eingeschaltet wird Aus Sie müssen die Taste auf der Fernbedienung oder die OPEN Taste auf dem Bedienteil drücken um den Bildschirm auszufahren Präsentieren Der Bildschirm bleibt auch im ausgeschalteten Zustand ausgefahren OSD Menü Englisch Auswahl der Sprache in welch...

Страница 29: ...29 DEUTSCH ASP SETUP 1 Aufrufen des Menüs 1 Drücken Sie die MENU Taste auf der Fernbedienung um das Hauptmenü aufzurufen 2 Berühren Sie das U Icon auf dem Bildschirm um das ASP Menü aufzurufen ...

Страница 30: ...verändern möchten 3 Verändern des Wertes eines Menüpunktes 1 Drücken Sie die OK Taste auf der Fernbedienung den SMART DIAL Drehknopf auf dem Bedienteil oder berühren Sie das entsprechende Icon auf dem Bildschirm um das Untermenü zur Veränderung des Menüpunktes aufzurufen 2 Betätigen Sie den POWER VOL Drehknopf drücken Sie eine der Tasten auf der Fernbedienung oder berühren Sie das entsprechende Ic...

Страница 31: ...etet Ihnen die Möglichkeit die Phasenlage des Subwooferausgangs zu verändern Dadurch können Sie vermeiden das sich bestimmte Frequenzen des Bass bereichs zwischen dem Subwoofer und den anderen Lautsprechern auslöschen 180 Bass Q Faktor 1 0 Nachdem Sie die Mitten Frequenz des Bass EQ eingestellt haben können Sie durch verändern der Bandbreite Q Faktor den Bereich der Anhebung Absenkung vergrößern 1...

Страница 32: ...üs 1 Drücken Sie die MENU Taste auf der Fernbedienung oder den Bereich A des Touch screens um das Hauptmenü aufzurufen 2 Berühren Sie das Icon auf dem Bildschirm um das Setup aufzurufen Auswahl einer Wiedergabequelle für den hinteren Bereich 1 Betätigen Sie den SMART DIAL Drehknopf auf dem Bedienteil oder drücken Sie eine der Tasten auf der Fernbedienung um eine Wiedergabequelle auszuwählen die im...

Страница 33: ...oder berühren Sie das entsprechende Icon etwas länger um eine Radiostation auf einem der 6 Speicherplätze zu speichern 6 Anzeige des Programmtyps PTY 7 Anzeige der aktuellen Uhrzeit 8 Berühren Sie das AIcon um zwischen den verschiedenen Frequenzbändern zu wählen FM1 FM2 FM3 AM1 und AM2 9 Berühren Sie das B Icon um den automatischen Sendersuchlauf zu starten und um die gefundenen Sender im aktuelle...

Страница 34: ... SUCHLAUF Drücken Sie die Taste auf der Fernbedienung oder berühren das f Icon auf dem Bildschirm um den automatischen Suchlauf zu starten und durch erhöhen der Empfangsfrequenz nach dem nächsten empfangbaren Sender zu suchen Drücken Sie die Taste bzw berühren Sie das Icon erneut um den automatischen Suchlauf zu beenden Drücken Sie die Taste auf der Fernbedienung oder berühren Sie das g Icon auf d...

Страница 35: ...n Programminhalten kann gesucht werden None News Affairs Info Sport Educate Drama Culture Science Varied Pop M Rock M Easy M Light M Classics Other M Weather Finance Children Social Religion Phone In Travel Leisure Jazz Country Nation M Oldies Folk M Document ALTERNATIVFREQUENZ AF Berühren Sie das AF Icon auf dem Bildschirm um die AF Funktion zu de bzw aktivieren Bei aktivierter AF Funktion wählt ...

Страница 36: ...in den DVD Modus und die eingelegte DVD wird wiedergegeben BITTE BEACHTEN Achten Sie darauf wenn Sie eine DVD einlegen dass sich nicht schon eine Disc im Gerät befindet da ansonsten das Laufwerk des Gerätes beschädigt werden kann Wenn Sie die PARENTAL LOCK Funktion entsprechend aktiviert haben und die eingelegte Disc aufgrund deren Einstufung nicht wiedergegeben werden kann müssen Sie erst den von...

Страница 37: ...L oder R zu wählen 8 Berühren Sie das Icon um den Untertitel einer DVD einzublenden 9 Berühren Sie das Icon um das Menü einer DVD aufzurufen WIEDERGABEOPTIONEN Stoppen der Wiedergabe Berühren Sie das Icon auf dem Bildschirm oder drücken Sie die F Taste auf der Fernbedienung um die Wiedergabe der DVD zu stoppen Berühren Sie das Icon auf dem Bildschirm oder drücken Sie die OK Taste auf der Fernbedie...

Страница 38: ...u de bzw aktivieren Wenn die PBC Funktion aktiviert wurde startet die Wiedergabe einer VCD automatisch mit dem ersten Track BITTE BEACHTEN Während die PBC Funktion aktiviert ist stehen Ihnen die folgenden Wiedergabeoptionen zur Verfügung Schneller Vorlauf Zeitlupe Nächster bzw vorheriger Track Während die PBC Funktion aktiviert ist stehen Ihnen die folgenden Wiedergabeoptionen nicht zur Verfügung ...

Страница 39: ...l die Taste auf der Fernbedienung oder berühren Sie Bereich D auf dem Bildschirm um zum nächsten Kapitel einer DVD zu gelangen Drücken Sie die Taste auf dem Bedienteil die Taste auf der Fernbedienung oder berühren Sie Bereich C auf dem Bildschirm um zum vorherigen Kapitel einer DVD zu gelangen SCHNELLER VORLAUF RÜCKLAUF Drücken Sie die Taste auf der Fernbedienung oder berühren Sie das Icon auf dem...

Страница 40: ...w digitale 2 CH Down Mixed Audiosignale zu dekodieren Verwenden Sie Surround 2 um digitale Bitstream Audiosignale zu dekodieren Lautsprecher Einstellung Front Lautsprecher Rear Lautsprecher Center Lautsprecher Sub woofer 2 CH Modus Wiedergabe einer 2 CH Audioquelle im 6 CH Modus mit deaktivierter Surround Funktion Wiedergabe einer 2 CH Audioquelle Downmix im 6 CH Modus mit aktivierter Surround Fun...

Страница 41: ...ergabe wird beim ausgewählten Titel Kapitel fortgesetzt VCD Spielzeit Wiedergabe wird bei der ausgewählten Spielzeit fortgesetzt Track Wiedergabe wird beim ausgewählten Track fortgesetzt 3 Berühren Sie das Icon auf dem Bildschirm um das numerische Eingabefeld aufzu rufen 4 Geben Sie mit Hilfe der numerischen Tasten auf der Fernbedienung oder des numerischen Eingabefeldes auf dem Bildschirm die ent...

Страница 42: ... Q2 Q3 Q4 OFF AUSWAHL VON VERSCHIEDENEN TONSPUREN NUR DVD Einige DVD s bieten die Möglichkeit deren Inhalt in verschiedenen Sprachen Tonspuren wiederzugeben Drücken Sie die AUDIO Taste auf der Fernbedienung oder berühren Sie Bereich E des Bildschirms und anschließend das Icon um zwischen den verschiedenen Tonspuren zu wählen BITTE BEACHTEN Während der Wiedergabe einer VCD können Sie durch drücken ...

Страница 43: ... Anzeige des aktuellen Wiedergabemodus 2 Der vierte Track einer VCD mit 16 Tracks wird gerade wiedergegeben 3 Anzeige der Spielzeit des aktuellen Titels 4 Anzeige der Equalizer Einstellung 5 Anzeige der Loudness Einstellung 6 Anzeige der Uhrzeit Symbol Eigenschaft 12cm Disc Max Spielzeit Single Side Single Layer DVD 5 Single Side Double Layer DVD 9 Double Side Single Layer DVD 10 Double Side Doubl...

Страница 44: ...s abgebildete Symbol bedeutet dass man das 16 9 Bildformat als Letter Box darstellen kann Hinweis auf den Regional Code der DVD Region 1 USA Canada East Pacific Ocean Islands Region 2 Japan Western Europe Northern Europe Egypt South Africa Middle East Region 3 Taiwan Hong Kong South Korea Thailand Indonesia South East Asia Region 4 Australia New Zealand Middle and South America South Pacific Ocean...

Страница 45: ...nde Icon auf dem Bildschirm um einen Menüpunkt auszuwählen BITTE BEACHTEN Die von Ihnen getätigten Einstellungen werden vom Gerät gespeichert Es besteht aber die Möglichkeit alle von Ihnen gemachten Einstellungen wieder in den Aus lieferungszustand des Gerätes zurückzusetzen Nähere Informationen dazu finden Sie im Kapitel RATING Auswahl eines Menüpunktes Betätigen Die den SMART DIAL Drehknopf auf ...

Страница 46: ...der Untertitel angezeigt werden soll Die Einstellungen im DVD Menü sind von dieser Auswahl aber nicht betroffen SPRACHMENÜ Einstellung Optionen Funktion Subtitle Englisch Deutsch Französisch Spanisch Italienisch Wählen Sie die Sprache aus in welcher der Untertitel einer DVD automatisch angezeigt werden soll Auto Aus Audio Englisch Deutsch Französisch Spanisch Italienisch Wählen Sie die Sprache aus...

Страница 47: ... bei leiseren Lautstärken Ein Laufzeitkorrektur Center 15ms Laufzeitkorrektur zwischen Center und den vorderen Lautsprechern 12ms 9ms 6ms 3ms 0ms Laufzeitkorrektur Rear 15ms Laufzeitkorrektur zwischen den vorderen und hinteren Lautsprechern 12ms 9ms 6ms 3ms 0ms Down Sampling Aus Normale Audiowiedergabe Ein Audiowiedergabe in 48KHz BITTE BEACHTEN Wenn Sie die Down Sampling Funktion aktiviert haben ...

Страница 48: ...während der Wiedergabe Aus Keine Anzeige des Symbols für mehrere Kamerapositionen während der Wiedergabe Erweiterte Bildformat einstekkung Fill Ohne Funktion Original H FIT W FIT Fit to Scan Pan Scan BITTE BEACHTEN Wenn Sie eine DVD wiedergeben die nicht im Widescreen Format aufgenommen wur den kann es aufgrund des Bildverhältnisses Breite Höhe im 16 9 Aspect Ratio Modus zu Bildstörungen kommen ...

Страница 49: ...in Nicht vorhanden Subwoofer Vorhanden Nicht vorhanden Center Groß Klein Nicht vorhanden BITTE BEACHTEN Wählen Sie Groß aus wenn Sie die angeschlossenen Lautsprecher im Full Range Modus betreiben wollen Wählen Sie Klein aus wenn Sie die angeschlossenen Lautsprecher über ein Hoch passfilter betreiben wollen Der Hochpassfilter wird automatisch aktiviert wenn Sie Klein auswählen und ist abhängig von ...

Страница 50: ...ffekten Surround Music Musikwiedergabe mit Surroundeffekten Panorama An Um eine räumlichere Audiowiedergabe zu schaffen wird die Klangkulisse von vorne nach hinten verschoben Aus Lautsprecheraus gleich Front Rear 0 bis 6 Verändern des Lautsprecherausgleichs zwischen den vorderen und hinteren Lautsprechern Lautsprecheraus gleich Center Front 0 bis 6 Verändern des Lautsprecherausgleichs zwischen den...

Страница 51: ...vierung der RATING Funktion ein Berechtigung 1 Kid Safe Wählen Sie eine der verschiedenen Einstufungen der Jugendschutzkontrolle aus 2 G 3 PG 4 PG 3 5 PG R 6 R 7 NC 17 8 ADULT Grundeinstel lungen laden Nein Ja Wählen Sie Ja wenn Sie alle Einstellungen in den Auslieferungszustand zurücksetzen wollen BITTE BEACHTEN Merken Sie sich das Passwort und machen Sie sich eine Notiz welche Sie an einem siche...

Страница 52: ...befasst Einlegen bzw Auswerfen einer Disc Wiedergabe einer Disc bzw Pausieren der Wiedergabe Beenden der Wiedergabe Auswahl eines Tracks Schneller Vor bzw Rücklauf Scan Random BITTE BEACHTEN Beachten Sie bei der Benutzung einer CD R oder CD RW das die Session geschlossen ist Andernfalls ist die Wiedergabe mit diesem Gerät nicht möglich Das Gerät ist mit den folgenden Standards kompatibel ISO 9660 ...

Страница 53: ...rühren Sie das R Icon um die RANDOM Funktion zu de bzw aktivieren 14 Anzeige des gerade wiedergegebenen Tracks und der Gesamtanzahl der sich auf der Disc befindlichen Tracks 15 Anzeige der abgelaufenen Spielzeit des gerade wiedergegebenen Tracks 16 Anzeige des Loudness Modus 17 Anzeige der eingestellten Lautstärke 18 Berühren Sie das S Icon um eine numerische Eingabe vorzunehmen 19 Anzeige des Equ...

Страница 54: ...en Sie das I Icon um den Inhalt des vorherigen Ordners anzuzeigen 10 Berühren Sie das J Icon um den Inhalt des nächsten Ordners anzuzeigen 11 Berühren Sie das D Icon um den schnellen Vorlauf zu starten 12 Berühren Sie das Q Icon um die REPEAT Funktion zu de bzw aktivieren 13 Berühren Sie das R Icon um die RANDOM Funktion zu de bzw aktivieren 14 Berühren Sie das S Icon um das numerische Tastenfeld ...

Страница 55: ... auswählen WECHSELN DES ORDNERS Berühren Sie eines der I JIcons auf dem Bildschirm um während der Wiedergabe zwischen den verschiedenen Ordnern zu navigieren TRACKLISTE Berühren Sie eines der G H Icons auf dem Bildschirm um während der Wieder gabe durch die verschiedenen Tracks bzw Bildschirmseiten zu navigieren WIEDERGABE VON JPEG DATEIEN 1 Die Wiedergabe von Bildern Diashow wird gestoppt und es ...

Страница 56: ...en sich auf der SD Karte befindlichen Tracks anzuzeigen 8 Berühren Sie das H Icon um die nächste Seite der Liste mit den sich auf der SD Karte befindlichen Tracks anzuzeigen 9 Berühren Sie das I Icon um den vorherigen Ordner anzuzeigen 10 Berühren Sie das J Icon um den nächsten Ordner anzuzeigen 11 Berühren Sie das K Icon um jeden Track für 10 Sekunden anzuspielen 12 Berühren Sie das Q Icon um die...

Страница 57: ...7 Berühren Sie das G Icon um die vorherige Seite der Liste mit den sich in dem Ordner befindlichen Tracks anzuzeigen 8 Berühren Sie das H Icon um die nächste Seite der Liste mit den sich in dem Ordner befindlichen Tracks anzuzeigen 9 Berühren Sie das I Icon um den Inhalt des vorherigen Ordners anzuzeigen 10 Berühren Sie das J Icon um den Inhalt des nächsten Ordners anzuzeigen 11 Berühren Sie das K...

Страница 58: ... Tracks 20 Anzeige des Loudness Modus 21 Anzeige der eingestellten Lautstärke 22 Anzeige des Equalizer Modus 23 Multi Zone Einstellung DAS HAUTMENÜ Berühren Sie das d Icon um das Hauptmenü des iPod auf dem Monitor anzuzeigen VIDEOWIEDERGABE Berühren Sie das c Icon um ein Video mit dem Moniceiver wiederzugeben das auf dem iPod gespeichert ist Die Auswahl des Videos erfolgt direkt über den iPod BITT...

Страница 59: ...on um zum letzten Wiedergabemodus zurückzukehren 6 Berühren Sie das Icon um jederzeit direkt den Bluetooth Modus aufzurufen 7 Berühren Sie das Icon um den Bildschirminhalt nach unten zu scrollen 8 Berühren Sie das Icon um den Bildschirminhalt nach oben zu scrollen VOR DER INBETRIEBNAHME DER BLUETOOTH FUNKTION Bevor Sie die Bluetooth Funktion des ZE MC192 verwenden können ist es nötig die folgenden...

Страница 60: ...Telefonat muss manuell angenommen werden Ein Das eingehende Telefonat wird automatisch angenommen anhängig vom verwendeten Mobiltelefon Verbinden Manuell Das zuletzt ausgewählte Mobiltelefon wird nicht automatisch mit dem ZE MC192 verbunden Automatisch Das zuletzt ausgewählte Mobiltelefon wird automatisch mit dem ZE MC192 verbunden SETUP DER BLUETOOTH INDIKATOR Im oben Bereich des Bildschirms befi...

Страница 61: ...rschiedene Mobiltelefone mit dem ZE MC192 verbunden haben und ein oder mehrere neue Mobiltelefone mit dem Gerät verbinden wollen werden die alten Einträge bzw Verbindungsprotokolle nach und nach gelöscht Das als Standard festgelegte und das zuletzt verwendete Mobiltelefon sind davon ausgenommen Das neu verbundene Mobiltelefon wird dann allerdings als zuletzt verwendetes Mobiltelefon erkannt Wenn S...

Страница 62: ...rät im Falle eines eingehenden Telefonates automatisch in den Bluetooth Modus unabhängig davon welcher Wiedergabemodus gerade aktiv ist Ein eingehender Anruf kann manuell oder auch automatisch angenommen werden was von den Einstellungen im Setup abhängig ist Sobald Sie angerufen werden erscheint das folgende Menü auf dem Bildschirm BEENDEN EINES TELEFONATES Berühren Sie das Icon um ein Telefonat z...

Страница 63: ...ie Bedienung des DVB T Tuners zu erhalten lesen Sie sich bitte dessen Bedienungsanleitung genau durch 14 BEDIENUNG DES NAVI SYSTEMS ZE NA100 150 AUSWAHL DES NAVIGATIONS MODUS Drücken Sie mehrmals die SRC Taste auf der Fernbedienung oder auf dem Bedienteil um das Navigationssystem als Modus auszuwählen Berühren Sie das Icon auf dem Bildschirm um das Navigationssystem als Modus auszuwählen BEDIENUNG...

Страница 64: ...ne originale DISC 2 Die Impedanz des Lautsprechers passt nicht zum Gerät 2 Verwenden Sie Lautsprecher mit einer passenden Impedanz bzw tauschen Sie die Lautsprecher aus 3 Der Lautsprecher hat einen Kurzschluss 3 Überprüfen Sie die Lautsprecheranschlüsse Die Tel Mute Funktion funktioniert nicht richtig 1 Das Anschlusskabel MUTE hat Kontakt mit Masse 1 Überprüfen Sie entsprechend die Installation bz...

Страница 65: ...e PARENTAL LOCK Einstellung ist zu hoch eingestellt 4 Ändern Sie die PARENTAL LOCK Einstellung 5 Der Regional Code der DISC stimmt nicht mit dem des Gerätes überein 5 Verwenden Sie ein DISC mit dem richtigen Regional Code 6 Die DISC wurde falsch herum eingelegt 6 Legen Sie die DISC mit dem Label nach oben in das Gerät Das Bild ist unscharf gestört oder dunkel 1 Die DISC wurde illegal vervielfältig...

Страница 66: ...be eines Sicherheitscode wird verlangt 1 Das Gerät wurde länger als 40 Sekunden von der Spannungsquelle getrennt und die Funktion Eingabe eines Sicherheitscode wurde davor aktiviert 1 Geben Sie den von Ihnen im Vorfeld festgestellten Sicherheitscode ein um das Gerät wieder in Betrieb zu nehmen 2 Deaktivieren Sie die Funktion Eingabe eines Sicherheitscode Wenn Sie diese Funktion deaktiviert haben u...

Страница 67: ...o 85dBA Dynamic range 95dB Frequency response 20Hz to 20kHz 3dB Channel separation 60dB 1kHz D A converter s 5 channel high performance 24 bit 192kHz multi bit Delta Sigma modulation DAC supports sample rates from 8 192kHz Electronic skip protection ESP DVD 2 3 sec CD DA 10 sec MP3 100 sec WMA 200 sec ESP time is approximate Mechanical anti vibration ability 10 200Hz X Y Z direction 1 0G Video sec...

Страница 68: ... 10 5 to 16V DC negative ground Fuse 10 amp mini ATM type DIN chassis dimensions WxHxD 178 x 50 x 178mm Änderungen der technischen Daten und des Designs zum Zwecke der Verbesserung des Produktes vorbehalten Sollten Sie dieses Gerät eines Tages entsorgen müssen beachten Sie bitte dass elektrische Geräte nicht mit dem Haushaltsmüll entsorgt werden sollten Führen Sie das Gerät wenn möglich dem Recycl...

Страница 69: ...69 DEUTSCH ...

Страница 70: ...ADJUSTMENT 84 REAR CAMERA MODE 84 IMAGE SETTING 84 PARKING BRAKE INTERLOCK 85 MONITOR MOVEMENT MECHANISM 85 BASIC OPERATIONS 86 88 POWER ON OFF 86 PLAYING SOURCE SELECTION 86 VOLUME ADJUSTMENT 86 AUDIO CONTROL MENU 86 6 CHANNEL AUDIO CONTROL 87 ANTI THEFT CODE FUNCTION 88 REAR ZONE 88 SYSTEM RESET 88 MUTE 88 SYSTEM SETUP MENU 89 96 MAIN MENU 89 SCREEN SETTING 90 GENERAL SETUP MENU 91 92 ASP AUDIO ...

Страница 71: ...YER OPERATION DISPLAY 115 116 MP3 WMA DISCS 117 118 JPEG DISCS 118 SD CARD READER OPERATION 119 ACCESSING SD CARD MODE 119 USING THE TOUCH SCREEN CONTROLS 119 IPOD OPERATION 120 121 ACCESSING IPOD MODE 120 IPOD INSTRUCTIONS 120 PLAYBACK OF VIDEO ON IPOD 121 BLUETOOTH OPERATION 122 125 BEFORE USING BLUETOOTH 122 THE BLUETOOTH INDICATOR 122 ACCESSING THE BLUETOOTH MODE 122 BLUETOOTH USER INTERFACE 1...

Страница 72: ...viewing angle left right 65 up 45 down 60 TUNER FM AM tuner Best stations memory BSM 30 preset stations 18 FM 12 AM Radio data system RDS A V CONNECTIONS 2 x RCA video outputs NTSC 1 x RCA video input 1 x RCA video input for rear view camera with automatic switching function Analog 5 1 RCA preamp line outputs front rear subwoofer and center 1 x 2 CH RCA preamp line outputs without volume adjustmen...

Страница 73: ...nd solder WARNING 1 Only connect the unit to a 12V negative ground system 2 Never install this unit where operation and viewing could interfere with safe driving conditions 3 To reduce the risk of a traffic accident except when using for rear view video camera never use the video display function while driving the vehicle This is a violation of law 4 To reduce the risk of a traffic accident never ...

Страница 74: ...74 CONTROLS AND INDICATORS FRONT PANEL bq 1 2 4 3 5 6 7 8 bl bp bn bo 9 cm cl br bu cn bs bt bm co ...

Страница 75: ...enu Rotate it clockwise anticlockwise to select the desired item and press it once to access or confirm 11 EJECT button Press the EJECT button to insert eject the disc 12 INFO DVD mode Press the INFO button to display playback information on the screen Press and hold to access the picture setup 13 ANGLE z Press the ANGLE z button to adjust the upward tilt angle of the screen one step at a time Pre...

Страница 76: ...r 19 DISP Press the DISP button to display system information on the LCD screen 20 LCD DISPLAY 21 AS PS Auto store program scan Press the AS PS button to auto store strong radio stations in the 6 preset channels of the current band Press and hold it to start to scan radio station 22 BAND Press the FM AM button to switch between FM and AM 23 Disc indicator light It is white when there is no disc in...

Страница 77: ... A Area B Area F Area C Area D Area E Area A Return to MAIN MENU Area B Display playing information Area C Select the previous chapter Area D Select the next chapter Area E Display the on screen controls and different mode displays different menu Area F On DVD VCD mode display the GOTO search menu on the screen directly ...

Страница 78: ...elects playing mode Numeric button 5 1 2 3 4 5 6 7 8 9 0 Directly access chapter track preset station for current band VOL up 6 Increase volume VOL down 7 Decrease volume Information 8 Displays playing information GOTO search 9 Search function in the VCD DVD disc Stop Band 10 Selects FM AM band on Tuner mode Stop playback on other mode Select 11 Enter the audio setting ESC 12 Exit the current menu...

Страница 79: ...Adjust the parameter of the TFT settings 15 REPEAT A B Set start point A and end point B to repeat continually 16 OK Start or pause the playback and confirm settings 17 DIRECTION BUTTONS Up down left right to select the items for setting 18 TITLE Enter the title menu of the current source 19 ROOT Enter the main menu of the disc Turn on PBC while playing VCD 20 REPEAT Repeat the playback of the cur...

Страница 80: ...e tuning frequency 23 FAST REVERSE Fast reverse the disc content 24 FAST FORWARD Fast forward the disc content 25 AUDIO Change the audio language for the disc playback 26 ZOOM Zooming IN OUT on image 27 ANGLE Playback in different angel for a scene if it is applicable 28 SUBTITLE Language selection for the subtitle ...

Страница 81: ... current source 6 ROOT Taste Enter the main menu of the disc Turn on PBC while playing VCD 7 OK Start or pause the playback Confirm settings 1 Slower Play 26 Slow forward playback Angle 27 Plays back disc in different angel for a scene SUB Title 28 Language selection for subtitle Multi Zone Remote Control Name Ref Signal Function Mute 3 Toggles on off audio output 2 1 3 4 6 8 10 13 16 17 5 7 12 14...

Страница 82: ...Stop the playback on other mode 12 PLAY PAUSE Start pause the playback 13 ZOOM Taste Zooming in out on an image 14 FAST REVERSE Fast reverse the disc content 15 FAST FORWARD Fast forward the disc content 16 SLOWER PLAY Slow forward the playback 17 REPEAT Repeat playback of the current chapter 18 AUDIO Change the audio language for the disc playback 19 SUBTITLE Language selection for the subtitles ...

Страница 83: ...em setup Rotate it clockwise anticlockwise to select the desired item and press it once to access or to comfirm 3 Name Ref Signal Function VOL down 1 Decrease volume VOL up 2 Increase volume Smart Dial 3 Press this encoder to access system set up Rotate clockwise anticlockwise to select desired item and press once to access or comfirm 2 1 3 1 3 2 ...

Страница 84: ...JUSTMENT The monitor angle can be adjusted for optimum viewing using by one of the following methods Press the buttons on the front panel to adjust the tilt angle of the screen one step at a time Press and hold the buttons to continuously adjust the tilt angle Adjust the Screen Tilt in the Screen setting to adjust the tilt of the screen to the desired degree REAR CAMERA MODE When the vehicle is pl...

Страница 85: ...NHIBIT When the PARKING cable is connected to the brake switch the display on the TFT monitor will display video only when the vehicle is stopped and the parking brake is applied Parking brake function is overridden when the video source is set to CAMERA When the parking brake inhibit is active the front monitor displays Caution with blue background preventing the driver from watching video while ...

Страница 86: ... up To install a rear view video camera connect the CAMERA video input cable to the rear view camera output cable NOTE If you have not connected a device to the unit the source can not be selected Example If you have not connected an iPod to the unit the iPod source will not be available VOLUME ADJUSTMENT To increase or decrease the volume level turn the rotary encoder on the front panel or press ...

Страница 87: ...els Loudness levels range from 1 4 or off When the loudness function is on LOUD is displayed on the screen Exiting the audio control menu Touch the return arrow on the top right of the display Press the ESC button on the remote control to exit the audio control menu 6 CHANNEL AUDIO CONTROL Item Adjustable range Master Volume 0 to 40 Front Left Channel Volume 10 to 10 Front Right Channel Volume 10 ...

Страница 88: ...emote control to mute the volume NOTE Press the MUTE button again to restore the volume Adjusting the volume or using any of the audio setup features will cancel the mute function REAR ZONE If a monitor is installed in the rear zone and connected to the rear zone AV output passengers on the back seat can control the unit by using the rear zone remote control See Multi Zone Remote Control for instr...

Страница 89: ...o access the DVD mode 3 Touch to access the iPod mode 4 Touch to access the DVBT mode 5 Touch to access the Camera mode 6 Touch to access the AUX IN mode 7 Touch to turn to the previous menu 8 Touch to access the SD Card mode 9 Touch to access the General setup mode bl Touch to access the Multizone mode bm Touch to access the Bluetooth mode bn Touch to access the Navigation mode 5 bn 2 1 3 4 9 8 7...

Страница 90: ...press the MENU button on the remote control to access the MAIN menu Select the O button on the bottom of the screen to access the screen setup Adjusting a Feature Setting Options Function Brightness 0 to 20 Press the buttons to adjust the brightness Screen tilt 1 to 6 Touch the 1 to 6 number on the screen directly to adjust the tilt of the screen to the desired degree Screen saver ON No function O...

Страница 91: ...e direction button 3 Confirm your selection by pressing the OK button or by pressing the SMART DIAL button The new value setup is complete Adjusting the clock 1 Access the Clock setting under the general setup menu 2 Press the direction button on the remote control to move the cursor to the Hour or Min position and press the OK button You also can touch the Hour or Min position directly 3 The nume...

Страница 92: ... The video output is in the standard NTSC format PAL The video output is in the standard PAL format TFT Auto Open On The TFT panel automatically opens when the unit is turned on Off You must press the OPEN button on the TFT panel or the button on the remote control to open it Manual The TFT panel does not open or close when the unit is turned on or turned off OSD Menu English The menus are display...

Страница 93: ...e audio adjustments Accessing the ASP SETUP menu Press the MENU button on the remote control to access the MAIN menu Select the Ubutton to access the ASP setup A menu appears with the option for the first item and then you can touch the button to the option on the next page and press the button to return ...

Страница 94: ...by pressing the OK button on the remote control or by pressing the SMART DIAL button A submenu appears in a second row with the selected option 2 Select a new value by pressing the direction button 3 Confirm your selection by pressing the OK button on the remote control or by pressing the SMART DIAL button The new setup is complete Return to normal playback The system will automatically return the...

Страница 95: ...he subwoofer is set to Off and any other speaker is set to Large 120Hz 160Hz Sub Phase 0 Subwoofer output IN phase 180 Subwoofer output OUT OF phase NOTE Depending on your installation reversing the subwoofer phase may increase the bass output Bass Q Factor 1 0 When the bass center frequency is selected adjusting the bass Q factor alters the sharpness of the bass output 1 25 1 5 2 0 FM AM Gain 7 b...

Страница 96: ...ngers while DVB T is available for the rear passengers Accessing the rear zone mode 1 First you have to enter the general setup menu then touch the icon to access the rear zone menu 2 Use the multi zone remote control to access the rear zone and to select a source to play Exit the rear zone mode Press the icon to deactivate the rear zone mode ...

Страница 97: ... FM 2 FM 3 AM 1 AM 2 9 BTouch to automatically scan and store stations in current radio band You can also press the AS PS button on the unit 10 gTouch to seek backward 11 fTouch to seek forward 12 CTouch to tune backward one step 13 DTouch to tune forward one step 14 K Touch to activate deactivate SCAN function 15 Program type indicator Touch to activate deactivate the PTY function 16 Touch to act...

Страница 98: ...utton on the screen to seek the next available channel by increasing the tuning frequency Press the button again to stop searching Press the button on the remote control or touch the gbutton on the screen to seek the next available channel by decreasing the tuning frequency Press the button again to stop searching MANUAL TUNING Touch the D or C button to increase or decrease the tuning frequency o...

Страница 99: ...ivate the AF function When AF is activated and a radio signal is too weak the tuner automatically switches to the best alternative frequency NOTE During auto switching radio frequency some interference could be heard Turn off the AF function can cease this issue TA FUNCTION Traffic Announcement Touch on the screen to activate deactivate the AF function When TA is activated the unit will auto seek ...

Страница 100: ...ode is entered and the playback begins NOTE If Parental Lock Rating is activated and the disc inserted is not authorized the 4 digit code must be entered and or the disc must be authorized see RATING Parental Lock Menu You cannot insert a disc if there is already a disc in the unit or if the power is off NOTE CD R RW DVD R RW DVD R RWs will not play unless the recording session is closed Ejecting ...

Страница 101: ...ed back from A to B continually 7 Touch to choose a language if the disc is recorded in multiple languages 8 Touch to display subtitles 9 Touch to return to the DVD main menu CONTROLLING PLAYBACK Stopping playback Touch the stop button on the screen or press the BAND button on the remote control to stop DVD play and touch the play pause button on the screen or the OK button on the remote control t...

Страница 102: ... define a specific area of a disc to repeat Press the button on the screen or on the remote control to set the start point A of the repeated section Press the button again once you reach the desired end point B of the repeated section The selected portion of the DVD will now repeat continuously Press the button again to cancel the A B section setting and stop repeat play ACCESSING THE DVD MENU 1 Y...

Страница 103: ...t Speaker Rear Speaker Center Speaker Sub woofer 2CH mode Play 2CH audio in 6CH mode with surround off Play 2 channel downmix audio in 6 channel mode with surround on Play 2 channel audio in 6 channel mode with surround on FAST FORWARD FAST REVERSE Press the button on the remote control or touch the button of the area E on the screen to fast forward Keep pressing or touching and releasing the butt...

Страница 104: ...area on the screen to display a numeric keypad on the screen 4 Enter a time track number into the field by using the numeric keypad on the remote control or on the screen 5 Press the OK button on the remote control or on the touch screen to go to the specified location on the disc 6 Press the button on the remote control or touch the F area on the screen again to exit DIRECT CHAPTER TRACK SELECTIO...

Страница 105: ...should appear You also can touch area E and then touch the button PLAYBACK INFORMATION During DVD and VCD playback press the INFO button on the remote control or touch area B to display playback information on the screen including the media playing and current playback time DVD playback information The following information is displayed at the top of the screen during the DVD play back DVD VIDEO T...

Страница 106: ...nt title 4 Indicates EQ setting 5 Indicates the loud setting 6 Indicates the current system time 7 Indicates the current playback source of the rear zone GENERAL DISC INFORMATION Symbol 12cm Disc Properties Max Play Time Single side single layer DVD 5 Single side double layer DVD 9 Double side single layer DVD 10 Double side double layer DVD 18 MPEG 2 Method 133 minutes 242 minutes 266 minutes 484...

Страница 107: ...ample on the left the 16 9 video can be converted to letter box video Indicates the region code where the disc can be played Region 1 USA Canada East Pacific Ocean Islands Region 2 Japan Western Europe Northern Europe Egypt South Africa Middle East Region 3 Taiwan Hong Kong South Korea Thailand Indonesia South East Asia Region 4 Australia New Zealand Middle and South America South Pacific Ocean Is...

Страница 108: ...memorized If you want to restore the factory default settings please use the Load Factory in the RATING Menu see rating menu Selecting a feature for adjustment Once inside a menu press the buttons on the remote control or touch the item directly to select the feature to be adjusted Adjusting a feature 1 Enter the option field for the feature you want to adjust by pressing the OK button on the remo...

Страница 109: ... Features Setting Options Function Subtitle English German French Spanish Italian Select the default language which you would like subtitles if available to be displayed Auto Off Audio English German French Spanish Italian Select the default language which you would like audio if available to be played DVD menu English German French Spanish Italian Select the default language in which you would li...

Страница 110: ...kers to create a time delay between 1 and 5 milliseconds to producing a more accurate audio effect 3ms 2ms 1ms 0ms REAR CONTROL 15ms Adjust the time difference between the rear and front speakers to create a time delay between 3 and 15 milliseconds to producing a more accurate audio effect 12ms 9ms 6ms 3ms 0ms Down Sampling Off Normal output On Audio signal output at 48kHz NOTE When down sampling ...

Страница 111: ...in wide view with a 16 9 aspect ratio Angle Mark On Angle indicator if available is shown Off Angle indicator is not shown View Mode Fill No function Original H FIT W FIT Fit to Scan Pan Scan NOTE For standard discs which are not formatted for widescreen use of the 16 9 aspect ratio will result in image distortion ...

Страница 112: ...kers are not present Subwoofer Present Use when the subwoofer is present None Use when the subwoofer is not present Center Large Use when the center speaker has a good bass output Small Use when the center speaker does not have a good bass output None Use when the center speaker is not present SPEAKER SELECTION Selecting LARGE for the multi channel speaker option will give a full range output Sele...

Страница 113: ...nd effect SURR Movie Enhance movie surround effects SURR Music Play surround music effects Panorama On Extend the sound from the front to the rear to achieve a better surround effect Off Panorama is turned off Dimension 0 to 6 Shift audio output between the front and rear speakers Center Width 0 to 6 Shift audio output between the front and center channel speakers ...

Страница 114: ...atings by using your password 2 G 3 PG 4 PG 13 5 PG R 6 R 7 NC 17 8 ADULT Load Factory No Select Yes to restore the factory default settings for the DVD setup only except the password and parental lock setting Yes To reset the password access the RATING menu and enter the current password Once the correct password is entered you can access the Password field and enter a new one NOTE Record the pas...

Страница 115: ...SO 9660 file name 31 characters file extension 3 characters Joliet 64 characters If the file or folder name does not conform to ISO 9660 file system standards it may not be displayed or played back correctly CD PLAYER USER INTERFACE 01 Current source indicator touch this area to access the MAIN menu 02 Disc title 03 Track title 04 Current time 05 E Touch to play pause 06 F Touch to stop disc playb...

Страница 116: ...he numeric keypad on the screen and then you can use the numeric keypad to access a track directly 20 System EQ setting Playing CD Files After inserting a CD disc files will play in the sequence of the directory In playing back you can press the numeric button on the remote control or touch a track on the screen directly to play Previous Next page Touch the G or H icon on the screen to navigate th...

Страница 117: ...isc capacity use the Disc at once setting The touch keys for MP3 WMA CD DVD playback are described below 01 Current source indicator touch this area to access MAIN menu 02 Disc title 03 Track title 04 Current time 05 ETouch to play pause the disc playback 06 FTouch to stop the disc playback 07 GTouch to turn to the previous page 08 HTouch to turn to the next page 9 ITouch to navigate through the d...

Страница 118: ... of the main directory In playing back you can press the numeric buttons on the remote control or touch the track directly to play Change Directory Folder Touch the I or J icon on the screen to navigate through the directories folders Previous Next Page Touch the G or H icon on the screen to navigate through the pages files JPEG DISCS 1 Stop playback and return to the picture list 2 Rotate picture...

Страница 119: ...se 6 F Touch to stop disc playback 7 G Touch to turn to the previous page 8 H Touch to turn to the next page 9 I Touch to display previous folder 10 J Touch to display next folder 11 K Activate deactivate the scan function 12 Q Touch to activate deactivate repeat single mode 13 R Touch to activate deactivate random mode 14 S Touch to display the numeric keypad on the screen to access a track direc...

Страница 120: ...6 F Touch to stop disc playback 7 G Touch to turn to the previous page 8 HTouch to turn to the next page 9 I Touch to navigate through the directories folders 10 J Touch to navigate through the directories folders 11 K Activate deactivate the scan function 12 c Touch to wait for iPod video photo 13 Q Touch to activate deactivate the repeat single mode 14 R Touch to activate deactivate the random m...

Страница 121: ...AIN menu iPod VIDEO PLAYBACK Press the c icon to play back videos which are stored on the iPod NOTE It is nessesary to activate the video output of the iPod If there are videos on the iPod you have to select them on iPod otherwise there will be no picture on the display However you can return to the MAIN menu by pressing the c icon again ...

Страница 122: ...ooth indicator at the top of the screen When the Bluetooth function is Off the indicator is grey When the Bluetooth function is On and no phone is connected to the unit the indicator will blink If a phone has been connected to the unit the indicator is on solid ACCESSING BLUETOOTH MODE Access the MAIN menu first and touch the button on the screen to access the Bluetooth mode Touch the button at th...

Страница 123: ... call list and missed call list If the number has been stored in the phone book it can be accessed by touching or on the screen to navigate through the phone book entries Touch the number to initiate the phone call NOTE Not all Bluetooth enabled phones support this feature BLUETOOTH SETUP Select the button to access the Bluetooth setup ...

Страница 124: ...d The phone least used except the default phone will be deleted and the new paired phone will become the last used phone Last used phone The phone connected with the unit that was used last If you want pair your phone with the unit the password 1234 is used to complete the pairing When asked enter this password in the phone which you are pairing with this unit AUTO CONNECT If the unit has been set...

Страница 125: ...ooth setup and the controls and indicators title for exact instructions When a call comes in the following interface will be displayed on the screen END A CALL Touch the icon to end a call BLUETOOTH MOBILE PHONE COMPATIBILITY The compatibility list gives an example of Bluetooth mobile phones on the market If your Bluetooth phone is not listed try it out in practice or contact your dealer for more ...

Страница 126: ...lease read the navigation software user manual Listening to an audio program while using viewing the navigation You can listen to an other playing mode while using the navigation mode 1 Select a playing mode 2 Touch the NAVI icon to select the navigation mode The map will be shown on screen and audio will continue to play while you are in the navigation mode 3 Navigation voice prompts will mute th...

Страница 127: ...button on the front panel or the SRC button on the remote control until DVB T appears at the top of the screen 2 Access the MAIN menu and select the DVB T icon on the touchscreen to enter the DVB T operation interface DVB T Operation Please read the DVB T user manual ...

Страница 128: ...er speakers 3 Speaker is shorted 3 Check speaker contact Tel Mute malfunction 1 MUTE wire is grounded 1 Check that MUTE connection is not grounded and that it s properly insulated Unit resets itself when engine is off 1 Incorrect connection between ACC and positive battery wire 1 Check wiring and correct GENERAL Problem Cause Corrective action Monitor does not open automatically 1 TFT Auto Open is...

Страница 129: ...sc is used 3 Use compatible disc 4 Disc rating exceeds Parental Lock rating limit 4 Change Parental Lock settings to lower restriction 5 Disc region code is not compatible with unit 5 Use disc with proper region cod 6 Disc is inserted upside down 6 Insert disc with label side up Image blurred distorted or dark 1 Disc is illegally copied 1 Use original disc PBC cannot be used during VCD playback 1 ...

Страница 130: ...rature inside the player gets too hot a protective circuit automatically stops the playback of the disc If this occurs allow the unit to cool before operating the player again 4 Never insert anything other than a 5 12 cm compact disc into the player as the mechanism can be damaged by foreign objects 5 Do not attempt to use a 3 8 cm CD single disc in this unit either with or without an adaptor as d...

Страница 131: ...85dBA Dynamic Range 95dB Frequency Response 20Hz to 20kHz 3dB Channel Separation 60dB 1kHz D A Converter s 6 channel high performance 24 bit 192kHz multi bit Sigma Delta modulation DAC supports sample rates from 8 192kHz Electronic Skip Protection ESP DVD 2 3 sec CD DA 10 sec MP3 100 sec WMA 200 sec ESP time is approximate Mechanical anti vibration ability 10 200Hz X Y Z direction 1 0G Video secti...

Страница 132: ...pedance 10k Power Supply 10 5 to 16V DC negative ground Fuse 10 amp mini ATM type DIN chassis dimensions 178 x 50 x 178 mm W x H x D Specification and design of this model is necessarily subject to changes without notice If at any time in the future you should need to dispose this product please note that waste electrical products should not be disposed of with household waste Please recycle where...

Страница 133: ...133 ENGLISH ...

Страница 134: ...ing date and dealer stamp together with the original sales slip 2 JAHRE GARANTIE Sehr geehrter Kunde Vielen Dank dass Sie sich zum Kauf dieses Produktes von ZENEC entschlossen haben Wir bitten Sie die Originalverpackung aufzuheben z B für den Transport bei einem Garantiefall Wenn Sie Garantie Leistungen für dieses ZENEC Produkt beanspruchen wenden Sie sich bitte direkt an den Händler bei dem das G...

Страница 135: ...135 WARRANTY GARANTIE ZENEC MODEL ZE MC192 Serial number Date of purchase Your name Your address City State ZIP or postal code Country Dealer s address stamp ...

Страница 136: ......

Отзывы: