background image

HDbridge 2920i Configuration Guide  

|

  Page 5 

Factory default settings allow HDb2920i units to broadcast 

up to 2 HD-SDI sources on RF channels for reception at 

connected HDTVs, and in IP for distribution over Ethernet 

networks.

We recommend using the most updated version of 

firmware. You can find the latest version on the Support 

section of our website (zeevee.com). 

Beginning setup

1.

 Apply  power.

2.

 Connect an HD-SDI video source to the HD-SDI input port, 

using an HD-SDI cable (which is sold separately).

3.


Optional 

– Connect the Analog Audio if the digital audio  

is not present on HD-SDI or if you want to implement the  

delay matched audio feature.

Tuning your channel at the HDTV (Auto Scan)

1. 

Connect the Coaxial Output of the HDb2920i to your  

RF network.


  If the RF power for your network is too high, you may 

observe video breakup.

2.

 Specify Cable (not Air or Antenna) setting in your TV menu.

3.

 Enter the RF number to tune directly to the channel.  

For default channel lineup information, refer to the  

Default Channel Lineup table.


If you cannot tune directly to 

the channel at this point, it is 

because most TVs will require 

you to run a full Auto Scan.

4

. Run the Auto Scan through 

the menu system of your 

HDTV to find the channels. 

DEFAULT CHANNEL 

SETTINGS

SDI Input

RF 

#

HDTV 

Channel 

Port 1

2

2.1

Port 2

3

3.1

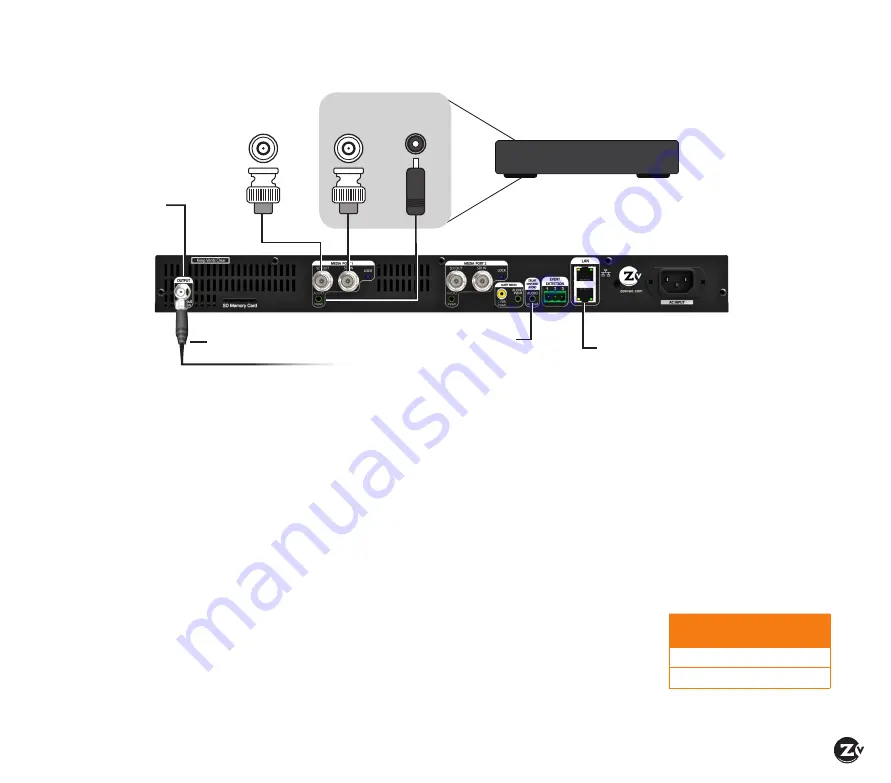
Basic Installation

Back of HDb2920i Modulator

HD-SDI  

HD-SDI pass-through 

to local monitor

(optional)

Analog 

Audio

Video Source

HD-SDI  

Video Source

RF Output 

 +45 dBmV

Ethernet to network or 

directly to computer

Delay Matched  

Analog Audio Out to 

audio system

WARNING: +45 dBmV

Do not connect directly to HDTV

Coax cable connects 

to coax network

Содержание HDbridge 2920i

Страница 1: ...HDbridge 2920i CONFIGURATION GUIDE S E R I E S NA...

Страница 2: ...rous voltage with in the product s enclosure that may be of sufficient magnitude to constitute a risk to persons The exclamation point within an equilateral triangle is intended to alert the user to t...

Страница 3: ...of Contents Front and Back Panels 4 Basic Installation 5 Beginning setup 5 Tuning your channel at the HDTV Auto Scan 5 Front Panel Configuration 6 7 Setting the RF broadcast channels or power 6 Cable...

Страница 4: ...e set between 45 to 25 dBmV using the Maestro web interface or the front panel Audio Video Inputs Digital Audio Video HD SDI with pass through Analog Audio 3 5mm Audio Alert Media Future feature devel...

Страница 5: ...e HDb2920i to your RF network If the RF power for your network is too high you may observe video breakup 2 Specify Cable not Air or Antenna setting in your TV menu 3 Enter the RF number to tune direct...

Страница 6: ...nges press OK to accept You can then select the next item for configuration 6 When finished making changes use the arrow buttons to scroll down and select Apply then click OK to save your changes Note...

Страница 7: ...for Channel 5 Video 78 0 MHz Channel 6 Video 84 0 MHz IRC Frequencies Same as Standard Frequencies Except for Channel 5 Video 79 25 MHz Channel 6 Video 85 25 MHz 19 150 156 42 330 336 72 510 516 107...

Страница 8: ...lan tab 2 Click in the RF field and enter the RF number as you choose from the RF Frequency Map on page 7 3 Click in the Channel field and enter a channel number virtual channel The channel number is...

Страница 9: ...hat is attached to a display COMPUTER OR SERVER If you want secondary processing of the stream the stream can be sent to a server or servers In such a case UDP unicast addressing is typically used to...

Страница 10: ...ro tabs to configure your unit as needed We provide brief information here Please click on the Help button on each tab or refer to the Support section of our website for further detail on configuratio...

Страница 11: ...ailed information on EAS in the Support section of the website THE NETWORK TAB Allows you to assign a static IP address to the unit THE SUPPORT TAB Provides technical support contact information and a...

Страница 12: ...ors be sure the RF selected on the unit does not conflict with any other channels keep in mind that some analog modulators may spill over to adjacent channels and cause unexpected interference If you...

Страница 13: ...not within the control of ZeeVee Any modifications or other changes to the ZeeVee Equipment including but not limited to software or hardware modification in any way other than as expressly authorized...

Страница 14: ...a postcard stamp Customer Details Product Details End User Company Name Serial Number an 11 or 12 digit number End User Address 1 Model Number End User Address 2 Date of Purchase Installation State P...

Отзывы: