background image

2

Zanussi 818 18 83-02/9

Safety instructions

GB

Your new freezer may have other functions compared to your previous one.
Carefully read these instructions to learn how the appliance works and how to care for it. Keep the instruction
booklet. It will come in handy if you later sell the cabinet or give it to somebody else.

These warnings are provided in the interests of your safety.

Ensure that you understand them all before

installing or using the appliance. Your safety is of paramount importance. If you are unsure about any of the
meanings or warnings contact the Customer Care Department.

For the User

·

The cabinet is intended for keeping foodstuff in a
normal household as explained in this instruction
booklet.

·

Do not keep explosive gases or liquids in the
refrigerator or freezer compartment. They may
explode and cause injury and material damage.

·

Do not let sharp objects come into contact with
the refrigerating system on the back of and inside
the cabinet. If the refrigerating system is
punctured, the cabinet will be damaged and
foodstuff inside may spoil.

·

Do not keep carbonised drinks or bottles in the
freezer compartment. The glass bottles may
break.

·

The cabinet is heavy. The edges and projecting
parts of the cabinet may be sharp. Be careful
when moving the cabinet and always use gloves.

Child Safety

·

Pay attention so that small children do not gain
access to the operating controls or the inside of
the cabinet.

Scrapping old cabinets

When discarding the cabinet, hand it over to a
recycling station. For more information, call your
local city office or your dealer.

Contents

GB

Safety instructions

2

. . . . . . . . . . . . . . . . .

Scrapping old cabinets

2

. . . . . . . . . . . . . . . . . . . . . . .

Contents

2

. . . . . . . . . . . . . . . . . . . . . . . . . .

Description of the Appliance

3

. . . . . . . .

Control Panel

3

. . . . . . . . . . . . . . . . . . . . . . . . . . . . . .

Before use

4

. . . . . . . . . . . . . . . . . . . . . . . . .

Using the freezer

4

. . . . . . . . . . . . . . . . . . .

To start the freezer and set the correct temperature 4
Temperature inside the freezer

4

. . . . . . . . . . . . . . . .

Switching off

4

. . . . . . . . . . . . . . . . . . . . . . . . . . . . . .

Alarms and other features

4

. . . . . . . . . . . . . . . . . . . .

Freezing

4

. . . . . . . . . . . . . . . . . . . . . . . . . . . . . . . . . .

Suitable storage periods

5

. . . . . . . . . . . . . . . . . . . . . .

Thawing

5

. . . . . . . . . . . . . . . . . . . . . . . . . . . . . . . . . .

Cabinet interior

5

. . . . . . . . . . . . . . . . . . . . . . . . . . . .

Hints and Tips

6

. . . . . . . . . . . . . . . . . . . . .

Saving energy

6

. . . . . . . . . . . . . . . . . . . . . . . . . . . . .

Food Storage

6

. . . . . . . . . . . . . . . . . . . . . . . . . . . . . .

Protect the environment

6

. . . . . . . . . . . . . . . . . . . . . .

Maintenance and Cleaning

6

. . . . . . . . . .

Removing the ventilation grille

6

. . . . . . . . . . . . . . . .

Cleaning

6

. . . . . . . . . . . . . . . . . . . . . . . . . . . . . . . . . .

Defrosting the freezer

7

. . . . . . . . . . . . . . . . . . . . . . .

When the appliance is not in use

7

. . . . . . . . . . . . . . .

Something Not Working

8

. . . . . . . . . . . .

Technical specification

9

. . . . . . . . . . . . .

Installation

9

. . . . . . . . . . . . . . . . . . . . . . . .

Electrical cord

9

. . . . . . . . . . . . . . . . . . . . . . . . . . . . .

Unpacking

9

. . . . . . . . . . . . . . . . . . . . . . . . . . . . . . . .

Remove the transport supports

9

. . . . . . . . . . . . . . . .

Cleaning

9

. . . . . . . . . . . . . . . . . . . . . . . . . . . . . . . . . .

Installing the cabinet

10

. . . . . . . . . . . . . . . . . . . . . . . .

Electrical connection

10

. . . . . . . . . . . . . . . . . . . . . . . .

Door Reversal

11

. . . . . . . . . . . . . . . . . . . . . . . . . . . . .

Содержание ZV220RM

Страница 1: ...FREEZER CONGÉLATEUR GEFRIERGERÄT VRIESKAST FRYSESKAB ZV220RM ZV255RM 8181883 02 9 Instruction book Notice d utilisation Gebrauchsanweisung Gebruiksaanwijzing Brugsanvisning ...

Страница 2: ...t keep carbonised drinks or bottles in the freezer compartment The glass bottles may break The cabinet is heavy The edges and projecting parts of the cabinet may be sharp Be careful when moving the cabinet and always use gloves Child Safety Pay attention so that small children do not gain access to the operating controls or the inside of the cabinet Scrapping old cabinets When discarding the cabin...

Страница 3: ...Ventilations grille 3 3 2 2 2 2 1 Control Panel A D s B C E A Red warning lamp Lights if it is too warm inside the cabinet B Yellow indicator lamp Lights when fast Freeze is operating C FAST FREEZE button Used to switch the Fast Freeze feature on and off D Green indicator lamp Lights when the freezer is operating E Thermostat control Use to switch on and set the desired temperature in the freezer ...

Страница 4: ... the temperature setting is changed This will allow the temperature to stabilise inside the cabinet Temperature inside the freezer To ensure that foodstuff will keep for a long time be sure that the temperature inside the freezer is 18 C or below Please note however that the energy consumption increases as the temperature decreases Switching off Set the thermostat control to the 0 position Unplug ...

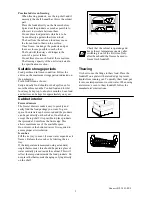
Страница 5: ...at the cabinet is operating and keeps the set temperature one day after switching it on for the first time Only after then should the freezer be used to freeze fresh foodstuff Thawing It is best to use the fridge to thaw food Place the foodstuff on a plate with a raised edge to prevent liquids from running out To quickly thaw food put it in room temperature or in cold water When using a microwave ...

Страница 6: ...iquids which may evaporate should be placed in the larder compartment Avoid buying frozen food if you can not store it straight away The use of an insulated container is advisable When you arrive home place the frozen food in the freezer immediately Ensure that food placed in the freezer is dated and labelled and used in date order to ensure that food is consumed at its best Remove suspect food fr...

Страница 7: ...y turning every other drawer one half turn Put insulating material around the drawers e g blankets or newspapers The frozen products can also be packed closely together and be kept in a cold location e g in the fridge Defrosting can be accelerated by placing bowls with hot water not boiling inside the freezer Take out the drain spout and place it in the bottom freezer drawer where water can collec...

Страница 8: ...perature where the cabinet is placed is above normal room temperature The cabinet does not operate at all Cooling or interior light does not operate No indicator lamps light The cabinet is not switched on Power does not reach the cabinet Try connecting another electrical device to the power outlet The fuse has blown The power plug is not properly connected Sound level in cabinet is too high The re...

Страница 9: ...company recommended by the supplier or a qualified person may adjust it Unpacking Unpack the cabinet and check that it is in good condition and free of any transport damage Notify the dealer immediately of any damage Hand the packaging over for recycling For more information contact your local city office or the dealer Do not allow children to play with the packaging The plastic film can cause suf...

Страница 10: ...ace behind the cupboard must be at least 50 mm deep Cabinet is placed at a location whose ambient temperature corresponds to the climate classification for which the appliance is designed See on the rating plate on the inside of the appliance The following table shows which ambient temperature is correct for each climate classification Climate classification for an ambient temperature of 10 C to 3...

Страница 11: ... plastic cover Secure the hinge on the other side 6 Raise the cabinet and replace the ventilation grille 7 Change the position of the handle Remove the cover washers concealing the screws If the washers are difficult to remove use a small flat screwdriver Then unscrew the handle Carefully press the plastic plugs into the holes on the side opposite that of the door using a drift Secure the handle i...

Страница 12: ...îçå Ö ëJ ìåÇ ëíêçãÄÉíêáÉÄÉåÉå dÉê íÉå ÑΩê ÇáÉ hΩÅÜÉI òìã oÉáåáÖÉå ìåÇ ÑΩê cçêëí ìåÇ d êíÉåK gÉÇÉë g Üê îÉêâ ìÑí ÇáÉ bäÉÅíêçäìñJdêìééÉ áå ΩÄÉê NRM i åÇÉêå ÇÉê bêÇÉ ΩÄÉê RR jáääáçåÉå mêçÇìâíÉ EhΩÜäëÅÜê åâÉI eÉêÇÉI t ëÅÜã ëÅÜáåÉåI pí ìÄë ìÖÉêI jçíçêë ÖÉå ìåÇ o ëÉåã ÜÉêF ãáí ÉáåÉã tÉêí îçå êìåÇ NQ jêÇK rpaK iÉ dêçìéÉ bäÉÅíêçäìñ Éëí äÉ éêÉãáÉê Ñ ÄêáÅ åí ãçåÇá ä ÇD éé êÉáäë ÇçãÉëíáèìÉëI ÇDÉåíêÉíáÉå Éí é...

Отзывы: