background image

Electrical connection

• Ground the appliance according to safety precautions.
• Make sure that the rated voltage and type of power on

the rating plate agree with the voltage and the power of

the local power supply.

• This appliance is supplied with a mains cable. It has to

be supplied with a correct plug, able to support the

load marked on the rating plate. The plug has to be fit-

ted in a correct socket.

• Any electrical component must be installed or replaced

by the Service Force Centre technician or qualified

service personnel.

• Always use a correctly installed shockproof socket.
• Make sure that there is an access to the mains plug af-

ter installation.

• Do not pull the mains cable to disconnect the appli-

ance. Always pull the mains plug.

• The appliance must not be connected with an extension

cable, an adapter or a multiple connection (risk of fire).

Check that the ground connection is in conformity with

the standard and regulations force.

• The power cable must be placed in such a way that it

does not touch any hot part.

• Connect the appliance to the mains with a device that

lets to disconnect the appliance from the mains at all

poles with a contact opening width of minimum 3 mm,

eg. automatic line protecting cut-out, earth leakage

trips or fuse.

• None of a parts of the connection cable can not get a

temperature 90 °C. The blue neutral cable must be

connected to the terminal block label with "N". The

brown (or black) phase cable (fitted in the terminal

block contact marked with "L") must always be connec-

ted to the live phase.

Replacement of the connection cable

To replace the connection cable use only H05V2V2-F T90

or equivalent type. Make sure that the cable section is ap-

plicable to the voltage and the working temperature. The

yellow/green earth wire must be approximately 2 cm lon-

ger than the brown (or black) phase wire.

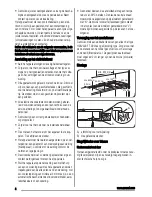
Assembly

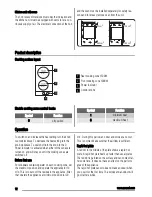
55 mm

30 mm

min. 650 mm

490 mm

min. 100 mm

270 mm

40-50 mm

min. 600 mm

B

A

A) seal to remove
B) supplied brackets

Possibilities for insertion

Kitchen unit with door
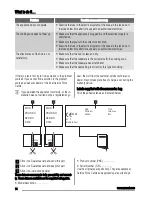
The panel installed below the hob must be easy to remove

and let an easy access in case a technical assistance inter-

vention is necessary.

min 20 mm

(max 150 mm)

30 mm

60 mm

b

a

a) Removable panel
b) Space for connections


11

www.zanussi.com

Содержание ZEE3921IXA

Страница 1: ...NL Gebruiksaanwijzing 2 EN User manual 9 FR Notice d utilisation 16 DE Benutzerinformation 24 Vaste kookplaat Solid hotplate hob Zone de cuisson Kochfeld mit Kochplatten ZEE3921I ...

Страница 2: ...en tijdens en na het gebruik uit de buurt van het apparaat totdat het apparaat afgekoeld is Veiligheid tijdens het gebruik Verwijder al het verpakkingsmateriaal stickers en folie van het apparaat voordat u het in gebruik neemt Schakel de kookzones na ieder gebruik uit Gevaar voor brandwonden Plaats geen metalen bestek of deksels op de kookplaat want deze kunnen erg heet worden Waarschuwing Brandge...

Страница 3: ...apparaat wordt gebruikt dienen in acht genomen te worden veiligheidsvoor schriften correcte recycling overeenkomstig de voor schriften veiligheidsvoorschriften met betrekking tot elektrische installaties enz Houd de minimumafstanden naar andere apparaten en units in acht Tijdens de installatie moet een antistootbescherming zijn aangebracht bijv lades mogen alleen worden aan gebracht als er onder h...

Страница 4: ...r is Trek niet aan het netsnoer om het apparaat los te kop pelen Trek altijd aan de stekker Het apparaat moet niet worden aangesloten op een ver lengsnoer een adapter of een meervoudige aansluiting brandgevaar Controleer of de aarding conform de normen en regelgeving is De stroomkabel moet zo worden geplaatst dat er geen contact wordt gemaakt met een heet oppervlak Sluit het apparaat op de netvoed...

Страница 5: ...3 Stroomindicatielampje 4 Bedieningsknoppen Bedieningsknoppen elektrische kookzones Symbool Functie 0 uit stand Symbool Functie 1 minimale warmte 6 maximale warmte Bediening Om de temperatuur in te schakelen en de instelling te ver hogen de knop linksom draaien Draai de knop naar rechts om de kookstand te verlagen Draai de knop naar 0 om het apparaat uit te schakelen Het controlelampje gaat brande...

Страница 6: ...over acrylamides Belangrijk Volgens recente wetenschappelijke informatie kan het intensief bruinen van levensmiddelen met name in producten die zetmeel bevatten een gezondheidsrisico vormen tengevolge van acrylamides Om die reden adviseren wij levensmiddelen zoveel mogelijk bij lage temperaturen gaar te laten worden en de gerechten niet te veel te bruinen Onderhoud en reiniging Reinig het apparaat...

Страница 7: ...niet naar tevredenheid Zorg ervoor dat de kookplaat schoon en droog is Zorg ervoor dat het kookgerei de juiste maat heeft voor de kookzone Zorg ervoor dat het kookgerei een vlakke bodem heeft Zorg ervoor dat de warmte instelling correct is voor het soort bereiding Als er een storing optreedt probeer dan eerst zelf een op lossing voor het probleem te vinden Als u niet zelf het probleem kunt verhelp...

Страница 8: ...Het symbool op het product of op de verpakking wijst erop dat dit product niet als huishoudafval mag worden behandeld maar moet worden afgegeven bij een verzamelpunt waar elektrische en elektronische apparatuur wordt gerecycled Als u ervoor zorgt dat dit product op de juiste manier wordt verwijderd voorkomt u mogelijke negatieve gevolgen voor mens en milieu die zich zouden kunnen voordoen in geval...

Страница 9: ...tion until the appliance is cold Safety during operation Remove all packaging stickers and layers from the ap pliance before the first use Set the cooking zones to off after each use Risk of burns Do not put cutlery or saucepan lids on the cooking surface as they can become hot Warning Fire danger Overheated fats and oils can ignite very quickly Correct operation Do not leave the appliance unatten...

Страница 10: ...nces and units Install anti shock protection for example install the drawers only with a protective panel directly below the appliance If the fixing bracket is near to the terminal block al ways make sure the connection cable does not come in contact with the edge of the bracket Prevent damage of the cut surfaces of the worktop against moisture with a correct sealant Seal the appliance to the work...

Страница 11: ...art Connect the appliance to the mains with a device that lets to disconnect the appliance from the mains at all poles with a contact opening width of minimum 3 mm eg automatic line protecting cut out earth leakage trips or fuse None of a parts of the connection cable can not get a temperature 90 C The blue neutral cable must be connected to the terminal block label with N The brown or black phase...

Страница 12: ...kwise To switch off turn the knob to the 0 Power indicator is activated when either of the zones are turned on and will stay on until the cooking zones are switched off Before first use Put cookware containing water on each cooking zone set the maximum position and operate the appliance for 10 min This is to burn off the residue in the appliance After that operate the appliance at minimum position...

Страница 13: ...at the lowest temperatures and do not brown food too much Care and cleaning Clean the appliance after each use Always use cookware with clean bottom Warning Before any maintenance or cleaning can be carried out you must disconnect the hob from the electricity supply The hob is best cleaned while it is still warm as spillage can be removed more easily than if it is left to cool Warning Sharp object...

Страница 14: ...try to find a solution to the problem yourself If you cannot find a solution to the problem yourself speak your dealer or the local Service Force Centre If you operated the appliance incorrectly or the in stallation was not carried out by a registered engi neer the visit from the customer service technician or dealer may not take place free of charge even during the warranty period Labels supplied...

Страница 15: ...pment By ensuring this product is disposed of correctly you will help prevent potential negative consequences for the environment and human health which could otherwise be caused by inappropriate waste handling of this product For more detailed information about recycling of this product please contact your local council your household waste disposal service or the shop where you purchased the pro...

Страница 16: ...s s approcher de l appareil pendant ou après son utilisation et cela jusqu à ce qu il soit froid Utilisation Retirez tous les emballages les étiquettes et les films protecteurs de l appareil sauf la plaque signalétique avant de l utiliser pour la première fois Mettez les zones de cuisson à l arrêt après chaque uti lisation Risque de brûlures Ne posez aucun objet contenant du métal comme les couver...

Страница 17: ...ueriez de vous blesser ou d endommager l appareil Vérifiez que l appareil n a pas été endommagé pendant le transport Ne branchez pas un appareil endommagé Si nécessaire contactez votre magasin vendeur L installation et le raccordement de l appareil à l ali mentation électrique doivent uniquement être effectués par un professionnel qualifié N utilisez des appareils encastrables qu après les avoir i...

Страница 18: ...t être insé rée dans une prise murale appropriée Pour toute intervention sur votre appareil faites appel au service après vente de votre magasin vendeur Utilisez toujours une prise antichoc correctement in stallée Assurez vous que la prise principale est accessible après installation Ne tirez jamais sur le câble d alimentation électrique pour débrancher l appareil Tirez toujours sur la prise de co...

Страница 19: ...our des raisons de sécurité et pour permettre de re tirer facilement le four de l ensemble 50 cm2 360 cm2 180 cm2 120 cm2 Description de l appareil Description de la table de cuisson 1 2 3 4 180 mm 145 mm 1 Zone de cuisson arrière 1500 W 2 Zone de cuisson avant 1000 W 3 Voyant de mise sous tension 4 Manettes de commande Manettes de commande des zones de cuisson électriques Symbole Fonction 0 posit...

Страница 20: ...e cuis son avant de mettre celle ci en fonctionnement Mettez à l arrêt les zones de cuisson avant la fin du temps de cuisson pour utiliser la chaleur rési duelle Pour obtenir des résultats satisfaisants le diamè tre des plats et des zones de cuisson doit être identique Récipient de cuisson Le fond du récipient de cuisson doit être lisse propre et sec aussi plat et épais que possible avant chaque u...

Страница 21: ... la table de cuisson utilisez un nettoyant spécial pour acier inoxydable Le rebord en inox des plaques peut subir une légère décoloration en raison de la charge thermique En cas d anomalie de fonctionnement Problème Cause et solution possibles L appareil ne fonctionne pas du tout Vérifiez le fusible du système électrique de l habitation dans la boîte à fusi bles Si les fusibles grillent de manière...

Страница 22: ...ER NO DATA MODEL MODEL MOD PROD NO SER NO 03 IT MADE IN ITALY TYPE 230V 50Hz IP20 0049 1 2 3 1 Collez la sur la carte de garantie et envoyez cette partie 2 Collez la sur la carte de garantie et conservez cette partie 3 Collez la sur la notice d utilisation Ces informations sont nécessaires pour pouvoir vous of frir une aide rapide et adaptée Ces données figurent sur la plaque signalétique fournie ...

Страница 23: ...les de l art nous préservons l environnement et notre sécurité s assurant ainsi que les déchets seront traités dans des conditions optimum Pour obtenir plus de détails sur le recyclage de ce produit veuillez prendre contact avec les services de votre commune ou le magasin où vous avez effectué l achat Emballage Tous les matériaux d emballage sont écologiques et recyclables Les composants en plasti...

Страница 24: ... dem Gerät spielen können Halten Sie das Verpackungsmaterial von Kindern fern Andernfalls besteht Erstickungs und Verletzungsge fahr Halten Sie Kinder während und nach dem Betrieb vom Gerät fern bis das Gerät kalt geworden ist Sicherheit während des Betriebs Entfernen Sie vor dem ersten Gebrauch alle Verpa ckungsmaterialien Aufkleber und Auflagen Schalten Sie die Kochzonen nach jedem Gebrauch aus ...

Страница 25: ... Fall an Ihren Händler Das Gerät darf nur von Fachpersonal montiert und an die Stromversorgung angeschlossen werden Einbaugeräte dürfen nur nach dem Einbau in bzw unter normgerechte passende Einbauschränke und Arbeits platten betrieben werden Nehmen Sie weder technische noch anderweitige Än derungen am Gerät vor Es besteht Unfallgefahr und das Gerät könnte beschädigt werden Halten Sie unbedingt al...

Страница 26: ...sche Bauteile dürfen nur vom Kundendienst oder von einer Fachkraft installiert oder ausgewechselt wer den Schließen Sie das Gerät nur an eine sachgemäß instal lierte Schutzkontaktsteckdose an Stellen Sie sicher dass der Netzstecker nach der Mon tage noch zugänglich ist Ziehen Sie nicht am Netzkabel wenn Sie das Gerät vom Stromnetz trennen möchten Ziehen Sie dazu im mer direkt am Netzstecker Das Ge...

Страница 27: ...ofen müs sen aus Sicherheitsgründen über separate elektrische An schlüsse verfügen Der Backofen muss sich leicht aus dem Unterbauschrank entfernen lassen 50 cm2 360 cm2 180 cm2 120 cm2 Gerätebeschreibung Kochfeldanordnung 1 2 3 4 180 mm 145 mm 1 Hintere Kochzone 1500 W 2 Vordere Kochzone 1000 W 3 Betriebs Kontrolllampe 4 Einstellknöpfe Kochzonen Schalter Symbol Funktion 0 Position AUS Symbol Funkt...

Страница 28: ...Restwärme zu nutzen Für zufriedenstellende Ergebnisse sollte der Durchmesser des Geschirrs und der verwendeten Kochzone gleich groß sein Kochgeschirr Der Boden des Kochgeschirrs sollte so dick und flach wie möglich sein Verwenden Sie Töpfe und Pfannen mit einem Bo den der der Größe der Kochzone entspricht Kochzone Durchmesser des Kochgeschirrs Vorne max 145 mm Hinten max 180 mm Anwendungsbeispiele...

Страница 29: ...iche Ursache und Abhilfe Das Gerät funktioniert nicht Sehen Sie im Sicherungskasten nach ob die Sicherung des Geräts ausge löst hat Wenn die Sicherung öfter auslöst wenden Sie sich an eine Elekt rofachkraft Die Kochzone heizt nicht auf Vergewissern Sie sich dass das Gerät und die Stromversorgung einge schaltet sind Drehen Sie den richtigen Kochzonen Einstellknopf Sehen Sie im Sicherungskasten nach...

Страница 30: ... ITALY TYPE 230V 50Hz IP20 0049 1 2 3 1 Kleben Sie ihn auf die Garantiekarte und verschicken Sie diesen Teil 2 Kleben Sie ihn auf die Garantiekarte und behalten Sie diesen Teil 3 Kleben Sie ihn auf die Gebrauchsanweisung Halten Sie folgende Angaben bereit damit Ihr Anliegen schnell und ordnungsgemäß bearbeitet werden kann Die erforderlichen Angaben finden Sie auf dem Typenschild Modell Produktnumm...

Страница 31: ...undheit Ihrer Mitmenschen Umwelt und Gesundheit werden durch falsches Entsorgen gefährdet Weitere Informationen über das Recycling dieses Produkts erhalten Sie von Ihrem Rathaus Ihrer Müllabfuhr oder dem Geschäft in dem Sie das Produkt gekauft haben Verpackungsmaterial Die Verpackungsmaterialien sind umweltverträglich und wiederverwertbar Kunststoffteile sind mit inter nationalen Abkürzungen wie z...

Страница 32: ...www zanussi com shop 397221501 B 072012 ...

Отзывы: