background image

USE

ENGLISH

31

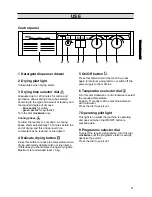
Control panel

1 Detergent dispenser drawer

2 Drying pilot light

It illuminates when drying starts.

3 Drying time selector dial

Graduated up to 120 minutes for cotton and
synthetics, allows drying time to be selected
according to the type and amount of laundry and
the required degree of dryness:

blue sector for cotton
green sector for synthetics

Turn the dial clockwise only. 

Cooling phase 

To allow the laundry to cool down, a cooling
phase starts automatically 10 minutes before the
end of drying and this phase must in no
circumstances be reduced or interrupted.

4 Delicate drying button

Press this button to reduce the temperature when
drying particularly delicate cotton or linen items.
In this case you should select a longer drying time.
Maximum recommended load: 1.5 kg.

5 On/Off button 

Press this button to start the machine, press
again to interrupt a programme or switch off the
power supply to the machine.

6 Temperature selector dial 

Turn this dial clockwise or anti-clockwise to select
the required temperature.
Position 

means that the machine will wash

with cold water.
Press the dial to pop it out.

7 Operating pilot light

This light is on whilst the machine is operating
and goes out when the ON/OFF button is
pressed again.

8 Programme selector dial

To select the required programme, turn this dial
clockwise until the programme letter is exactly
opposite the pointer.
Press the dial to pop it out.

1

2

3

5

6

7

4

8

Содержание WDJD 1082

Страница 1: ...LAVADORA SECADORA WASHER DRYER WDJD1082 MANUAL DE USO INSTRUCTION BOOKLET 124976161 ...

Страница 2: ... overloading the drum Use the prewash programme only for very soiled laundry Measure out detergent according to the water hardness the degree of soiling and the quantity of laundry being washed Environment protection Packaging recycling Materials marked with the symbol are recyclable To enable them to be recycled they must be placed in the appropriate collection areas or containers Check with your...

Страница 3: ... Controls 31 Programme selection 32 Washing and drying hints 33 Sorting the laundry 33 Temperatures 33 Before loading the laundry 33 Maximum loads 33 Removing stains 33 Detergents and additives 34 Drying 34 International wash code symbols 35 Operating sequence 36 37 Washing and drying programmes 38 39 Maintenance 40 Bodywork 40 Detergent dispenser drawer 40 Drain filter 40 Water inlet filter 41 Em...

Страница 4: ...this dispenser before drying Do not overload the appliance Follow the instructions in the instruction book Make sure that all pockets are empty Objects such as coins safety pins pins and screws can cause extensive damage Do not machine wash garments saturated with petroleum methylated spirits trichlorethylene etc If such fluids have been used to remove stains prior to washing wait until they have ...

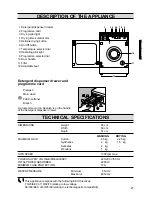
Страница 5: ...73 relating to low voltage 89 336 EEC of 03 05 89 relating to electromagnetic compatibility DESCRIPTION OF THE APPLIANCE 01 Detergent dispenser drawer 02 Programme card 03 Drying pilot light 04 Drying time selector dial 05 Delicate drying button 06 On Off button 07 Temperature selector dial 08 Operating pilot light 09 Programme selector dial 10 Door handle 11 Filter 12 Adjustable feet Detergent di...

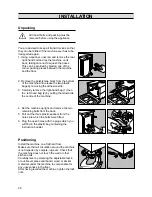
Страница 6: ...et the machine upright and remove the two remaining bolts from the back 5 Pull out the three plastic spacers from the holes into which the bolts were fitted 6 Plug the open holes with the plugs which you will find in the plastic bag containing the instruction booklet Positioning Install the machine on a flat hard floor Make sure that air circulation around the machine is not impeded by carpets rug...

Страница 7: ...done by tying it to the tap with a piece of string or attaching it to the wall In a sink drain pipe branch This branch must be above the trap so that the bend is at least 60 cm above the ground Directly into a drain pipe at a height of not less than 60 cm and not more than 90 cm The end of the drain hose must always be ventilated i e the inside diameter of the drain pipe must be larger than the ou...

Страница 8: ...d plate 6 on the opposite sides Fig B 10 Remove the door catch 7 and plate 8 as explained in paragraph 7 11 Turn the door through 180 12 Refit the door catch 7 and plate 8 reversing their position and pressing firmly to engage the hook Fig B 13 Fit the door onto the washing machine Insert the top pin first then the bottom pin into the hinge 3 Fig B finally screw the hinge onto the washing machine ...

Страница 9: ...tton to reduce the temperature when drying particularly delicate cotton or linen items In this case you should select a longer drying time Maximum recommended load 1 5 kg 5 On Off button Press this button to start the machine press again to interrupt a programme or switch off the power supply to the machine 6 Temperature selector dial Turn this dial clockwise or anti clockwise to select the requir...

Страница 10: ... drying time Select the drying programme H or R Depress button if desired Press the ON OFF button Automatic washing and drying NON STOP programme Automatic washing and drying is only possible with linen cotton and synthetics programmes The maximum load size is 2 25 kg for cotton and 1 5 kg for synthetics Do not exceed these quantities Select the temperature and the wash programme Select the drying...

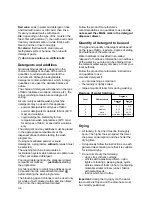
Страница 11: ...abrics and woollens drum no more than one third full Washing a maximum load makes the most efficient use of water and energy For heavily soiled laundry reduce the load size Laundry weights The following weights are indicative bathrobe 1200 g napkin 100 g quilt cover 700 g sheet 500 g pillow case 200 g tablecloth 250 g towelling towel 200 g tea cloth 100 g night dress 200 g ladies briefs 100 g man ...

Страница 12: ...ked just before starting the programme Any fabric softener or starching additives must be poured into the compartment marked before starting the wash programme The bleaching agent chlorine can be used only for white or fast coloured cotton and linen items Pour it into the compartment marked Follow the product manufacturer s recommendations on quantities to use and do not exceed the MAX mark in the...

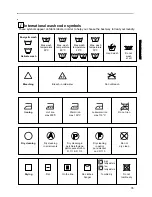
Страница 13: ...ture 30 C Hand wash Do not wash at all Bleaching Bleach in cold water Do not bleach Ironing Hot iron max 200 C Warm iron max 150 C Lukewarm iron max 110 C Do not iron Dry cleaning Dry cleaning in all solvents Dry cleaning in perchlorethylene petrol pure alcohol R 111 R 113 Dry cleaning in petrol pure alcohol and R 113 Do not dry clean Drying Flat On the line On clothes hanger Tumble dry high tempe...

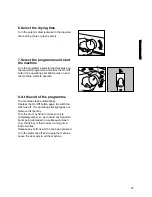
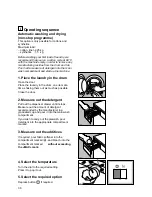
Страница 14: ...y in the drum one item at a time shaking them out as much as possible Close the door 2 Measure out the detergent Pull out the dispenser drawer until it stops Measure out the amount of detergent recommended by the manufacturer in a graduated cup and pour it into the main wash compartment If you wish to carry out the prewash pour detergent into the appropriate compartment marked 3 Measure out the ad...

Страница 15: ...erate 8 At the end of the programme The machine stops automatically Depress the On Off button again to switch the machine off The operating pilot light goes out Remove the laundry Turn the drum by hand to make sure it is completely empty so as to avoid any forgotten items being damaged in a subsequent wash e g shrinking or their colour running into a load of whites Release any buttons which have b...

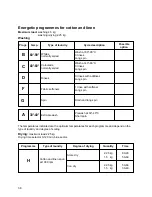
Страница 16: ...th additives Long spin F Fabric softeners 1 rinse with softener Long spin G Spin Drain and long spin The temperatures indicated are the optimum temperatures for each programme and depend on the type of laundry and degree of soiling Drying maximum load 2 25 kg Drying time selector 0 120 min blue sector A 30 40 Extra prewash Prewash at 30 40 C Short spin Time Programme Type of laundry Degree of dryi...

Страница 17: ...Quantity 90 100 60 70 R Synthetics spun at 650 rpm Store dry 1 5 kg 1 0 kg 70 80 40 50 Iron dry 1 5 kg 1 0 kg Delicate programmes for synthetics mixed fibres delicates and woollens Maximum load washing 2 kg woollens 1 kg washing drying synthetics 1 5 kg At the end of these programmes the last rinse water is not emptied out so as to avoid creasing of the fabrics To empty out the water select progra...

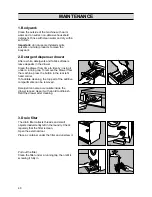
Страница 18: ... drawer from the machine press the button in the rear left hand corner To facilitate cleaning the top part of the additive compartments can be removed Detergent can also accumulate inside the drawer recess clean it with an old toothbrush Refit the drawer after cleaning 3 Drain filter The drain filter collects threads and small objects inadvertently left in the laundry Check regularly that the filt...

Страница 19: ...e access to the outlet hose because for example the appliance is built in the kitchen furniture slightly loosen the outlet filter after placing a bowl on the floor to let the water come out slowly At the end screw the filter again 6 Frost precautions If the machine is installed in a place where the temperature could drop below 0 C proceed as follows Close the water tap and unscrew the water inlet ...

Страница 20: ...uch detergent or unsuitable detergent creates too much foam has been used Check whether there are any leaks from one of the inlet hose fittings It is not always easy to see this as the water runs down the hose check to see if it is damp Check that the drain hose is not damaged Unsatisfactory washing results Too little detergent or unsuitable detergent has been used Stubborn stains have not been tr...

Страница 21: ... an unusual noise compared with other traditional machines This motor enables a softer start to the spin and controls the increase in spin speed better In this way machine performance is improved Water is not visible in the machine The machine which is the result of modern technology runs in a very economical way with low water consumption Performance is nevertheless excellent Spinning starts late...

Страница 22: ...Z ...
Отзывы: