30
Door reversal
The opening direction of the outer door on this
washing machine can be reversed. To carry out
this operation, proceed as follows:
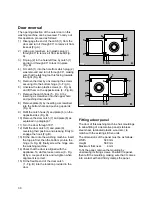
1) Disengage the end of the catch (1) from the
door and turn it through 90° to remove it from
its seat (Fig. A).
2) Using a screwdriver, turn plastic plug (2)
through 90° to remove it from its seat (Fig.
A).
3) Fit plug (2) in the hole left free by catch (1)
and turn it through 90° to lock it in place
(Fig. B).
4) Fit catch (1) into the hole from which plug (2)
was removed and turn it through 90°, making
sure that the latching tooth is facing towards
the right (Fig. B).
5) Remove the door by unscrewing the screws
securing it to the bottom hinge (3 - Fig. A).
6) Unscrew the two plastic screws (4 - Fig. A)
and fit them on the opposite side (4 - Fig. B).
7) Remove the catch hook (5 - Fig. A) by
inserting a screwdriver into the upper hole
and pushing downwards.
8) Remove plate (6) by inserting a screwdriver
into the bottom hole and pushing upwards
(Fig. A).
9) Refit the catch hook (5) and plate (6) on the
opposite sides (Fig. B).
10) Remove the door catch (7) and plate (8) as
explained in paragraph 7.
11) Turn the door through 180°.
12) Refit the door catch (7) and plate (8),
reversing their position and pressing firmly to
engage the hook (Fig. B).
13) Fit the door onto the washing machine. Insert
the top pin first, then the bottom pin into the
hinge (3- Fig. B); finally screw the hinge onto
the washing machine.
14) Check that the door is aligned with the
appliance. To do this, loosen screw (9 - Fig.
B) by a couple of turns and re-tighten when
alignment is correct.
15) Fit the flexible end of the door catch
(1 - Fig. B) into the location provided in the
door.
Fitting a door panel
The door of this washing machine has mouldings
to allow fitting of a decorative panel (stainless
steel sheet, laminated plastic, wood etc.) to
match with the existing kitchen units.
The dimensions of the panel must be as follows:
Width
588 mm
Height
588 mm
Maximum thickness
00
4 mm
To fit the panel, remove the moulding by
unscrewing its fixing screws. Position the panel,
then refit the moulding, making sure that it comes
into contact with and firmly clamps the panel.
P0534
7
4
2
3
9
1
8
6
5
A
P0535
5
4
2
3 9
1
7
8
6
B
Содержание WDJD 1082
Страница 1: ...LAVADORA SECADORA WASHER DRYER WDJD1082 MANUAL DE USO INSTRUCTION BOOKLET 124976161 ...
Страница 22: ...Z ...


