background image

5

1

2

3

4

5

A U T O R E V E R S E

DRYING

T I M E

T C     4 9 1 D

IMPORTANT: PLEASE READ THE INSTRUCTION BOOK BEFORE USING THIS APPLIANCE

STORE  DRY

DOOR

OPEN

IRON  DRY

COTTON

SYNTHETICS

Spun at rpm
kg  5
kg  2.5

   800 / 900    1000 / 1200


90' -110'    85' -105'

  60' -  75'    55' -  70'

   800 / 900      1000 / 1200


75' - 95'       65' -  90'

  45' - 60'       40' -  55'

Spun at rpm

     650

50' - 60'

30' - 40'

kg  2.5
kg  1

STORE  DRY

DRYEL GUIDE

For  "HAND WASH" & "DRY CLEAN ONLY" Labels, use with                   bag & sheet.

12

0

10

0

80

60

40

20

80

60

40

20

HIG

H

LO

W

0

0

6

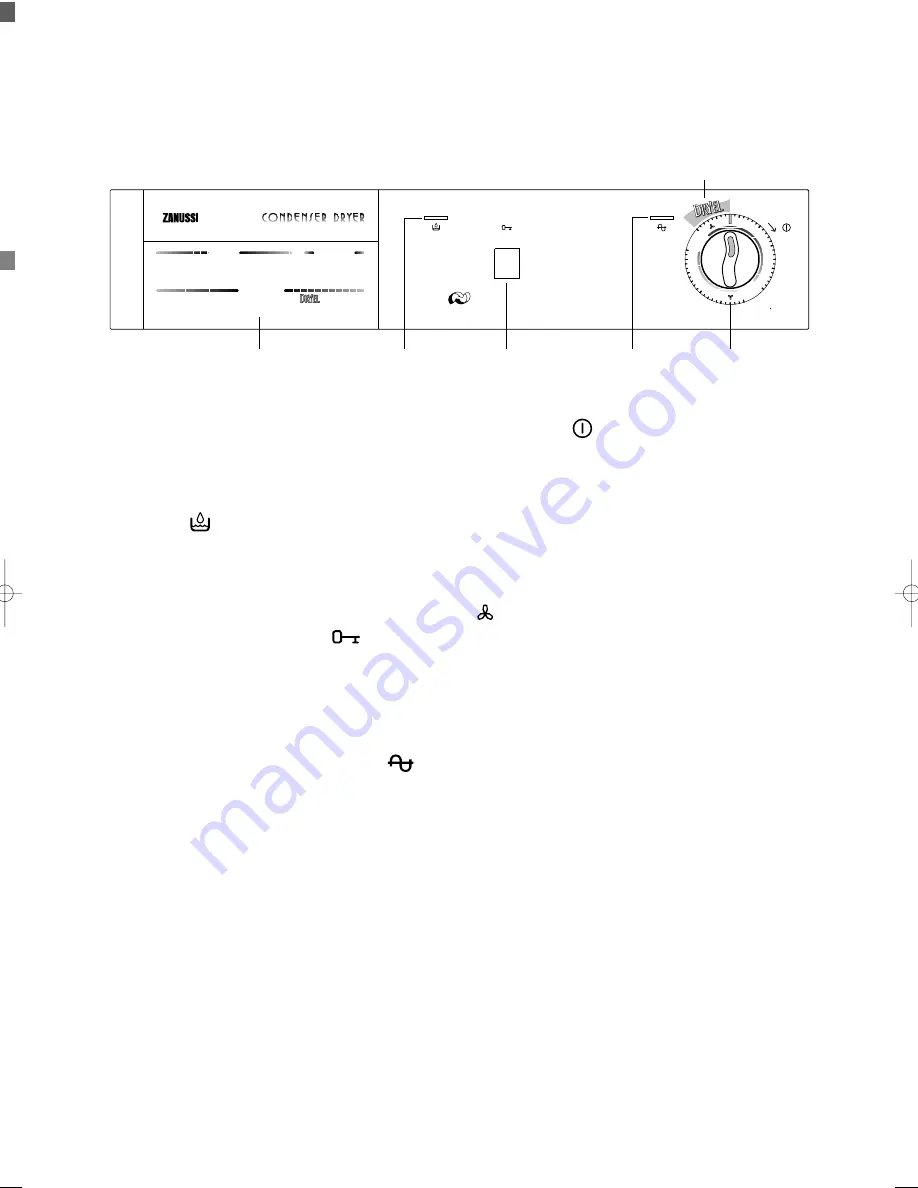
The Control Panel

1 Programme Chart

This will help you to select the correct time for
drying.

2 Water Full Indicator Light

(red) 

This light illuminates when the reservoir is full or
improperly fitted.
The programme will be interrupted.

3 Door Open Button 

Depress this button to open the door.
The door of the machine can be opened at any time
during the programme if you want to feel the dryness
of the fabrics.

4   Mains-On Light (green) 

This light indicates operating status.

5 Time Selector Dial-On/Off

Switch 

Turn the dial clockwise (to the right) to select the
time for drying (see Chart page 6). At the same time
the machine is switched on and the programme starts.

This dryer has two drying cycles of up to 120  and 80
minutes, giving a high or low heat temperature
according to the type of fabric. 

When selecting the drying time you should remember
that it includes a 12 minute cooling phase (position

on the dial).

This phase should not be shortened, stopped or
avoided, as this could cause skin burns or damages to
the laundry.

6 Dryel Cycle

For your convenience your Zanussi dryer has a
special Dryel cycle so that you get best results when
using Dryel.

Dryel is a product which is designed to clean and
freshen garments labelled “dry clean only” and “hand
wash”, at home in your tumble dryer.

Turn the time selector dial 

clockwise

to select the

Dryel cycle. Line up the blue line on the dial with the
green line in the 12 o’clock position. The “0”
positioned on the dial will now be at the start of the
Dryel mark
Your Zanussi dryer will run for about 30 minutes
including a cool down period.
Always follw the instructions on the Dryel
packaging.

125995521 TC491D.qxd  12/12/00  2:57 PM  Pagina  5    (Nero/Process Black pellicola)

Содержание TC 491 D

Страница 1: ...00 900 1000 1200 90 110 85 105 60 75 55 70 Spun at rpm 650 30 40 25 35 kg 2 kg 1 800 900 1000 1200 75 95 65 90 45 60 40 55 IMPORTANT PLEASE READ THE INSTRUCTION BOOK BEFORE USING THIS APPLIANCE STORE DRY STORE DRY A U T O R E V E R S E DRYING T I M E T C 4 8 1 W INSTRUCTION BOOKLET 125995521 GB ...

Страница 2: ...sure that no gas lighters have accidentally been left in pockets of garments to be loaded into appliance Danger of explosion Never tumble dry items that have been in contact with inflammable solvents petrol methylated spirits dry cleaning fluid and the like As these substance are volatile they could cause an explosion Tumble dry only items washed with water In order to avoid danger of fires caused...

Страница 3: ...nd Cleaning 9 External cleaning 9 Cleaning fluff filter 9 Cleaning the condenser unit 9 Emptying the water reservoir 9 Something Not Working 10 Service and Spare Parts 10 Customer Care 10 Zanussi Service Force 11 12 Guarantee Conditions 13 For the Installer Installation Instructions 14 Technical Specifications 14 Positioning 15 Stacking kit optional accessory 15 Door reversal 16 Electrical connect...

Страница 4: ...d inside Help to keep your country tidy use authorised disposal sites for your old appliance How do we help to protect the environment We use recycled paper Energy saving tips To save energy we recommend that you follow these hints Try to load the maximum capacity of the machine as small loads are uneconomical Always load well spun laundry The higher the spin speed the lower the electricity consum...

Страница 5: ...lector Dial On Off Switch Turn the dial clockwise to the right to select the time for drying see Chart page 6 At the same time the machine is switched on and the programme starts This dryer has two drying cycles of up to 120 and 80 minutes giving a high or low heat temperature according to the type of fabric When selecting the drying time you should remember that it includes a 12 minute cooling ph...

Страница 6: ...brics which do not require ironing Synthetics or mixed fabrics which have to be ironed Please see labels on items Degree of drying Store dry 2 5 50 60 30 40 40 50 20 30 1 2 5 1 Iron dry Amount of laundry in kg Drying time in minutes for laundry spun at a minimum speed of 650 rpm Dryel Cycle Dryel is a product which is designed to clean and freshen garments labelled dry clean only and hand wash at ...

Страница 7: ...lease check the laundry does not get caught between the door and filter 2 Select the drying time Turn the selector dial clockwise to the desired time in the high or low temperature section according to the fabric The mains on light illuminates and the programme starts 3 When drying is completed The machine stops automatically and the mains on light goes out Open the door and take out the laundry C...

Страница 8: ...arge and small articles When drying large items such as sheets we recommend you periodically stop the dryer to redistribute the load DO NOT use the tumble dryer to dry the following Articles contaminated with inflammable substances e g petrol cleaning solvents cooking oil fats or hair lacquer Woollen and synthetic wool mixtures unless the item is labelled as suitable for tumble drying Very delicat...

Страница 9: ...nsiderably as a result of the drying action P0638 Cleaning the condenser unit Clean the air condenser periodically 3 or 4 times a year depending on how frequently the dryer is used Pull out the condenser holding it at the top and remove all fluff Clean it with a brush and rinse it under the shower if necessary Also clean the outside removing all fluff Clean the rubber seal round the porthole door ...

Страница 10: ...on a charge will be made even if the appliance is under guarantee Service Spare Parts In the event of your appliance requiring service or if you wish to purchase spare parts please contact your local Zanussi Service Force Centre by telephoning 0870 5 929929 Your telephone call will be automatically routed to the Service Force Centre covering your post code area The addresses are listed on the foll...

Страница 11: ... ZE1 0PW SHETLAND Bolts Shetland Ltd 26 North Road Lerwick OWN SALES Shetland ZE1 0PE WHALSAY Leask Electrical Harisdale Symbister Whalsay OWN SALES Shetland ZE2 9AA NORTHERN IRELAND BELFAST Owenmore House M27 Kilwee Business Park Upper Dunmury Lane Belfast BT17 0HD WALES CARDIFF Guardian Industrial Estate M28 Clydesmuir Road Tremorfa Cardiff CF2 2QS CLYWD Unit 6 7 Coed Parc M14 Abergele Road Rhud...

Страница 12: ...a Road M49 Enfield London EN3 7BB GRAVESEND Unit B4 M57 Imperial Business Estate Gravesend Kent DA11 0DL HARPENDEN Unit 4 M46 Riverside Estate Coldharbour Lane Harpenden AL5 4UN LETCHWORTH 16 17 Woodside Ind Estate M50 Works Road Letchworth Herts SG6 1LA LONDON 2 4 Royal Lane M76 Yiewsley West Drayton Middlesex UB7 8DL MAIDENHEAD Reform Road M60 Maidenhead Berkshire SL6 8BY MOLESEY 10 Island Farm ...

Страница 13: ...arts of glass or plastic Costs incurred for calls to put right an appliance which is improperly installed or calls to appliances outside the United Kingdom Appliances found to be in use within a commercial environment plus those which are subject to rental agreements Products of Zanussi manufacture which are NOT marketed by Zanussi European guarantee If you should move to another country within Eu...

Страница 14: ...ed out by a qualified electrician or competent person DIMENSIONS Height 85 cm 33 5 Width 60 cm 23 6 Depth 60 cm 23 6 POWER SUPPLY VOLTAGE 230 240 V 50 Hz TOTAL POWER ABSORBED 2700 W 13A MAXIMUM RECOMMENDED LOAD Cotton linen 5 kg 11 lbs Synthetics delicates 2 5 kg 5 lbs DRUM VOLUME 108 l This appliance complies with the following E E C Directives 73 23 EEC of 19 2 73 Low Voltage Directive and subse...

Страница 15: ...nce in its permanent operating position check that the dryer is absolutely level with the aid of a spirit level If it is not raise or lower the four adjustable feet until it is The feet must never be removed Do not restrict the floor clearance through deep pile carpets strips of wood or similar This might cause heat build up which would interfere with the operation of the appliance Important When ...

Страница 16: ...r catch C by pressing both lugs together see small illustration 6 Loosen opposite plastic part D as in step 5 you may need to use a screwdriver to assist in both steps 5 and 6 7 Interchange and insert parts C and D 8 Remove screws E and refit on the opposite side Fix hinge B on the right handside Do not fully tighten the screws 9 To mount door see picture B First locate into upper right hand hole ...

Страница 17: ...inal marked with the letter E or by the earth symbol or coloured green and yellow The wire coloured blue must be connected to the terminal N or coloured black The wire coloured brown must be connected to the terminal marked L or coloured red Upon completion there must be no cut or stray strands of wire present and the cord clamp must be secure over the outer sheath WARNING A cut off plug inserted ...

Страница 18: ...he world s largest producer of powered appliances for kitchen cleaning and outdoor use More than 55 million Electrolux Group products such as refrigerators cookers washing machines vacuum cleaners chain saws and lawn mowers are sold each year to a value of approx USD 14 billion in more than 150 countries around the world ...

Отзывы: