background image

13

Mod. CINEA CANALIZÁVEL

 rev 00

Installation

translated from the original text

IT

IT

FR

FR

ES

ES

NL

NL

EN

EN

fig. 8 pipe length 

2.5.7 

BORES FOR PASSAGE OF EXHAUST PIPE 

ON WALL OR ROOF: RECOMMENDED IN-

STALLATION AND DIAMETER

Once the position of the stove has been established (par. 

2.5.6), a hole must be drilled for passage of the flue gas ex-

haust pipe. This varies according to the type of installation 

(and of the exhaust pipe diameter) and on the type of wall or 

roof. The insulation material must have mineral origin (rock-

wool, ceramic fibre) with a nominal density exceeding 80 kg/

m3.

Insulation thickness 

[mm]

Diameter of the 

holes [mm]

Wooden wall, or 

anyway flammable or

with flammable pa ts

100

300

Cement wall or roof

50

200

Brick wall or roof

30

160

tab.4 bore diameter for exhaust pipe passage

2.5.8 

USING A TRADITIONAL FLUE

If you wish to use an existing flue, we recommend having 

it checked by a professional chimney sweep to ensure that 

it is fully airtight. This is because the flue gas, being slightly 

pressurised, can infiltrate into possible cracks in the flue and 

invade the living areas. Should the flue not result in perfect 

conditions after the inspection, it is advisable to have it sealed 

with new materials. In the event of a large-size existing flue, 

we recommend inserting a pipe having a diameter of maxi-

mum 150 mm; it is also advisable to insulate the flue gas ex-

haust pipe. The following figures describe the solutions to be 

chosen in the event an existing flue is used

Insulation

Tee fitting

Tee fitting

Airtight cap

Tee fitting

Cleaning 

direction

Cleaning 

direction

Cleaning direction

.

fig. 9 traditional flue

2.5.9 

USING AN EXTERNAL FLUE GAS DUCT

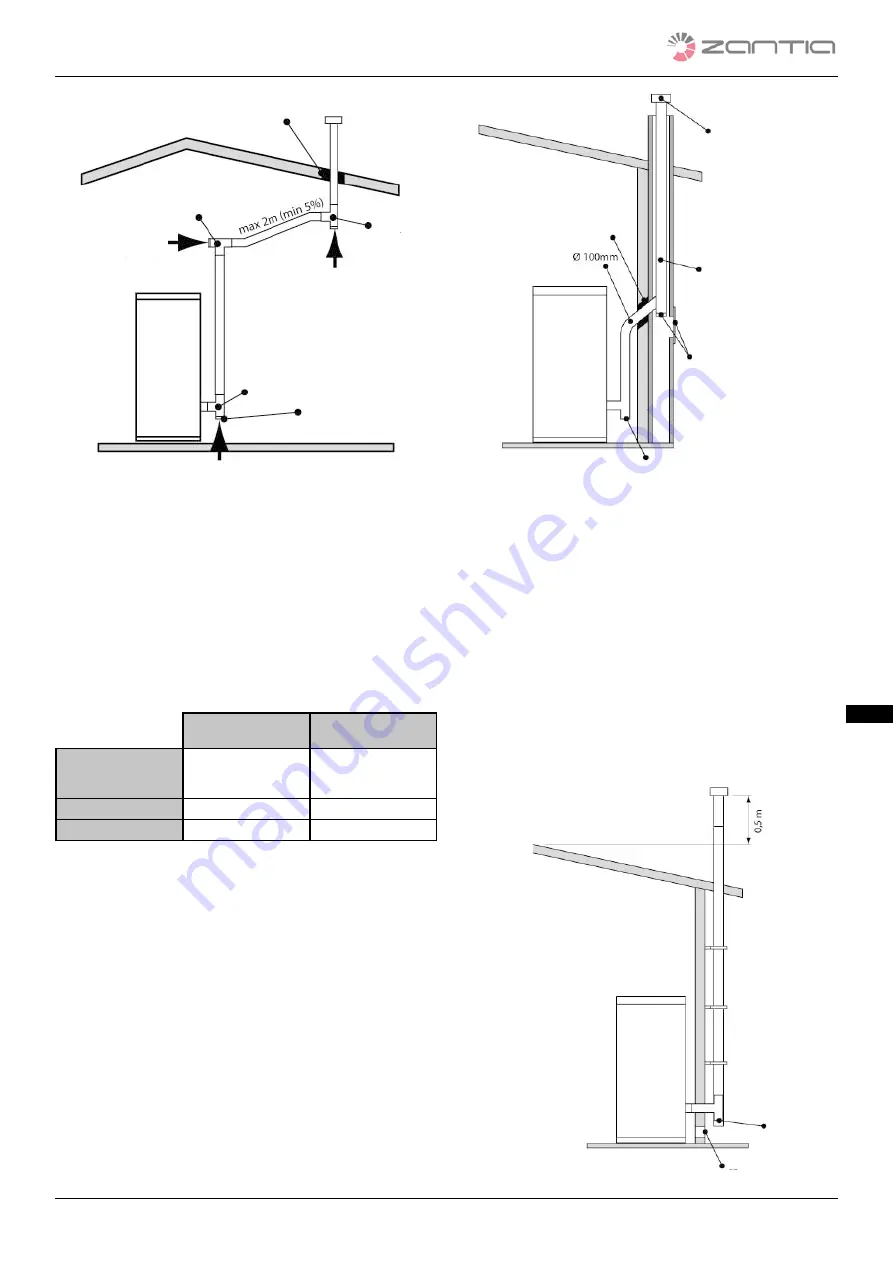
AN external flue gas duct can be used only if it meets the fol-

lowing requirements:

•  Only insulated (double-walled) stainless steel pipes must 

be used fastened to the building (following fig.).

•  An inspection must be provided at the base of the duct 

to carry out periodic verifications and maintenance oper-

ations.

•  It must have a wind barrier chimney and respect the "d" dis-

tance from the ridge of the building as shown in par. 2.4.3, tab. 

1.

•  The following figure shows the solution to be chosen in the 

event an external fuel gas duct is used.

Chimney

Insulation

Inspection 

doors

Max Ø 150

Tee fitting

Inspection

Air intake with non-lockable grille

Содержание CINEA Pellets Stove

Страница 1: ...EN Use and maintenance manual FR Manuel d utilisation et d entretien PT Manual de uso e manuten o CINEA CANALIZ VEL DUCTED PELLET STOVE PO LE PELLETS CANALIS SALAMANDRA A PELLETS CANALIZ VEL...

Страница 2: ......

Страница 3: ...MNEY 9 2 4 4 INSTALLING A COMBUSTION AIR INTAKE 10 2 5 POSITIONING 10 2 5 1 GENERAL NOTES 10 2 5 2 MINIMUM SAFETY CLEARANCES 10 2 5 3 FLOOR PROTECTION 11 2 5 4 MINIMUM CLEARANCE FOR POSITIONING THE AI...

Страница 4: ...ANING 21 5 1 1 CLEANING BEFORE EACH IGNITION 21 5 1 2 CHECK EVERY 2 3 DAYS 21 5 1 3 CLEANING THE GLASS 22 5 2 PERIODICAL CLEANING EVERY 6 MONTHS 22 5 2 1 CLEANING FLUE DUCT AND GENERAL CONTROLS 22 5 3...

Страница 5: ...text requires the utmost attention The italic text is used to call your attention to other sec tions of this manual or for any additional clarifications The Note gives the reader additional informatio...

Страница 6: ...commended in this manual to solve simple problems Always unplug the appliance before intervening and only operate with the stove cold IT IS absolutely prohibited to remove the pellet tank pro tective...

Страница 7: ...reiterate that the Manufacturing Company only pro vides the warranty at the above mentioned conditions and is in no way liable to direct or indirect damage result ing from the product to object or th...

Страница 8: ...ces are allowed a maximum of 15 Pa of negative environmental pressure There is no flue gas backflow into the room with the prod uct lit Flue gas exhaust is implemented in full safety dimension ing flu...

Страница 9: ...ation ducts are not allowed since they can create negative pressure in the place of in stallation even when installed in adjacent or communicat ing rooms IT is prohibited to create fixed or moving ope...

Страница 10: ...s it is important to periodically verify that air pas sage is not obstructed flat roof sloped roof IMPORTANT This appliance cannot be used in the event of shared flue 2 5 POSITIONING 2 5 1 GENERAL NOT...

Страница 11: ...able pa ts fig 6 minimum safety clearances for positioning product 2 5 3 FLOOR PROTECTION In the event of heat sensitive or flammable flooring this must be protected e g by means of steel sheets marbl...

Страница 12: ...ons of the manufacturer and any way with the silicon gasket supplied to guarantee its seal ing IT is prohibited to install dampers or other valves that can obstruct the flue gas exhaust IT is prohibit...

Страница 13: ...lue and invade the living areas Should the flue not result in perfect conditions after the inspection it is advisable to have it sealed with new materials In the event of a large size existing flue we...

Страница 14: ...ge External air intake with non lockable grille Inspection fig 11 electric connection of the stove Once the power cable at the back of the stove is plugged in move the switch also located at the back...

Страница 15: ...s phase IT is good practice to guarantee effici t ven tilation of the environment during the first ig nition as the product issues some smoke and the smell of paint Do not remain near the stove and as...

Страница 16: ...emperature thermostat 3 Menu Accesses the MENU MENU Accesses the next submenu level PROGRAMMING Sets the value and proceeds to the next item of the menu 4 ON OFF unlock OPERATING Held down for 2 secon...

Страница 17: ...remote control is off because the bat tery is missing the product can be command ed from the control panel at the top When re placing batteries pay attention to the polarity by following the symbol on...

Страница 18: ...daily programming You can set two operating time slots according to tab 7 where the OFF setting tells the clock to ignore the command Selection Description Possible values START 1 activation time time...

Страница 19: ...you to perform a pellet preload lasting 90 with the stove off and cold Start by pressing the key 1 and inter rupt by pressing the key 4 The following also appear on the display Timer A Power B Room T...

Страница 20: ...ulation If STANDBY mode is activated the stove switches off with a delay equal to the time preset by the manufacturer after hav ing reached the set temperature The stove restarts after the room temper...

Страница 21: ...nt for proper operation of the product the feed is interrupted It is a mechanical safety device for detecting the correct draught of the flue 5 ROUTINE CLEANING All the parts must be cleaned up when t...

Страница 22: ...appliance must be unplugged while it is not used For greater safety especially in the presence of children we recommend removing the power cable If when restarting the stove and pressing the main swi...

Страница 23: ...riggered by cutting power to the auger and simultaneously displaying the message ALARM SIC FAIL stopping the system fig 38 control panel general thermostat alarm 6 7 FAULTY FLUE GAS EXTRACTION FAN ALA...

Страница 24: ...ing the brazier Clean the brazier Tank empty Load pellets in the tank Auger without pellets Fill the tank and follow the instructions for the first ignition The stove blocks due to lack of pellet feed...

Страница 25: ...__________________________ The company ZANTIA CLIMATIZA O S A Guarantees the maximum confidentiality of your personal data kept in our Archive and used exclusively to verify the validity of the warran...

Страница 26: ...rred for equipment or parts of them assembled but produced by other companies 7 No compensation is acknowledged for the time of inefficiency of the product awaiting repair 8 The warranty is personal a...

Страница 27: ...TION DE LA PRISE D AIR DE COMBUSTION 35 2 5 POSITIONNEMENT 35 2 5 1 REMARQUES G N RALES 35 2 5 2 DISTANCES MINIMALES DE S CURIT 35 2 5 3 PROTECTION DU SOL 36 2 5 4 DISTANCES MINIMALES POUR LE POSITION...

Страница 28: ...TOYAGES QUOTIDIENS HEBDOMADAIRES 46 5 1 1 NETTOYAGE AVANT CHAQUE ALLUMAGE 46 5 1 2 CONTR LE TOUS LES 2 3 JOURS 47 5 1 3 NETTOYAGE DE LA VITRE 47 5 2 NETTOYAGE P RIODIQUE TOUS LES 6 MOIS 47 5 2 1 NETTO...

Страница 29: ...V ES AU MANUEL ET COMMENT LE CONSULTER Nous vous demandons de prendre soin de ce manuel et de le conserver dans un endroit ayant un acc s facile et rapide En cas de perte ou destruction de ce manuel d...

Страница 30: ...interventions d assistance technique ne pas encastrer le produit dans des espaces troits ne pas le coller un mur car cela pourrait compro mettre l afflux correct de l air L absence de tirage de la par...

Страница 31: ...es tique et la mise la terre correcte au moment de la panne 5 La garantie consiste fournir ou remplacer gratuite ment les parties d fectueuses ou retenues comme telles par notre Service Technique Les...

Страница 32: ...produit fonctionne exclusivement pellet combustible de forme cylindrique obtenu en unissant divers types de bois conform ment la norme DIN 51731 Par cons quent un pellet ayant des caract ristiques dif...

Страница 33: ...uer toute manuten tion avec des moyens adapt s en faisant at tention aux normes en vigueur en mati re de s curit Ne pas renverser l emballage Pour ouvrir l emballage proc der comme suit ter les agrafe...

Страница 34: ...its de combustion La chemin e devra r pondre aux conditions requises suivantes Avoir une section et une forme int rieure quivalente celle du conduit de fum e Avoir une section utile de sortie sup rieu...

Страница 35: ...tc l ext rieur expos aux agents atmosph riques ou dans des zones hu mides L installation du produit doit se faire dans un lieu permettant une utilisation facile et s re et un entretien simple Ce lieu...

Страница 36: ...it r sister au poids de celui ci et avoir une paisseur d au moins 2 mm voir la fig suivante fig 7 protections du sol 2 5 4 DISTANCES MINIMALES POUR LE POSI TIONNEMENT DE LA PRISE D AIR La prise d air...

Страница 37: ...en acier aluminate peint paisseur minimum 1 5 mm en acier inox Aisi 316 d un diam tre de 100 mm pour les tuyaux l int rieur du conduit de fum e 150 mm maximum Les tuyaux flexibles sont ad mis s ils r...

Страница 38: ...e c ramique avec une densit nominale sup rieure 80 kg m3 Epaisseur isolation mm Diam tres des trous effectuer mm Mur en bois ou inflammabl ou contenant des par ties inflammable 100 300 Mur ou toit en...

Страница 39: ...rrupteur situ l arri re du po le sert alimenter le syst me l arri re du po le se trouve un compartiment porte fu sibles situ c t de la prise d alimentation Avec un tournevis ouvrir le couvercle du com...

Страница 40: ...produit exhalera un peu de fum e et une odeur de peinture Ne pas rester proximit du po le et comme nous l avons Chargement pellet d j dit a rer l environnement La fum e et l odeur de peinture dispara...

Страница 41: ...2 secondes il al lume ou teint le po le s il est respecti vement teint ou allum BLOCAGE D bloque le po le et le remet en tat teint MENU PROGRAMMA TION Se met au niveau du menu sup rieur les modificati...

Страница 42: ...ie il est possible de commander le produit du tableau de commande situ dans la partie sup rieure du produit Pendant l op ration de remplacement faire attention la polarit en suivant le symbole grav su...

Страница 43: ...dien fig 18 tableau de commande programmation journali re Il est possible de configurer deux tranches de fonctionne ment d limit es par les horaires configur s selon le tab 7 en configurant OFF on ind...

Страница 44: ...p ra ture configur e SET est inf rieure celle de l environnement pendant une p riode d termin e Pour modifier le mode du menu 05 Mode stand by en utilisant les touches 1 et 2 fig 14a il est possible d...

Страница 45: ...SET temp rature gal 7 C et d sactiver du menu 03 Set chrono 01 activer chrono les fonctions chrono off L activation du produit s effectue avec le produit allum et avec le contact ferm Le raccordement...

Страница 46: ...nde des fum es La sonde des fum es rel ve la tem p rature des fum es dans la turbine d aspiration et intervient la r ali sation de 270 C en mettant le po le en mode conomie CO Sonde ambiante La sonde...

Страница 47: ...des joints en fibre c ramique pr sents sur la porte du po le Si n cessaire commander des joints neufs votre revendeur de confiance ou contacter le centre d assistance autoris pour ex cuter l op ratio...

Страница 48: ...rme est imm diatement activ e fig 36 tableau de commande alarme d arr t pendant le travail La proc dure d arr t est imm diatement activ e 6 5 ALARME PRESSOSTAT DE S CURIT VIS SANS FIN Si le pressostat...

Страница 49: ...met en tat NETTOYAGE FINAL et attend que la temp rature des fum es baisse jusqu une valeur pr tablie par le constructeur fig 41 tableau de commande coupure de courant Apr s une coupure de courant ce d...

Страница 50: ...pellet dans le r servoir Vis sans fin sans pellet Remplir le r servoir et proc der au 1er allumage du po le en suivant les instructions Le po le se bloque pour manque d alimentation du pellet Probl m...

Страница 51: ...______________________________ La soci t ZANTIA Climatiza o S A Assure la plus grande confiden tialit des donn es personnelles qui sont conserv es dans notre Fi chier et utilis es exclusivement pour v...

Страница 52: ...s ou des parties mont es dessus mais produites par d autres soci t s les garanties des fabricants sont c d es 7 Aucune indemnit n est admise pendant la p riode d inefficacit du produit en attente de r...

Страница 53: ...A O DE TOMADA DE AR DE COMBUST O 61 2 5 POSICIONAMENTO 61 2 5 1 NOTAS GERAIS 61 2 5 2 DIST NCIAS M NIMAS DE SEGURAN A 61 2 5 3 PROTE O DO PAVIMENTO 62 2 5 4 DIST NCIAS M NIMAS PARA O POSICIONAMENTO DA...

Страница 54: ...1 LIMPEZA ANTES DE CADA ACENDIMENTO 73 5 1 2 CONTROLO A CADA 2 3 DIAS 73 5 1 3 LIMPEZA DO VIDRO 73 5 2 LIMPEZA PERI DICA A CADA 6 MESES 73 5 2 1 LIMPEZA DA CONDUTA DE FUMOS E CONTROLOS EM GERAL 73 5 3...

Страница 55: ...N SULTAR O MANUAL Conserve este manual em boas condi es em um local de acesso f cil e r pido Se este manual for extraviado ou destru do solicite uma c pia ao nosso revendedor ou diretamente ao Servi o...

Страница 56: ...isolantes dispon veis no mercado Esta avalia o deve ser feita tamb m no que se refere a m veis poltronas cortinas e semelhantes Para facilitar eventuais interven es de assist ncia t cni ca n o encaix...

Страница 57: ...nsporte ou adultera es efetuadas por pessoal n o autorizado 4 O Fabricante n o assume qualquer responsabilidade por avarias nas partes el tricas causadas por liga o el trica incorreta ou por aquelas p...

Страница 58: ...mento dos pellets A responsabilidade por uso impr prio do produ to totalmente do utilizador e exime o fabricante de toda e qualquer responsabilidade civil e penal N o efetuar qualquer modifica o n o a...

Страница 59: ...ificar a inte gridade do produto recomend vel realizar as movimenta es com equipamentos adequados prestando aten o s normas vigentes em mat ria de seguran a N o inverter a posi o da embalagem Para abr...

Страница 60: ...rte interna da estufa 2 4 3 TERMINAL O fumeiro deve ser provido no cume de um dispositivo de nominado terminal adequado para facilitar a dispers o na atmosfera dos produtos da combust o O terminal dev...

Страница 61: ...outro aparelho de aquecimento de sprovido de um fluxo de entrada de ar pr prio e adequado lareira estufa etc em ambientes externos expostos aos agentes atmosf ricos ou em zonas h midas A instala o do...

Страница 62: ...to e ter uma espessura de pelo menos 2 mm ver a fig seguinte fig 7 prote es do pavimento 2 5 4 DIST NCIAS M NIMAS PARA O POSICIONAMENTO DA TOMADA DE AR A tomada de ar comburente da estufa a pellets n...

Страница 63: ...er um compri mento m nimo de 50 mm O di metro dos tubos depende do tipo do sistema TIPO DE SISTEMA COM TUBO DE PAREDE DUPLA 100 mm Comprimento m nimo 2m Comprimento m ximo com 3 curvas de 90 8m Para i...

Страница 64: ...XTERNA poder ser utilizada uma conduta de fumos externa somente se ela satisfizer os seguintes requisitos Devem ser utilizados somente tubos isolados parede du pla de a o inox fixados ao edif cio fig...

Страница 65: ...or ta fus veis 3 PRIMEIRO ACENDIMEN TO Antes da coloca o em funcionamento da estufa NECESS RIO requisitar os servi os de um t c nico autorizado para o PRIMEIRO ACENDIMEN TO e para a calibra o para ess...

Страница 66: ...cial pois o produto poder exalar um pouco de fuma a e cheiro de tinta N o permanecer perto da estufa e como j mencionado arejar o ambiente O fumo e o cheiro de tinta desaparecem depois de aproximadame...

Страница 67: ...a a estufa se estiver desligada ou ligada respetivamente BLOQUEIO Desbloqueia a estufa colocando a no estado desligado M E N U P R O GRAMA O Vai para o n vel de menu superior as modifica es efetuadas...

Страница 68: ...mbiente portanto devem ser eliminadas sepa radamente em contentores espec ficos Quando o telecomando est desligado por falta de pilha poss vel comandar a partir do painel de comandos situado na parte...

Страница 69: ...painel de comandos defini o de hora e data 4 6 PROGRAMA O DO CRONOTERM STA TO Permite a habilita o e a desabilita o global de todas as fun es de cronoterm stato fig 17 painel de comandos habilita o d...

Страница 70: ...o idioma 4 8 MODO STAND BY Ativa a modalidade STAND BY que coloca o produto na condi o de desligamento depois que a temperatura ambi ente permanecer superior ao valor definido SET al m do tempo progr...

Страница 71: ...ilitados fig 25 painel de comandos condi o de funcionamento 4 16 MODIFICAR A DEFINI O DA TEMPER ATURA AMBIENTE Para modificar a temperatura ambiente basta usar as teclas 1 e 2 O ecr exibe o estado da...

Страница 72: ...rogramado e ap s decorrer o tempo programado Limpar sempre o braseiro antes de reacender fig 31 painel de comandos aguardar arrefecimento antes de reacender 4 4 22 FUN ES DOS COMPONENTES MEC NI COS E...

Страница 73: ...ois podem ter absorvido humidade com subsequente altera o das suas caracter sticas originais o que os torna inadequados para a combust o 5 1 2 CONTROLO A CADA 2 3 DIAS Limpar e esvaziar a gaveta de ci...

Страница 74: ...no ecr Sonda temperatura fumos ALARM SOND FUMOS Sobretemperatura fumos ALARM HOT TEMP Falha no acendimento ALARM NO FIRE Falta de alimenta o de rede COOL FIRE ver Press stato de seguran a da rosca sem...

Страница 75: ...tilador de as pira o a estufa para e exibe se a mensagem ALARM FAN FAIL Ativa se imediatamente o procedimento de desliga mento fig 39 painel de comandos alarme ventilador de aspira o de fumos 7 PROBLE...

Страница 76: ...cher o reservat rio e prosseguir de acordo com as instru es do 1 acendi mento da estufa A estufa entra em bloqueio por falta de alimenta o de pellets Problema t cnico na rosca sem fim IMPORTANTE retir...

Страница 77: ...a s _____________________________________________ A empresa ZANTIA Climatiza o S A Assegura o m ximo sig ilo de dados pessoais os quais s o guardados no nosso Ar quivo e utilizados exclusivamente para...

Страница 78: ...quipamentos ou partes montadas provenientes de outros fabricantes s o transferidas as garantias fornecidas por esses fabricantes 7 N o reconhecido o direito a qualquer indemniza o durante o per odo de...

Страница 79: ...ffable Volume aquec vel 280 310 m Power supply Alimentation lectrique Alimenta o el trica 230V 50 Hz Nominal electric consumption Absorption lectrique nominale Absor o el trica nominal 110 W Pellet ta...

Страница 80: ...80 Mod CINEA CANALIZ VEL rev 01 PT FR EN CINEA CANALIZ VEL fig 42 CINEA CANALIZ VEL dimens es totais dimensiones dimensions d encombrement...

Страница 81: ...da de fumos 6 Safety pressure switch Pressostat s curit Press stato de seguran a 7 Thermocouple Thermocouple Term stato de seguran a 8 Auger Vis sans fin Rosca sem fim 9 Resistance R sistance Resist n...

Страница 82: ...82 Mod CINEA CANALIZ VEL rev 01...

Страница 83: ......

Страница 84: ......

Отзывы: