ZANKER Built-in oven Скачать руководство пользователя страница 2

65

Guide to Use the

instructions

Safety Instructions

Step by step instructions for an

operation

Hints and Tips

F

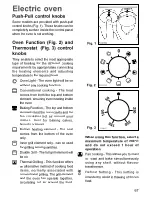
The oven will work only if the time

of day has been set (please read

the relevant instructions).

Once the oven has been installed:

a) set the thermostat knob to MAX (250);

b) switch the oven function control knob to

conventional cooking ( );

c) allow  the  oven  to  run  empty  for

approximately 45 minutes;

d) open a window for ventilation.

During this time, an unpleasant odour may

be emitted. This is absolutely 

normal

, and

is caused by residues of manufacturing.

Repeat this operation for the grill and fan

cooking function.

Once this operation is carried out, let  the

oven cool down, then clean the oven cavity

with  a  soft  cloth  soaked  in  warm  soapy

water.

Before  cooking  for  the  first  time,

carefully  wash  the 

oven

accessories

.

When the oven is first installed

F

FO 0799

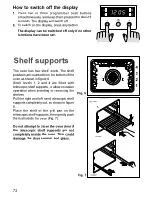
To  open  the  oven  door,  always

catch    the  handle  in  its  central

part.

MANUFACTURER:

ELECTROLUX ZANUSSI  S.p.A.

Viale Bologna, 298

47100 FORLÌ (Italy)

Содержание Built-in oven

Страница 1: ...oil l Easy clean liners if provided should never be cleaned with any other than soapy water l Before any maintenance or cleaning work is carried out on the appliance always turn off the isolator switc...

Страница 2: ...es d open a window for ventilation During this time an unpleasant odour may be emitted This is absolutely normal and is caused by residues of manufacturing Repeat this operation for the grill and fan...

Страница 3: ...one de cuisson derri re droite 4 Bouton plaque zone de cuisson derri re gauche 5 Bouton plaque zone de cuisson avant gauche 6 Bouton du s lecteur 7 Lampe t moin g n rale 8 Bouton du thermostat 9 Lampe...

Страница 4: ...the oven cavity and the fan circulates hot air around your dishes Best for baking cakes biscuits or bread Bottom heating element The heat comes from the bottom of the oven only Inner grill element on...

Страница 5: ...are turned on Safety thermostat In order to avoid excessive overheating due to incorrect use of the appliance or else to a faulty component the oven is equipped with a safety thermostat which cuts of...

Страница 6: ...ay 1 press button or 2 After the setting is carried out wait for 5 seconds the Time of day pilot lamp will go out and the display will show the set time The appliance is ready for use To reset the cor...

Страница 7: ...l the display shows 0 00 After 5 seconds the pilot lamp will go out and the display will revert to the time of day End of cooking function Thanks to this function you can set the oven to switch off au...

Страница 8: ...end of cooking time The relevant pilot lamps will come on and the display will show the time of day The oven will switch on and off according to the set programmes Minute minder function The minute mi...

Страница 9: ...are counted from the bottom of the oven as shown in figure 6 Shelf levels 1 2 and 4 are fitted with telescopic shelf supports to allow en easier operation when inserting or removing the shelves Pull...

Страница 10: ...same time and up to three tins of biscuits and mini pizzas to be eaten immediately or subsequently deep frozen Naturally the oven can also be used for cooking on just one shelf In this case you should...

Страница 11: ...le way of checking whether meat is done or not is to press it with a spoon if the meat does not yield under this pressure it means that it is done to a turn In the case of roast beef and fillet steaks...

Страница 12: ...1 and 3 175 40 60 2 fishes 800 Fillets 2 200 2 1 and 3 175 30 40 4 fillets FLANS Pasta flan 2 200 2 1 and 3 175 40 50 Vegetable flan 2 200 2 1 and 3 175 45 60 Quiches 2 200 2 1 and 3 175 35 45 Lasagne...

Страница 13: ...t 2 1 and 3 160 45 60 Small cakes 2 1 and 3 160 15 25 Biscuits 2 1 and 3 160 10 20 Meringues 2 1 and 3 100 90 120 Steaks 4 800 4 max 10 8 Chops 4 600 4 max 12 8 Sausages 8 500 4 max 10 6 Chicken cut i...

Страница 14: ...melled surfaces this inconvenient Cleaning and Maintenance may remove enamel gloss but it does not impair oven operation Clean the oven thoroughly after use in this way it will be possible to remove c...

Страница 15: ...the oven light Disconnect the appliance from its power supply point Push in and unscrew the glass cap Fig 12 Unscrew the light bulb and replace it with a new heat proof bulb 300 C having the followin...

Страница 16: ...ge 50 Hz 230 V l Ceramic hobs Type ZKM 2416 Maximum powerabsorbed 6 7 kW Power supply voltage 50 Hz 230 V Nominal heating power l Oven with traditional hob kW 10 08 l Oven with ceramic hob kW 9 28 9 7...

Страница 17: ...nserted into a suitable wall socket If you require a direct connection to the electric network mains it will be necessary to fit between the appliance and the mains an omnipole switch with a minimum g...

Страница 18: ...O0207 Fig 16 FO0039 Fig 18 Building in Electrical connection with the hob This oven can be connected to hobs indicated in the paragraph Technical data The socket for connecting the hob is located at t...

Страница 19: ...mentioned conditions are also valid for refrigerators for caravens on condition that they are situated within the national boundaries and are accessible by roads open to traffic Furthermore at the ti...

Страница 20: ...nqualified personnel 8a If the appliance has been built in underinserted suspendedor installed in such a way that the time required to move it and put it back in position exceeds thirty minutes in tot...

Страница 21: ...35676 5801 10 01 Grafiche MDM Forl...

Отзывы: