Zamp Solar SCC1011 Скачать руководство пользователя страница 3

3

This charger is designed for indoor use only and should never be exposed

to rain.

Do not disassemble the controller. Take to a qualified person if the unit

requires repairing.

Lead acid, LiFePO4, LTO,  batteries can be dangerous. Ensure no sparks

or flames are present when working near batteries.

Eye protection should always be used. Never short circuit the battery

Given sufficient light solar panels always generate energy even when they 

are disconnected.

Accidental ‘shorting’ of the terminals or wiring can result in sparks causing

personal injury or a fire hazard. We recommend that you cover up the 

panel(s) with some sort of soft cloth so you can block all incoming light

during the installation. This will ensure that no damage  is caused to the

Solar Panel or Battery if the wires are accidentally  short circuited.

Always install a battery fuse on each circuit including the solar controller

Do not reverse connect the wires to the solar panel or battery

WARNING – IMPORTANT PLEASE READ

MOUNTING THE DEVICE

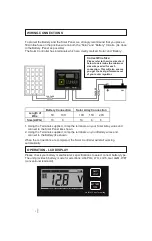
The Solar Controller has two mounting options.

1. Surface mount:

The quickest and easiest way to mount the unit is to use the two plastic 

spacers and self tapping screws supplied and mount the unit to a flat surface,

2. Flush (panel) mount:

Before deciding to use this mounting method, please ensure there is sufficient 

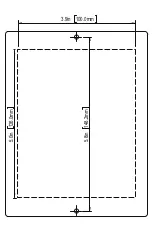
depth behind the controller or in the cavity. (Refer to Diagram below)

Using the dimensions shown in the following diagram, mark a  105mm x

130mm rectangle where you wish to mount the controller and cut-out the panel 

opening then use the two self- tapping screws supplied to secure the unit.

Содержание SCC1011

Страница 1: ...1 Solar Controller Battery Charger SCC1011 Input DC12V 24V Solar panel Max 50V Output DC 12V 24V 40A User s Manual...

Страница 2: ...as required This process will also reduce water loss and help prevent the battery from drying out Protects your battery from discharge at night Under low light or no light conditions the solar panel...

Страница 3: ...ill ensure that no damage is caused to the Solar Panel or Battery if the wires are accidentally short circuited Always install a battery fuse on each circuit including the solar controller Do not reve...

Страница 4: ...to the Solar Panel like shown 2 Using the Terminals supplied crimp the terminals on your Battery wires and connect to the Battery like shown When the connections are completed the Solar Controller wil...

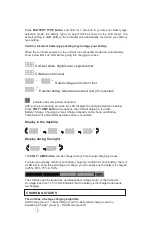
Страница 5: ...LCD displays the charging statues as below Press VOLT AMP button in sequence the LCD will display in turn with Battery Voltage Charging Current Charged capacity Amp hour and Battery Temperature if ext...

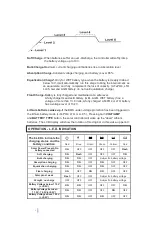
Страница 6: ...teries wake up If the BMS under voltage protection has been triggered in the lithium battery mode LiFePO4 LTO or LI 95 Pressing both VOLT AMP and BATTERY TYPE button the solar controller will wake up...

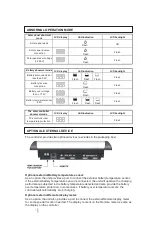
Страница 7: ...vides two optional devices excludes in the packaging box Optional external Battery temperature sensor As an option the unit provides a port to connect the external battery temperature sensor if the ex...

Страница 8: ...ge at25 15 5 0 2 VDC 2 9 Equalization charging timer timed out 2 Hour 2 10 Float charging voltage at 25 For LI 95 LTO and LiFePO4 battery 13 4 0 2 VDC For Gel AGM WET battery 13 6 0 2 VDC 2 11 Voltage...

Страница 9: ...5 8in 148 2mm 5 0in 126 0mm 3 9in 100 0mm...

Отзывы: