background image


DOC-USR-0087-06


___________________________________________________________________________________________ 

Z3 Technology, LLC 

 100 N 8

th

 ST, STE 250 

 Lincoln, NE 68508-1369 USA 

 +1.402.323.0702 

27 

(3)


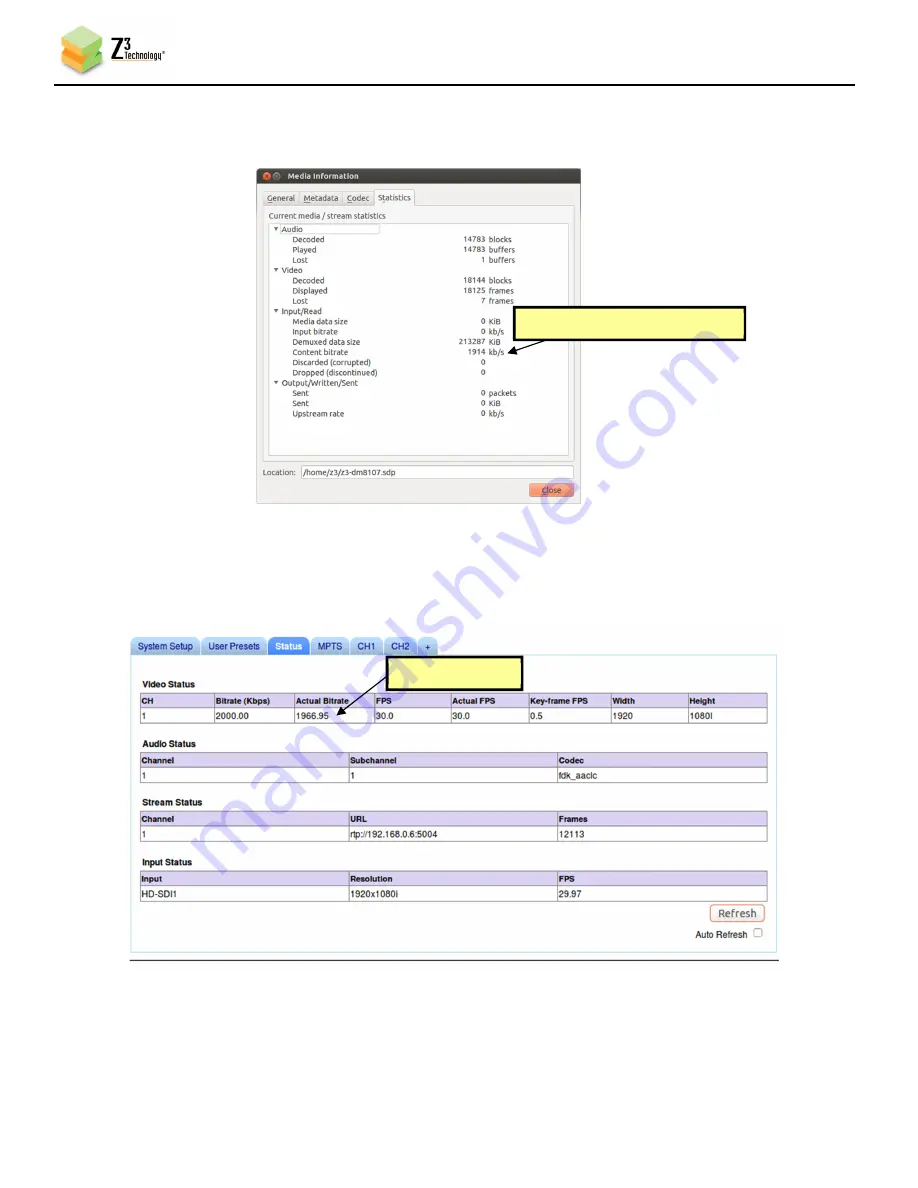
You will see the quality of the picture in VLC change and the video bitrate drop: 


(4)


If you click on the status page and click “Refresh,” you will also see the updated bitrate reflected. 


The parameter “Frame Rate Divider” can also be updated dynamically using the “update” 

button. All other parameters require a stop and then start to change. 

Figure 25  Drop in Bitrate after Dynamic Bitrate Change 

Lower video + audio bitrate 

Figure 26  Status Page Output Showing Lower Bitrate 

Lower bitrate 

Содержание Z3-DME-04

Страница 1: ...ietary information of Z3 Technology LLC Z3 This document may not be used reproduced disclosed or disseminated to anyone without the prior written approval of an authorized representative of Z3 Z3 reserves the right to change this product at any time and without notice All product names trademarks trade names service marks or service names mentioned in this document are the property of their respec...

Страница 2: ...anty link Corrected Doc formerly DOC USR 0077 xx NC TA 2 41a 12 29 2016 Updated per SW v2 41a Added MPTS information Added recording to USB information Updated Operating Controls photo Formatting updates TA 2 41b 01 16 2017 Correction to latency recommendations in Section 6 11 Added information for YouTube Live streaming TA 2 48c 07 05 2017 Clarifications to language in section 6 Added Section 6 8...

Страница 3: ... Configure Channel 1 Encode and UDP Streaming 14 6 5 Run VLC to View UDP Stream 16 6 6 Streaming RTP or RTSP 17 6 7 Run VLC to View RTSP Stream 17 6 8 Streaming RTMP 19 6 9 Changing the Bitrate Dynamically 25 6 10 Adjusting the UDP TS Rate 28 6 11 Encoding Audio Channels 30 6 12 Tuning for Latency 31 6 13 Encoding from HDMI or Composite In 33 6 14 Encoding Closed Caption Data 35 6 15 Record to USB...

Страница 4: ...tion 53 10 0 SUMMARY OF OPTIONS 54 10 1 The System Setup Tab 54 10 2 The User Presets Tab 56 10 3 The Status Tab 56 10 4 The MPTS Tab 57 10 5 The CH1 CH2 CH3 Tab 58 10 6 Values Appearing at the Bottom of All Tabs 64 APPENDIX A Configuring the Wowza Server for RTMP 65 APPENDIX B Troubleshooting 67 LIST OF FIGURES Figure 1 Z3 DME 04 7 Figure 2 Package Contents 9 Figure 3 Front and Rear Panels 11 Fig...

Страница 5: ... 29 Figure 29 CH1 Tab Configuration Enabling Multiple Audio Channels 30 Figure 30 Tuning for Various Use Cases 31 Figure 31 VLC Media Player Tools Menu 32 Figure 32 VLC Media Player Advanced Preferences 32 Figure 33 Creating the CH2 Tab 33 Figure 34 Composite Adapter Cable 33 Figure 35 CH2 Tab Configuration HDMI or Composite Input 34 Figure 36 Connection for Closed Caption Extraction 35 Figure 37 ...

Страница 6: ...er Presets Tab 47 Figure 54 Entering a User Preset Name 47 Figure 55 Saving a User Preset 48 Figure 56 Setting a Static IP Address within a User Preset 49 Figure 57 Reboot Reminder for Changing IP Settings 50 Figure 58 ZFinder with Z3 DME 04 DHCP Address 50 Figure 59 Updating the Device Firmware from the Web Interface 51 Figure 60 Updater Screen 51 Figure 61 Selecting Set Password 52 Figure 62 Pas...

Страница 7: ... allows users to quickly stream video from any of those three sources to the web or internal clients PCs via UDP RTP RTSP or RTMP This solution is ideal for applications such as low cost broadcast encoders low bandwidth video security satellite uplink remote monitoring and industrial applications The Z3 DME 04 provides immediate access to multi format HD video integrated system peripherals and pro...

Страница 8: ...P stream For encoding from HDMI or composite a second channel needs to be created This is described in detail on page 33 Details on streaming RTMP and also on using the Encode 1 to 3 Ch mode which allows one source to be encoded three different ways as long as the total processing involved fits within the constraints of the encoder s performance can be found in Section 7 0 STREAMING RTMP IN THREE ...

Страница 9: ... STE 250 Lincoln NE 68508 1369 USA 1 402 323 0702 9 3 0 PACKAGE CONTENTS Z3 DME 04 5V Power Supply HDMI Cable Composite Adapter Cable Serial Cable Gender Changer BNC to BNC Cable Note The serial cable and gender changer are included for advanced troubleshooting purposes only and are not needed by the typical user Figure 2 Package Contents ...

Страница 10: ... resolutions and bitrates 1x USB 2 0 Interface for local storage HTTP based configuration software for user friendly configuration and control RS 232 serial port for technical configuration and control Operating Temp 0 to 40 degrees C at 20 80 relative humidity non condensing Storage Temp 10 to 65 degrees C at 20 80 relative humidity non condensing Measurements 157 x 122 x 33 mm 6 19 x 4 81 x 1 31...

Страница 11: ...LC 100 N 8th ST STE 250 Lincoln NE 68508 1369 USA 1 402 323 0702 11 5 0 OPERATING CONTROLS Seen in order of appearance 1 Ground A B 6 5V Power 2 USB 2 0 7 HDMI In 3 RS 232 Serial Port 8 A V In 4 Status LED indicators 9 HDMI Out 5 Power Switch 10 Gigabit Ethernet 11 SDI In Figure 3 Front and Rear Panels REAR VIEW FRONT VIEW ...

Страница 12: ...ured in this document 6 1 Set up the HD Source 1 Select an HD source with SDI output Power on the HD Source Connect SDI to a monitor Set the HD Source to 1080i output Select content you would like to stream Once playback is seen on the monitor you ve confirmed the source works 6 2 Connect and Power Up the Z3 DME 04 2 Connect the SDI source to SDI In on the front of the unit 3 Connect an Ethernet c...

Страница 13: ...Windows PC found on the USB Flash Drive provided to you with your order from Z3 Technology This software scans your local network for any connected Z3 devices In the example below the Z3 DME 04 appears on IP 192 168 1 117 Figure 6 ZFinder with Z3 DME 04 Selected Note Selecting Edit Device allows for manual changes to network settings Selecting Flash LED s is not applicable to the Z3 DME 04 as ther...

Страница 14: ...1 tab change Video Resolution to 1920x1080 or Follow Input 2 Select UDP from the Output Format dropdown 3 Set the Dest Address to the IP address of the PC running VLC media player in the pictured example 192 168 0 6 or to a multicast address An example multicast address would be 225 1 2 3 If you are on a shared network check with your Network Administrator 4 Make note of the value of Dest Port Thi...

Страница 15: ...PED Then click on start Once you do this the status will change to RUNNING If the encoder hadn t started already simply click on start and observe the status change Note If you want to encode 1080p60 you must first change Operating Mode at the bottom right from Encode Interlaced Progressive to Encoder Single Ch HD Note that in Encoder Single Ch HD mode only CH1 can be used Figure 8 CH1 Tab Configu...

Страница 16: ...ur PC 2 Select Media Open Network Stream In the box type udp 192 168 0 6 5004 where 192 168 0 6 matches the values of the computer IP address or multicast address entered for Dest Address and 5004 is the value of Dest Port noted previously 3 Press Enter on your keyboard or click Play at the bottom of the dialog box 4 You should now see video streaming to VLC Figure 10 Example of Z3 Video Streaming...

Страница 17: ...ng sent Note As RTSP operates through port 554 it is advised never to set the Dest Port field to 554 when RTP RTSP is selected 3 Click on start to start the RTP RTSP encoding session 6 7 Run VLC to View RTSP Stream 1 Run VLC media player on your PC 2 Select Media Open Network Stream 3 Enter rtsp IP_Address z3 ch m mp4 for the network URL where a IP_Address is the IP address of your encoder If your...

Страница 18: ...ng used For example rtsp IP_Address z3 1m mp4 If you are using a unicast address as we are in the example pictured omit the letter m after z3 1 in the address In this example the full network URL would be rtsp 192 168 1 3 z3 1 mp4 Note VLC version 2 1 5 or later is needed for RTSP support 4 Click Play or hit Enter to begin streaming Figure 13 Example of Z3 Video Streaming to VLC RTP Figure 12 VLC ...

Страница 19: ... used here as an example server for RTMP streaming 1 In the CH1 configuration tab click on stop to stop the current encoding session 2 Set Output Format to RTMP 3 For Dest Address type IP_Address port app stream_name a IP_Address will be the IP address of the PC with the Wowza server installed In the example pictured 192 168 0 4 is used b port will be the port used on the PC with the Wowza server ...

Страница 20: ...web browser in this example 192 168 0 4 8088 This will bring up the Wowza server User Interface Log in with your valid user name and password 8 Click on Applications and select the name of the app you previously created for streaming in our example we created an app called live 9 Click on Test Players near the top of the interface 10 The Test Players dialog box should appear Select the Adobe RTMP ...

Страница 21: ...___________________________________________________________________ Z3 Technology LLC 100 N 8th ST STE 250 Lincoln NE 68508 1369 USA 1 402 323 0702 21 Figure 16 Viewing Content on Wowza 1 Select Adobe RTMP tab 2 Type stream name 3 Click Start ...

Страница 22: ... interface CH1 tab and click on stop to stop the current encoding session 4 Set Output Format to RTMP 5 For Dest Address type server_url stream_key a server_url will be the value specified in your YouTube Live dashboard Omit the RTMP protocol rtmp and enter a rtmp youtube com live2 b stream_key will be the value specified in your YouTube Live dashboard 6 It is recommended to set Video Rate Control...

Страница 23: ...YouTube live dashboard 6 8 3 Facebook Live 1 If you haven t already ensure you have an active Facebook account and page if broadcasting for an organization 2 Point your browser to facebook s main URL facebook com and navigate to the page management interface for your page if desired Select the Live Video link at the top of the Create Post dialog box near the top of the page Figure 19 Facebook Crea...

Страница 24: ...ayed on the left Figure 20 Facebook Live Streaming Dialog 4 Return to the Z3 DME 04 web interface and select the Ch1 tab Click Stop Ensure the Output Format is set to RTMP 5 Enter the Server URL minus the protocol header and stream Key as a continuous string in the Dest Address field In our example the full address reads rmtp api facebook com 80 rtmp 101180953856248 ds 1 s_l 1 a ATicDctn4rtiWCXW A...

Страница 25: ...the Facebook Live Video Setting dialog box to ensure your stream is previewing properly Add a message to the video stream if desired and click Go Live at the bottom Your Stream is now active Figure 22 Facebook Live Stream Preview 6 9 Changing the Bitrate Dynamically The Z3 DME 04 includes an Update button which allows you to change the bitrate and or frame rate without stopping and restarting the ...

Страница 26: ...26 1 In VLC click on Tools and select Codec Information This brings up a window with four tabs Select the Statistics tab In this tab you can see the current video audio bitrate 2 In the CH1 screen change the bit rate from 8000K to 2000K and click update Figure 24 Changing the Bitrate Dynamically 1 Change bitrate to 2000K 2 Click update Video Audio bitrate Figure 23 Viewing Bitrate in VLC ...

Страница 27: ...n VLC change and the video bitrate drop 4 If you click on the status page and click Refresh you will also see the updated bitrate reflected The parameter Frame Rate Divider can also be updated dynamically using the update button All other parameters require a stop and then start to change Figure 25 Drop in Bitrate after Dynamic Bitrate Change Lower video audio bitrate Figure 26 Status Page Output ...

Страница 28: ...um of the video and audio bitrate For example the default value out of the factory is a value of 10Mbps corresponding to 8Mbps for the video There are times however when it is desirable to make this value higher For example if the encoder bitrate is very low below 1Mbps it is advisable to allow more leeway in the event there are some challenging scenes to encode An example follows 5 Return to the ...

Страница 29: ...t to start encoding 3 Open VLC to view your UDP stream Section 6 5 and view the Status tab Section 6 8 You will see a lower value for the overall input rate and for the content rate The value of TS Rate must be higher than video bitrate audio bitrate 1 25 If an attempt is made to input a value less than this the error message TS rate too small to carry elementary streams will appear Figure 28 TS R...

Страница 30: ... the Audio Info section set Enable to yes using the dropdown menu for each audio channel you desire 3 Using the dropdown menus for each enabled channel set Mode to a stereo for up to two audio channels b mono for up to four audio channels 4 Set the remaining options including Codec and Bit Rate to your desired settings 5 Click on start to start encoding Select stereo for up to two audio channels s...

Страница 31: ... streaming using RTP will result in lower latency than streaming using TS If low latency with TS is desired there is a special TS lowlat mode that can be activated Setting this causes the TS muxer to send packets out immediately rather than gathering data and sending packets once they reach maximum network size The tradeoff is less efficient use of the network and a TS stream that is no longer per...

Страница 32: ...02 32 1 Click Tools on the main menu and select Preferences from the dropdown Figure 31 VLC Media Player Tools Menu 2 In the Preferences window that appears change from show settings From Simple to All Select interface from the menu on the left and scroll to the bottom on the right side of the window to find the Network Caching ms value Figure 32 VLC Media Player Advanced Preferences ...

Страница 33: ... Composite In To encode with either HDMI or Composite In perform the following steps 1 Click on the CH2 tab If it is not there click on to generate this additional tab and then click on it 2 The channel 2 tab appears 3 Use the Video Source dropdown menu to specify either HDMI or Composite video input a If composite encode is desired a special composite adapter cable is needed The yellow connector ...

Страница 34: ...hnology LLC 100 N 8th ST STE 250 Lincoln NE 68508 1369 USA 1 402 323 0702 34 4 Verify the Dest Port field is not the same port number currently entered in the CH1 tab 5 Click on start Figure 35 CH2 Tab Configuration HDMI or Composite Input 4 Verify is not the same number as the CH1 tab 1 Change to HDMI or Composite ...

Страница 35: ...s automatically occurs any time Composite or SDI input with closed caption data included is used 1 Connect a Composite input with closed caption data to the Composite connector 2 Configure the Encoder to use composite input 3 Run VLC on your PC 4 Select Open Network Stream If the settings are those as shown in Figure 37 use the address udp 192 168 0 6 5006 Connect Composite with CC data Figure 36 ...

Страница 36: ... extracted and encoded You will then see the subtitles on the screen 6 Extraction of closed caption through SDI input is also possible In that case SDI In of the Z3 DME 04 is used The procedure for seeing the closed caption data through VLC is the same as shown above Note Full frame rate is needed for closed caption If frame rate divider is set to a value other than one then closed caption data wi...

Страница 37: ... field to select your USB storage location This will automatically populate if a USB is detected 4 In the File Prefix textbox enter the desired prefix for your ts file name a When saved a number will be automatically generated and added to the end of the file prefix starting with zero If subsequent recordings are made to the same USB existing files with the same prefix will be detected and the new...

Страница 38: ...her USB storage device to USB on the back of the encoder Note The USB drive must be formatted in either FAT32 VFAT EXT3 or EXT4 format 7 Connect and configure the encoder Output Format to output UDP See Section 6 4 8 When UDP is selected the Aux TS File Enable option appears Select True using the dropdown menu to enable an auxiliary ts file recording 9 The Aux TS File Location field appears Enter ...

Страница 39: ...rce 2 Open the user interface See Section 6 3 3 In the CH1 tab change the Output Format for your SDI video source to MPTS 4 In the CH2 tab change the Output Format for your HDMI or composite video source to MPTS 5 In the MPTS tab set the total MPTS transport rate This should equal the total transport rate of all channels being fed into the MPTS plus a 20 margin 6 Set Destination 1 to UDP ASI is no...

Страница 40: ...n used by Z3 2 1 5 10 Select Media Open Network Stream In the box type udp 225 1 2 3 6000 where 225 1 2 3 matches the values of the computer IP address or multicast address and 6000 is the value of IP Port entered in the MPTS tab 11 You will then see channel 1 To view channel 2 go to Playback Program 2 in VLC Figure 43 Opening VLC for MPTS Multicast Stream Figure 44 Viewing Channel 2 in VLC Select...

Страница 41: ...f RTMP and ignore the sections referring to Wowza in this section Note that if multiple channels off the same input is done the total performance cannot exceed the capability of the Z3 DME 04 for example three 1080p30 encodes at 30fps would not be allowed For multiple encodes the Z3 DME 04 can support the equivalent of 1x 1080i encode 1x 720p encode 7 1 Connect the Encoder 1 Follow steps 1 to 1 in...

Страница 42: ...68508 1369 USA 1 402 323 0702 42 8 For Dest Address type 192 168 0 4 1935 live 720 where 192 168 0 4 is the IP address of the PC with the Wowza server 9 If necessary set Authentication to Enable and enter the User name and Password After you re finished your settings should look something like the following Figure 46 3 Channel RTMP Encode Channel 1 Settings ...

Страница 43: ...for RTMP Streaming 10 To create a second channel click on the to the right of the CH1 tab 11 In the CH2 Tab set the Video Resolution to 720x480 for D1 video 12 Set Video Bit Rate to 2000K 13 For Dest Address type 192 168 0 4 1935 live d1 where 192 168 0 4 is the IP address of the PC with the Wowza server Figure 48 3 Channel RTMP Encode Channel 2 Settings Click on to create CH2 Figure 47 Creating t...

Страница 44: ...for RTMP Streaming 14 To create a third channel click on the to the right of the CH2 tab 15 In the CH3 Tab set the Video Resolution to 352x240 for CIF video 16 Set Video Bit Rate to 1000K 17 For Dest Address type 192 168 0 4 1935 live cif where 192 168 0 4 is the IP address of the PC with the Wowza server Figure 50 3 Channel RTMP Encode Channel 3 Settings Click on to create CH3 Figure 49 Creating ...

Страница 45: ...rt the Encode 19 Click on start all at the bottom of any tab 7 8 View the Content on Wowza 20 Go to a PC that is on the same network as the Wowza server and open a web browser in this example FireFox is used Type in the URL of the Wowza server with the port 8088 in this example 192 168 0 4 8088 This will bring up the Wowza home page Log in with your valid user name and password 21 At the top you w...

Страница 46: ... Select the Adobe RTMP tab change the Stream name to 720 this value needs to exactly match one of the directories you are streaming to in the Z3 DME 04 and click Start You will then see the content streamed from the Z3 DME 04 23 To view the other channels simply change the stream name to d1 or cif 4 Audio and Video start to appear Figure 52 Viewing DME 04 Content on Wowza 1 Select Adobe RTMP tab 2...

Страница 47: ... off and back on it automatically uses those settings 1 Click on the User Presets tab 2 Click on the new button 3 This brings up a text box to enter the new user preset name For this example type z3_config1 and click ok 4 Return to the System Setup tab 5 Select your newly created configuration from the preset dropdown menu at the bottom of the screen 6 As soon as you select z3_config1 the screen w...

Страница 48: ...the Save button 9 A pop up window appears to confirm the saving of these settings is complete Click OK Note The very first time settings are saved may take up to 30 seconds This is due to some flash initialization which occurs on the very first configuration save 10 In order for these changes to take effect the unit must be re started Power the unit off then back on and wait 45 60 seconds for the ...

Страница 49: ...ble by ZFinder To set your unit to a static IP address complete the following steps 1 The first step is to set up a custom configuration so that the manual networking setting is used the next time the system boots up To do this see Section 8 1 Saving Current Settings 2 Return to the System Setup tab 3 Select your newly created configuration from the preset dropdown menu at the bottom of the screen...

Страница 50: ...uration save 8 2 4 Open the GUI Using ZFinder 1 Run the ZFinder PC Utility on your Windows PC The ZFinder window appears ZFinder does a scan of the network and lists the location of all Z3 systems connected to the network The Z3 DME 04 appears with your manually entered IP address 2 Select the Z3 DME 04 and then click Open Device Figure 58 ZFinder with Z3 DME 04 DHCP Address 3 A web browser will t...

Страница 51: ...s you to the update image screen In this screen click on Browse 4 This brings you to the File Selection Screen From here select the name of the img file to update with and click Open The image file to be used will typically have the word UPD in the name 5 Click on Upload and Update 6 You will see screens stating that the image is being uploaded and that the flash is being updated After about one m...

Страница 52: ...rd cannot be undone 2 Once you click on go the change password options appear Enter the new password twice and click change 3 Wait for the password options to disappear This indicates that the password has changed 4 Refresh or retype the IP address in the web browser You will then see a prompt for a user name and password Use admin for the user name This value cannot be edited 5 Enter the new pass...

Страница 53: ... STATUS LED INDICATOR LIGHTS FOR HDMI COMPOSITE AND SDI INPUTS If status indicator is off this means the input is not present If the status LED indicator is solid green the input has been connected and is running If the status LED indicator is green and blinking this means the DME 04 is actively encoding If the status LED indicator is red and blinking this means the encoder is fault condition ...

Страница 54: ...92 168 a b 192 168 1 1 Sets the network gateway to use for the Z3 DME 04 Note that a save of these settings and a reboot is needed for changes to this value to take effect DNS Server IP 1 a b c d 8 8 8 8 Used to specify the DNS server for hostname lookup when in static IP mode for DHCP mode the DHCP server is used as the DNS server DNS Server IP 2 e f g h 8 8 4 4 Used to specify the secondary DNS ...

Страница 55: ...508 1369 USA 1 402 323 0702 55 download device logs Clicking this causes the Z3 DME 04 to extract a set of diagnostic logs that can be sent to Z3 in the event of an issue to be reported This file is saved on the PC which the GUI is being run view logs Allows viewing of a debug log This is a feature added for Z3 troubleshooting Reboot Click to restart the unit ...

Страница 56: ...sets 10 3 The Status Tab Note May take a few seconds to load after being clicked Output Value Explanation Video Status CH The channel number 1 2 or 3 Bitrate Kbps Current target bitrate of encoder Actual Bitrate Actual bitrate being output by encoder FPS Current target frames per second of encoder Actual FPS Actual frames per second being encoded Key frame FPS of key frames per second for example ...

Страница 57: ...er second for that input Refresh Refresh the current status values Auto Refresh If checked causes the values in the status tab to be refreshed automatically once every five seconds 10 4 The MPTS Tab Parameter Options default in bold Notes Rate 1 80M 24M The total transport rate of the MPTS stream This should equal the bitrates of all channels going into this stream plus at least a 10 overhead For ...

Страница 58: ...chosen for CH1 16 9 Checked Unchecked For any SD resolutions NTSC PAL checking this forces the aspect ratio to be 16 9 in the output otherwise a default value of 4 3 is used This value is ignored for HD resolutions Video Resolution 176x144 1920x1080 1280x720 Follow Input The encode resolution If this resolution is different from the capture resolution resizing will occur Follow Input generates the...

Страница 59: ... Progressive will convert the interlaced input to a progressive picture This can be used to improve quality if playing back on a PC player Progressive HQ activates a special high quality deinterlacer Since this requires extra cycles this is available only for D1 input and below Interlace can be used to make progressive input interlaced This value must be the same for all 3 channels in Encode 1 to ...

Страница 60: ...ing above 64Kbps is recommended for best results The bitrate range for AACHE is 32Kbps 64Kbps Bitrate 12Kbps 384Kbps 128Kbps The bitrate of the audio Mode Mono Stereo Select between stereo and mono inputs Source HD SDI HDMI Analog None Where to get audio for that subchannel Pid UDP TS Only 0 8191 120 121 122 123 If UDP format is selected the PID to use for that audio channel Max PTS PCR UDP TS Onl...

Страница 61: ... t forget to check the value of TS Rate to make sure it is in line with expectation TSRTP causes streaming of TS over RTP See Section 6 16 STREAMING RTMP IN THREE DIFFERENT RESOLUTIONS on page 38 for more on using the RTMP format TSFILE will write audio and video to a TS file If this is selected you should type the path name of the file in Dest Address for example media sda1 example ts to write to...

Страница 62: ...am PMT PID UDP Only 0 8191 31 PID assigned to PMT in the TS stream TS Rate UDP Only 125K 20000K 8000K The rate of the transport stream Normally this value should be set to 1 25 video bitrate audio bitrate This can be set to higher values to allow leeway for times when many bits are needed to encode This can be especially useful for ensuring smooth playback at lower bitrates see Section 6 10 Adjust...

Страница 63: ...an be used to quickly copy CH1 values to CH2 for example delete Used to delete excess tabs created by Clone status IDLE STOPPED RUNNING POLLING Current status of the encoder POLLING indicates start was pressed and the encoder is waiting for valid input data to be detected Note 1 Encode Resolutions Supported QCIF 176x144 WQVGA 320x180 QVGA 320x240 SIF 352x240 CIF 352x288 2 CIF 352x576 640x360 VGA 6...

Страница 64: ...e serial_menu Last value saved in GUI encoder factory default Factory defaults Can also add more profiles by clicking on new in the User Presets tab Save Click on this to save preset value to what was selected Operating Mode Encoder Interlaced Progressive Encoder Single Ch HD Encode 1 to 3 Ch This selects how the Z3 DME 04 is being used Encoder Interlaced Progressive is the default mode of operati...

Страница 65: ...MP streaming the following steps are needed 1 Log in to the Wowza Streaming Engine Manager Home page by typing http localhost 8088 where localhost is the IP address of the server in the pictured example 192 168 0 4 2 Click on Server in the top band of options On the left column click on Performance Tuning and then Java Settings Click Edit and then change Java Heap Size to Production Level and Java...

Страница 66: ...curity Click Edit and then make sure RTMP Publishing and RTSP Publishing are both set to Open and Client Restrictions is set to No client restrictions Then click Save The Wowza server is now configured to work with the Z3 DME 04 Note You can also specify Require password authentication for RTMP Publishing In this case Authentication on the channel tab needs to be enabled and a valid Wowza user nam...

Страница 67: ...t Port equal the value entered in the URL for VLC Was included in the UDP address for VLC Is the PC fast enough for 1080p decode on VLC Does the PC have enough DDR to handle 1080p decode on VLC Is VLC version 1 1x or later Problem Do not see video in VLC RTP If using an SDP file is the correct SDP file z3 dm8107 sdp being used and Dest Port set to 5004 If using the RTSP URL is the version of VLC v...

Отзывы: