background image

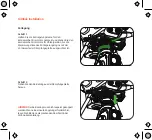
Assembling

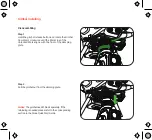
Step 1.

Find the Unlocked Mark etched on the Gimbal Yaw 

Motor and align the Mark Line with the front of the 

damping plate.

Step 2.

Insert the Gimbal Yaw Motor into the damping plate 

and rotate it counterclockwise until the Mark Line of 

the Locked Mark aligns with the front of the damping 

plate to secure the gimbal.

Step 3.

Remove the lens protector

Step 1

Step 3

Step 2

Gimbal Installing

Содержание E20Tvx

Страница 1: ......

Страница 2: ...CONTENTS EN Quick Start Guide DE Schnellstartanleitung FR Guide de démarrage rapide ES Guía de inicio rápido IT Guida Rapida ...

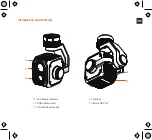
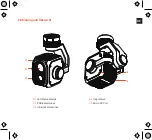
Страница 3: ...Introduction and Overview 01 LED Status Indicator 02 RGB Camera Lens 03 Infrared Camera Lens 04 Gimbal 05 Micro SD Port 01 02 03 05 04 ...

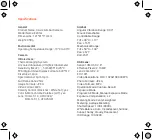
Страница 4: ...yes Color Monochrome Palettes LUT yes Lens 13mm f 1 0 HFOV32 9 8 8mm f 1 1 HFOV50 8 Gimbal Angular Vibration Range 0 03 Mount Detachable Controllable Range Tilt 30 to 110 Pan 165 Mechanical Range Tilt 50 to 140 Pan 671 Roll 50 RGB Lens Sensor CMOS 1 2 8 Effective Pixels 2 13MP Lens 23mm f 2 8 FOV 90 Video Resolutions FHD 1920x1080 30FPS Photo Formats JPEG Video Formats MP4 Operation Mode Capture R...

Страница 5: ...ith the front of the damping plate Step 2 Insert the Gimbal Yaw Motor into the damping plate and rotate it counterclockwise until the Mark Line of the Locked Mark aligns with the front of the damping plate to secure the gimbal Step 3 Remove the lens protector Step 1 Step 3 Step 2 Gimbal Installing ...

Страница 6: ...aw Motor clockwise until the Mark Line of the Unlocked Mark aligns with the front of the damping plate Step 2 Pull the gimbal out from the damping plate Notice The gimbal needn t bind separately If the re binding is needed please refer to the corresponding section in the Drone Quick Start Guide ...

Страница 7: ...ability of property damage collateral damage and or serious injury or create a high probability of superficial injury WARNING Read the ENTIRE instruction manual to become familiar with the features of the product before operating Do not use with incompatible components or alter this product in any way outside of the instructions provided by Yuneec Failure to use this product in the intended manner ...

Страница 8: ...y damage injury or for use of the product in violation with legal regulations especially in the following circumstances Damage and or injury as well violation of legal regulations resulting from a failure to comply with the operating instructions or the instructions at www yuneec com product information user manual and other legally binding information Damage and or injury as well violation of leg...

Страница 9: ... which infringes upon harms the privacy of other people Damage and or injury as well as violation of legal regulations caused by incorrect use of the batteries protection systems chargers or aircraft Consequential damage caused by the incorrect operation of any kind of system components and accessory parts especially memory cards whereby image or video material from the camera can become defect An...

Страница 10: ...easures Reorient or relocate the receiving antenna Increase the separation between the equipment and receiver Connect the equipment to an outlet on a circuit different from that to which the receiver is connected Consult the dealer or an experienced radio TV technician for help This device complies with part 15 of the FCC rules Operation is subject to the following two conditions 1 This device may...

Страница 11: ...ec Support Https yuneec kayako com This content subject to change download the latest version from www yuneec com If you have any questions about this document please contact us by Start a conversation on https yuneec kayako com ...

Страница 12: ...DE Einführung und Übersicht 01 LED Statusanzeige 02 RGB Kameralinse 03 Infrarot Kameralinse 04 Tragrahmen 05 Micro SD Port 01 02 03 05 04 ...

Страница 13: ... Linse 13mm f 1 0 HFOV32 9 8 8mm f 1 1 HFOV50 8 Gimbal Tragrahmen Winkelvibrationsbereich 0 03 Befestigung abnehmbar Steuerbereich Neigung 30 bis 110 Schwenk 165 Mechanischer Bereich Neigung 50 bis 140 Schwenk 671 Rollneigung 50 RGB Linse Sensor CMOS 1 2 8 Effektive Pixel 2 13MP Linse 23mm f 2 8 FOV 90 Videoauflösung FHD 1920x1080 30FPS Photoformate JPEG Videoformate MP4 Betriebsart Erfassung Aufz...

Страница 14: ...splatte aus Schritt 2 Setzen Sie den kardanischen Giermotor in die Dämpfungsplatte ein und drehen Sie ihn gegen den Uhrzeigersinn bis die Markierungslinie des Verriegelungslogos mit der Vorderseite der Dämpfungsplatte ausgerichtet ist um den Kardanring zu sichern Schritt 3 Entfernen Sie den Objektivschutz Schritt 1 Schritt 3 Schritt 2 Gimbal Installation ...

Страница 15: ...Uhrzeigersinn bis die Markierungslinie des Entriegelungslogos mit der Vorderseite der Dämpfungsplatte ausgerichtet ist Schritt 2 Ziehen Sie den Kardanring aus der Dämpfungsplatte heraus HINWEIS Der Kardanring muss nicht separat gekoppelt werden Wenn eine erneute Kopplung erforderlich ist lesen Sie bitte den entsprechenden Abschnitt in der Drohne Kurzanleitung ...

Страница 16: ...icht korrekt befolgt werden sind als Folge Sachschäden Kollateralschäden und oder schwere Verletzungen wahrscheinlich oder oberflächliche Verletzungen sehr wahrscheinlich WARNUNG Die GESAMTE Bedienungsanleitung durchlesen um sich vor dem Betrieb mit den Produktfunktionen vertraut zu machen Nicht versuchen das Produkt ohne Genehmigung von Yuneec mit inkompatiblen Komponenten zu verwenden oder auf i...

Страница 17: ...nd für verschiedene Zwecke nutzen einschließlich i Erfüllung verschiedener Meldepflichten ii Marketing Initiativen iii Analysen der Produktsicherheit iv Nachvollziehen und Analysieren der Interessen Gewohnheiten und des Nutzungsverhaltens unserer Benutzer für bestimmte Funktionalitäten Dienstleistungen Inhalte etc Haftungssauschluss Yuneec Electric Aviation haftet nicht für jegliche Schäden Verlet...

Страница 18: ...euer Explosion Überschwemmung Tsunami Erdrutsch Lawine Erdbeben oder andere Naturgewalten Schäden und oder Verletzungen sowie Verstöße gegen gesetzliche Vorschriften die durch eine illegale oder unethische Nutzung des Modells verursacht wurden z B das Aufnehmen von Videos oder Aufzeichnen von Daten die die Privatsphäre anderer Personen verletzen beeinträchtigen Schäden und oder Verletzungen sowie ...

Страница 19: ...n Verlegung oder Neuausrichtung der Empfangsantenne Vergrößerung des Abstands zwischen Gerät und Empfänger Gerät an eine Steckdose anschließen an deren Stromkreis nicht auch der Empfänger angeschlossen ist Hinzuziehen des Händlers oder eines erfahrenen Radio Fernsehtechnikers Dieses Gerät erfüllt den Abschnitt 15 der FCC Bestimmungen Der Betrieb unterliegt den folgenden zwei Bedingungen 1 Das Gerä...

Страница 20: ...yuneec kayako com Der Inhalt dieses Dokuments kann jederzeit geändert werden Die aktuelle Version können Sie unter www yuneec com herunterladen Bei Fragen besuchen Sie die Website https yuneec kayako com und wählen Sie Eine Unterhaltung beginnen ...

Страница 21: ...FR Introduction et vue dʼensemble 01 Témoin d état LED 02 Lentille RGB 03 Lentille infrarouge 04 Stabilisateur 05 Microport SD 01 02 03 05 04 ...

Страница 22: ...omes LUT oui Lentille 13mm f 1 0 HFOV32 9 8 8mm f 1 1 HFOV50 8 Stabilisateur Plage de vibration angulaire 0 03 Montage amovible Plage de réglage contrôlable Inclinaison 30 à 110 Orientation 165 Plage de réglage mécanique Inclinaison 50 à 140 Orientation 671 Rotation 50 Lentille RGB Capteur CMOS 1 2 8 Pixels effectifs 2 13 MP Lentille 23 mm f 2 8 FOV 90 Résolutions vidéo FHD 1920 x 1080 30 FPS Form...

Страница 23: ...rtissement Étape 2 Insérez le moteur de lacet du stabilisateur dans la plaque dʼamortissement et tournez le dans le sens antihoraire jusquʼà ce que la ligne de repère du symbole de verrouillage sʼaligne avec lʼavant de la plaque dʼamortissement pour fixer le stabilisateur Étape 3 Retirez le protecteur dʼobjectif Étape 1 Étape 3 Étape 2 Installation de la nacelle ...

Страница 24: ...e jusquʼà ce que la ligne de repère du symbole de déverrouillage sʼaligne sur lʼavant de la plaque dʼamortissement Étape 2 Retirez le stabilisateur de la plaque dʼamortissement REMARQUE Le stabilisateur n a pas besoin d être associé séparément Si une réassociation est nécessaire veuillez vous référer à la section correspondante du Guide de démarrage rapide du Drone ...

Страница 25: ... blessure grave ou superficielle MISE EN GARDE Lisez l INTÉGRALITÉ du manuel d instructions afin de vous familiariser avec les caractéristiques du produit avant de l utiliser N utilisez pas ce produit avec des composants non compatibles et ne le modifiez pas sans respecter les instructions fournies par Yuneec Toute utilisation du produit qui diffère de la façon prévue décrite dans le manuel d instruc...

Страница 26: ...té des produits iv la compréhension et lʼanalyse des intérêts de nos clients les habitudes lʼutilisation de certains services contenus fonctionnalités etc Clause de non responsabilité Yuneec Electric Aviation ne peut être rendue responsable des éventuels dommages blessures ou utilisations du produit qui violent la réglementation juridique en particulier dans les circonstances suivantes dommage et ...

Страница 27: ...ceptionnel par ex collision incendie explosion inondation tsunami glissement de terrain avalanche tremblement de terre ou autre catastrophe naturelle Dommage et ou blessure ainsi que violation des dispositions légales entraînés par une utilisation illégale ou immorale du modèle par exemple prise de photographies ou de vidéos qui violent le droit à la vie privée dʼautrui Dommage et ou blessure ains...

Страница 28: ...nterférences en prenant une ou plusieurs des mesures suivantes Réorienter ou déplacer l antenne de réception Éloigner l équipement du récepteur Connecter l équipement à une alimentation ou à un circuit différent de celui du récepteur Consulter le revendeur ou un technicien radio TV expérimenté pour se faire aider L appareil respecte la partie 15 des directives de la FCC Son fonctionnement est soum...

Страница 29: ...uneec kayako com Ce contenu est susceptible de changer téléchargez la dernière version à partir de www yuneec com Si vous avez des questions concernant ce document veuillez nous contacter en engageant une conversation sur https yuneec kayako com ...

Страница 30: ...ES Introducción y vista general 01 Indicador LED de estado 02 Cámara con lente RGB 03 Cámara con lente infrarroja 04 Cardán 05 Micro SD puerto 01 02 03 05 04 ...

Страница 31: ...as monocromas LUT sí Lentes 13mm f 1 0 HFOV32 9 8 8mm f 1 1 HFOV50 8 Cardán Rango de vibración angular 0 03 Montura extraíble Rango controlable inclinación 30 hasta 110 Panorámica 165 Rango mecánico inclinación 50 hasta 140 Panorámica 671 Rodaje 50 Lentes RGB Sensor CMOS 1 2 8 Píxeles reales 2 13 MP Lentes 23 mm f 2 8 Campo de visión FOV 90 Resoluciones de vídeo FHD 1920x1080 30 FPS Formatos de fo...

Страница 32: ...ca de amortiguación Paso 2 Inserte el motor de guiñada del cardán en la placa de amortiguación y gírelo en sentido antihorario hasta que la línea de marca del icono de bloqueo quede alineada con la parte frontal de la placa de amortiguación a fin de asegurar el cardán Paso 3 Retire el protector de la lente Paso 1 Paso 3 Paso 2 Instalar el gimbal ...

Страница 33: ... horario hasta que la línea de marca del icono de desbloqueo quede alineada con la parte frontal de la placa de amortiguación Paso 2 Retire el cardán de la placa de amortiguación AVISO No es necesario que vincule el cardán por separado Si debe volver a vincularlo consulte la sección correspondiente en la Guía de inicio rápido de Drones ...

Страница 34: ...strucciones para familiarizarte con las características del producto antes de usarlo No utilices este producto con componentes incompatibles ni lo modifiques de un modo no contemplado en las instrucciones facilitadas por Yuneec Si no usas este producto según el fin previsto descrito en el manual de instrucciones puedes provocar daños en el producto daños materiales y o lesiones personales graves Est...

Страница 35: ...s funciones servicios contenidos etc de nuestros usuarios Exención de responsabilidad Yuneec Electric Aviation no se hace responsable de ningún daño o lesión que resulte de un uso indebido del presente producto o de un uso que viole la normativa legal en especial bajo las siguientes circunstancias Los daños o lesiones así como el incumplimiento de la normativa legal derivados del incumplimiento de...

Страница 36: ...incendio explosión inundación tsunami deslizamiento de tierras avalancha terremoto u otras fuerzas de la naturaleza Los daños o lesiones así como el incumplimiento de la normativa legal causados por el uso ilegal o inmoral del modelo p ej para grabar vídeos o datos que vulneren o menoscaben la privacidad de terceros Los daños o lesiones así como el incumplimiento de la normativa legal causados por...

Страница 37: ...a tomando una o varias de las siguientes medidas Reorientar o reubicar la antena receptora Aumentar la separación entre el equipo y el receptor Conectar el equipo a una salida en un circuito diferente al que está conectado el receptor Solicitar ayuda al distribuidor o un técnico experto de radio TV El presente dispositivo cumple la parte 15 de las reglas FCC Su manejo está sujeto a las siguientes ...

Страница 38: ...Yuneec Https yuneec kayako com Este contenido está sujeto a cambios descargue la última versión de www yuneec com Si tiene preguntas sobre este documento por favor contáctenos en Comienze una conversación en https yuneec kayako com ...

Страница 39: ...I T Introduzione e panoramica 01 Indicatore LED di stato 02 Lente videocamera RGB 03 Lente videocamera a infrarossi 04 Stabilizzatore a bilanciere 05 Micro porta SD 01 02 03 05 04 ...

Страница 40: ...le sì Obiettivo 13mm f 1 0 HFOV32 9 8 8mm f 1 1 HFOV50 8 Stabilizzatore a bilanciere Intervallo vibrazione angolare 0 03 Supporto sganciabile Intervallo controllabile Inclinazione tra 30 e 110 Pan 165 Intervallo meccanico Inclinazione tra 50 e 140 Pan 671 Rollio 50 Lente RGB Sensore CMOS 1 2 8 Pixel effettivi 2 13 MP Obiettivo 23 mm f 2 8 Campo visivo 90 Risoluzioni video Full HD 1920 x 1080 30 FP...

Страница 41: ... smorzamento Step 2 Per assicurare la sospensione cardanica inserire il motore di imbardata della sospensione cardanica nella piastra di smorzamento e ruotarlo in senso antiorario fino ad allineare lʼindicatore del logo di blocco con la parte anteriore della piastra di smorzamento Step 3 Rimuovere la protezione dellʼobiettivo Step 1 Step 3 Step 2 Installazione del gimbal ...

Страница 42: ...enso orario fino ad allineare lʼindicatore del logo di sblocco con la parte anteriore della piastra di smorzamento Step 2 Estrarre la sospensione cardanica dalla piastra di smorzamento NOTA Non è necessario collegare separatamente la sospensione cardanica Se deve essere eseguito un nuovo collegamento fare riferimento alla relativa sezione della Guida rapida dei modelli Drone ...

Страница 43: ... collaterali e gravi lesioni alle persone o il rischio elevato di lesioni superficiali AVVERTENZA Prima di iniziare a utilizzare il prodotto leggere l INTERO manuale di istruzioni per familiarizzare con le caratteristiche del prodotto Non utilizzare il prodotto con componenti incompatibili o tentare di modificare il prodotto in alcun modo che esuli dalle istruzioni fornite da Yuneec Se il prodotto n...

Страница 44: ... degli interessi delle abitudini delle modalità di utilizzo di certe funzioni servizi e contenuti da parte dell utente ecc Disclaimer Yuneec Electric Aviation declina qualsiasi responsabilità per eventuali danni lesioni o per usi del prodotto in violazione delle norme legislative in modo particolare nelle seguenti circostanze In caso di danni e o lesioni nonché violazioni delle norme legislative d...

Страница 45: ...i tsunami frane valanghe terremoti o altre forze della natura In caso di danni e o lesioni nonché violazioni delle norme legislative causati dall uso illegale o immorale del modello p es nel caso di riprese video o registrazione di dati che infrangono o danneggiano i diritti di riservatezza di altre persone In caso di danni e o lesioni nonché violazioni delle norme legislative causati da un uso in...

Страница 46: ... o più delle seguenti misure Riorientare o spostare l antenna ricevente Aumentare la distanza tra il dispositivo e l apparecchio ricevente Collegare il dispositivo a una presa appartenente a un circuito diverso da quello al quale è collegato l apparecchio ricevente Consultare il rivenditore o un tecnico radio TV esperto Questo dispositivo è conforme alla Parte 15 delle regole FCC L uso è soggetto ...

Страница 47: ... Yuneec Su Https yuneec kayako com Questo contenuto soggetto a modifica download l ultima versione da www yuneec com Se avete domande su questo documento per favore Contattaci per iniziare una conversazione su https yuneec kayako com ...

Страница 48: ......

Отзывы: