background image

YOWZA DAYTONA TREADMILL 

32 


WARRANTY 


DISCLAIMER OF WARRANTIES AND LIMITATION OF REMEDIES:

 It is impossible to eliminate all risks inherently associated with 

use of the product. Personal injury or other unintended consequences may result because of factors beyond our control. WE MAKE 
NO OTHER WARRANTIES OF ANY KIND. EXPRESS OR IMPLIED, OTHER THAN THOSE EXPRESSLY SET FORTH WITHIN 
THIS DOCUMENT. ALL WARRANTIES OTHER THAN THE WARRANTIES EXPRESSLY PROVIDED HEREIN ARE SPECIFICALLY 
EXCLUDED. IN THE CASE OF NON-CONSUMER BUYERS, ALL IMPLIED WARRANTIES OF MERCHANTABILITY AND FITNESS 
FOR A PARTICULAR PURPOSE ARE HEREBY DISCLAIMED. 
 
IN THE CASE OF A CONSUMER BUYER, THE DURATION OF ALL IMPLIED WARRANTIES OF MERCHANTABILITY OR 
FITNESS FOR A PARTICULAR PURPOSE IS LIMITED TO THE DURATION OF THE EXPRESS WARRANTIES PROVIDED 
WITHIN THIS DOCUMENT. 
 
WE WILL NOT BE LIABLE FOR ANY DIRECT OR INDIRECT, CONSEQUENTIAL OR INCIDENTAL DAMAGES, LOSSES OR 
EXPENSES, INCLUDING BUT NOT LIMITED TO COMMERCIAL LOSSES, BUSINESS INTERRUPTION, OR DAMAGE TO 
PROPERTY OTHER THAN THE PRODUCT OR PRODUCTS TO WHICH THIS LIMITED WARRANTY APPLIES. 


EFFECT OF STATE LAWS:

 Some States do not allow limitations on how long an implied warranty lasts, so the above limitation may 

not apply to you. Some States do not allow the exclusion or limitation of incidental or consequential damages, so the above limitation 
or exclusion may not apply to you. This warranty gives you specific legal rights, and you may also have other rights which vary from 
State to State. If there is a section in there Bout disputes it should read that all disputes must be litigated in Collier county Florida. 


ALTERNATIVE DISPUTE RESOLUTION FOR NON-CONSUMER BUYERS:

 WE RESERVE THE RIGHT TO MANDATE 

ALTERNATIVE DISPUTE RESOLUTION TO SETTLE ANY OR ALL CLAIMS RESULTING FROM THIS SALES TRANSACTION. 
ALTERNATIVE DISPUTE RESOLUTION PROCEEDINGS WILL BE CONSULTED IN THE STATE OF FLORIDA ACCORDING TO 
THE COMMERCIAL RULES OF THE AMERICAN ARBITRATION ASSOCIATION. 

Содержание Daytona Plus

Страница 1: ...7 EXPLODED DIAGRAM P18 P23 8 STABILIZER ADJUSTMENT P24 9 MAINTENANCE P25 P26 10 IMPORTANT STEPS P28 11 MUSCLE CHART P29 12 STRETCHING ROUTINE P30 13 TROUBLESHOOTING P31 14 WARRANTY P32 P33 15 COMPUTER OPERATION P34 P42 Yowza Technical Support 877 969 9240 Enter Serial Number ________________________ Enter Original Sales Order ________________________ Purchase Date ______________ ...

Страница 2: ...tic shoes Never use the treadmill with bare feet wearing only stockings or in sandals When connecting the power cord plug the power cord into a grounded circuit No other appliance should be on the same circuit Always straddle the belt and allow it to start moving before stepping onto the belt Always examine your treadmill before using to ensure all parts are in working order Allow the belt to full...

Страница 3: ...res The manufacturer recommends a single outlet surge protector with a UL 1449 rating as a Transient Voltage Surge Suppressor TVSS with a UL suppressed voltage rating of 400V or less and an electrical rating 110VAC 15 amps This treadmill must be grounded to reduce the risk of electrical shock Grounding provides a path of least resistance for electric current should the treadmill malfunction This t...

Страница 4: ...e a friend Some of the assembly steps may require heavy lifting It is recommended that you obtain the assistance of another person when assembling this product User Weight Limitation Please note that there is a weight limitation for this product If you weigh more than 350LBS Approx 160 Kg It is not recommended that you use this product Serious injury may occur if the user s weight exceeds the limi...

Страница 5: ... 701 Upright Cover LL 1 702 Upright Cover LR 1 703 Upright Cover RR 1 704 Upright Cover RL 1 705 Upright Side Cover Left 1 706 Upright Side Cover Right 1 707 Wheel 65x25mm Set 2 708 Left Handlebar 1 709 Right Handlebar 1 710 Upright Lower Cap 2 725 I PAD Shelves 1 810 IWM Scale 1 E Power Cord 1 G Safety Key 1 I MP3 Connection Wire 1 707 E 708 A1 709 A2 801 G 706 703 701 702 704 705 710 725 I ...

Страница 6: ... and bolts use the scale below to measure them and compare them to the sizes listed No Description Qty 601 M8x25mm Allen Head CAP Bolt 2 602 M8x50mm Allen Head Bolt 4 604 4x15mm Screw 14 605 M10x45mm Bolt 2 606 10x22x2mm Spring Washer 2 608 M6x45mm Bolt 2 A Screwdriver 1 C 6mm T Type Allen Key 1 D 5mm Allen Key 1 F 4mm Allen Key 1 MILLIMETERS 601 602 604 605 606 608 F A C D ...

Страница 7: ...YTONA PLUS 208 211 Plastic Clamp Bracket 2 DAYTONA PLUS 211 212 Oilless bushing 4 DAYTONA PLUS 212 214 Compression spring 1 DAYTONA PLUS 214 217 Running Belt 1 DAYTONA PLUS 217 219 Running Deck 1 DAYTONA PLUS 219 221 Base Frame Fixed Plate 2 DAYTONA PLUS 221 222 Cushion M8X36X10 2 DAYTONA PLUS 222 DAYTONA 300 301 Rectangular Cushion 101X34X19 25 21 25 2 DAYTONA PLUS 301 302 Double Arc Shape Cushio...

Страница 8: ...42 343 Elevation Support Tube Axel 1 DAYTONA PLUS 343 344 Cushion Pad 18X35X2 1 DAYTONA PLUS 344 345 Washer 10X20X T1 5 2 DAYTONA PLUS 345 346 Cushion Pad 28X16 M8X12 2 DAYTONA PLUS 346 347 Round PVC Cushion M8X48 2 DAYTONA PLUS 347 351 Overlay 1 DAYTONA PLUS 351 DAYTONA 400 401 Hand Pulse Upper Cover Left 1 DAYTONA PLUS 401 402 Hand Pulse Bottom Cover Left 1 DAYTONA PLUS 402 403 Driving Motor 1 D...

Страница 9: ... 452 Digital Bluetooth Audio PC board 1 DAYTONA PLUS 452 DAYTONA 500 501 M10X120X47mm Carriage Bolt 1 DAYTONA PLUS 501 502 8x16x3mm Washer 2 DAYTONA PLUS 502 504 M8x20mm Allen Head Bolt 2 DAYTONA PLUS 504 505 M16x19 M16x22mm Bolt 1 DAYTONA PLUS 505 506 M16X24X10 Nut 1 DAYTONA PLUS 506 507 Plastic Washer 1 DAYTONA PLUS 507 508 20X49X5 5mm Washer 1 DAYTONA PLUS 508 510 M5X8mm Screw 2 DAYTONA PLUS 51...

Страница 10: ...2 555 6x8x8mm Plastic Washer 2 DAYTONA PLUS 555 556 4x12mm Screw 2 DAYTONA PLUS 556 557 17 2X22X1mm Washer 3 DAYTONA PLUS 557 DAYTONA 600 601 M8x25mm Allen Head CAP Bolt 2 DAYTONA PLUS 601 602 M8x50mm Allen Head Bolt 4 DAYTONA PLUS 602 604 4x15mm Screw 14 DAYTONA PLUS 604 605 M10x45mm Bolt 2 DAYTONA PLUS 605 606 10X16X2mm Spring Washer 2 DAYTONA PLUS 606 608 M6x45mm Bolt 2 DAYTONA PLUS 608 DAYTONA...

Страница 11: ...en area B Remove the treadmill and all the components and hardware from the box C Check the quantities of all components and hardware with the component and hardware lists on pages 5 6 D After verifying inventory if there is any missing parts please contact Yowza fitness at 877 969 9240 9 3 7 5 8 1 2 6 CU T CU T C U T C U T ...

Страница 12: ... 1 Rotate the Uprights 105 106 up and secure using the M8x25mm Allen Head CAP Bolt 601 to firm the upright and then attach the Upright Lower Cap 710 PLEASE CUT THE CABLE TIE AS SHOWN IN FIG 1 BEFORE YOU ASSEMBLE THE UPRIGHT 601 X2 601 601 106 105 101 C ...

Страница 13: ...ttp www yowzafitness com 13 STEP2 ASSEMBLY STEP 2 Attach the wheel to the base frame and secure using M10x45mm Bolt 605 with 10X16X2 Spring Washer 606 605 X2 606 X2 101 105 106 605 606 707 707 605 606 C ...

Страница 14: ...ct the 8pin Computer Wire Upper 413 to 8pin Computer Wire Lower 414 and Safety Key Wire Upper 415 to Safety Key Wire Lower 416 STEP 3 B Attach the Console Support Tube to the uprights and secure using M6x45mm Bolt 608 608 X2 102 608 608 105 106 416 415 413 414 F ...

Страница 15: ...http www yowzafitness com 15 STEP4 ASSEMBLY STEP 4 Attach the Left and Right Handlebar and secure using the M8x50mm Allen Head Bolt 602 602 X4 602 708 602 709 602 602 102 105 106 D ...

Страница 16: ...5 ASSEMBLY STEP 5 Attach the Upright Cover 701 702 705 to the left upright Repeat the above procedure to assemble the right side 315 703 706 704 705 701 702 STEP2 STEP1 STEP3 702 102 702 705 102 702 102 658 657 656 658 656 657 658 657 656 ...

Страница 17: ...Y STEP 6 Secure use the 4x15mm Screw 604 to firm the upright cover Place on your IWM scale in range of 3 meter and start to enjoy the exercise Your treadmill is now fully assembled 604 X14 604 604 604 604 702 701 703 704 105 604 604 604 701 702 ...

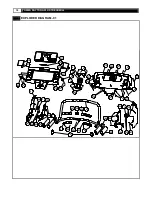
Страница 18: ...D DIAGRAM 01 428 604 604 525 531 525 531 604 525 531 525 604 315 530 706 525 433 524 524 402 401 209 705 541 209 701 702 331 527 102 527 552 407 426 341 549 342 318 319 703 704 340 426 317 531 314 432 108 109 527 527 530 711 541 711 324 330 ...

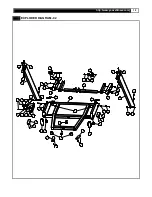
Страница 19: ...AM 02 105 329 529 323 212 212 523 302 322 523 212 302 333 328 333 328 529 329 335 106 103 101 316 530 530 316 335 606 605 606 605 534 601 221 221 534 513 601 509 337 404 509 405 510 556 204 513 406 602 602 602 602 608 608 301 301 530 530 303 309 ...

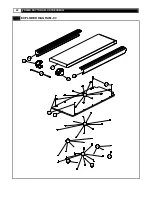
Страница 20: ...20 YOWZA DAYTONA PLUS TREADMILL EXPLODED DIAGRAM 03 516 336 320 543 217 332 332 516 535 511 538 538 538 511 538 321 219 ...

Страница 21: ...4 202 548 548 431 431 529 410 429 545 502 411 533 514 214 504 533 540 501 533 535 201 522 403 334 408 507 409 529 529 327 529 326 304 530 530 304 430 325 527 527 527 529 529 529 526 526 312 526 313 344 547 547 203 505 306 508 506 533 345 343 345 533 ...

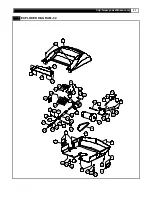
Страница 22: ...M 05 107 206 537 519 557 557 537 545 532 308 305 532 537 545 308 305 104 305 305 532 545 537 537 545 532 310 311 211 518 545 310 518 211 311 205 557 537 519 520 533 520 533 207 208 536 539 517 207 208 536 539 517 207 208 536 539 517 306 412 306 412 ...

Страница 23: ...AGRAM 412 442 439 656 413 426 426 407 424 446 438 434 436 437 443 440 415 422 421 î ª O Ó u ô Ï o 3P n µ É F 419 408 403 418 409 430 423 420 420 414 417 416 429 406 404 405 413 414 416 415 424 711 711 RT9 5NF IWM AP Â Å ú Ë m 451 452 443 ...

Страница 24: ...to make sure the treadmill stabilizer is adjusted correctly prior to use You may need the assistance of another person to perform this adjustment First locate the two adjustable stabilizers under the base frame Then simply rotate them in or out to adjust the level of the treadmill When properly adjusted the treadmill should sit firmly on both stabilizers and all cushions Locate the two adjustable ...

Страница 25: ...procedure until the walking belt is centered It may be necessary to set walking belt tension once you have completed this procedure if the belt feels like it is slipping while walking Refer below to the Walking belt slipping instructions Walking belt has shifted to the right First unplug the power cord from the surge protector Using the hex key provided turn the right rear roller adjustment bolt 1...

Страница 26: ...hecked periodically for lubrication to ensure optimal treadmill performance Your treadmill should not have to be lubricated usually within the first 400 hours of use Every 2 months of operation lift the sides of the walking belt and feel the top surface of the running deck as far as you can reach If you feel signs of silicone no further lubrication is required If it feels dry to the touch follow t...

Страница 27: ... to exercise only for a few minutes in your target zone However your aerobic fitness will improve over the next six to eight weeks Don t be discouraged if it takes longer It s important to work at your own pace Ultimately you ll be able to exercise continuously for 30 minutes And the better your aerobic fitness the harder you will have to work to stay in your target zone But remember these essenti...

Страница 28: ...lop primarily lower body muscle groups These muscle groups are shown in gray color on the chart below MUSCLE GROUPS A Shoulder muscles Calf muscles G B Pectoral muscles Trapezius muscles H C Bicep muscle Triceps muscles I D Abdominal muscles Back muscles J E Forearm muscles Gluteal muscles K F Quadriceps muscles Hamstring muscles L ...

Страница 29: ...nner Thigh Stretch Sit with the soles of your feet together with your knees pointing outward Pull your feet as close into your groin as possible Gently push your knees towards the floor Hold for 15 counts Hamstring Stretch Sit with your right leg extended Rest the sole of your left foot against your right inner thigh Stretch toward your toe as far as possible Hold for 15 counts Relax and then repe...

Страница 30: ...uirements section in this manual Program time has expired Treadmill will not incline Power fold models only Check for proper positioning of spring knob for folding See procedure in owners manual Treadmill will not unfold Power Fold only Check for proper positioning of spring knob for folding See procedure in owners manual Manual Fold only Folding locking lever is depressed Treadmill running belt m...

Страница 31: ... including but not limited to regular inspection and wear component replacement We do not warrant damage caused by the lack of normal maintenance repairs such as those detailed within the Owner s Manual We do not warrant any causes beyond our control Corrosion oxidation or deterioration caused by product location exposure or environment or conditions caused by unsuitable finishes cleaners or lubri...

Страница 32: ...QUENTIAL OR INCIDENTAL DAMAGES LOSSES OR EXPENSES INCLUDING BUT NOT LIMITED TO COMMERCIAL LOSSES BUSINESS INTERRUPTION OR DAMAGE TO PROPERTY OTHER THAN THE PRODUCT OR PRODUCTS TO WHICH THIS LIMITED WARRANTY APPLIES EFFECT OF STATE LAWS Some States do not allow limitations on how long an implied warranty lasts so the above limitation may not apply to you Some States do not allow the exclusion or li...

Страница 33: ...TION DISPLAY A B AUDIO VOLUME UP DOWN START C D INCLINE UP DOWN EXPRESS INCLINE BUTTONS E F IWM SYSTEM SAFETY KEY INSERT LOCATION G H ENTER EXPRESS SPEED BUTTONS I J FAN SPEED UP DOWN K L STOP PAUSE FITNESS TEST M N CUSTOM SAVE MOTION CONTROL O ...

Страница 34: ...M will display on the LCD Press START to begin training in QUICK START MODE or ENTER to go into PROGRAM MODE START Quick start Press to start exercise at an initial speed of 0 5 mph 0 8 km h STOP Press to stop exercise during any workout ENTER a Press to confirm program and preset function values during setting mode b Press to run setting procedure before pressing the START button CUSTOM SAVE When...

Страница 35: ...UTTONS Press the Express Speed or Express Incline buttons to adjust the speed or incline to your demand directly AUDIO SETTING Use MP3 Connection Wire G Insert your device and audio port on console Use device cable connecting on USB port on console can also charge the device while using AUDIO VOLUME After install your device and then you can start to press the Volume up or down to adjust properly ...

Страница 36: ... for 3 minutes without receiving any input Press any button to return to POWER ON MODE when the computer is in the SLEEP MODE QUICK START MODE Press the START after power on the treadmill to enter Quick Start workout mode when in QUICK START MODE the treadmill will countdown from 3 to zero and then the belt start at 0 8km h or 0 5 mph speed The workout Time Distance and approximate Calories figure...

Страница 37: ...automatically The IWM light will stop blinking and have one beep after the user s weight data is received You will see the user s weight figure that records on the console screen 2 Press Incline UP DOWN or Speed UP DOWN buttons to select user ID between U1 to U7 then press ENTER to confirm 3 You now need to set sex of the user Press the Incline UP DOWN or Speed UP DOWN buttons to change the user s...

Страница 38: ... and presses the ENTER the LCD will blink 30 00 min The user must next select the target time min and then press ENTER to confirm the setting The user may then press the START button to begin the program Time will count down from the defined target time with an initial speed with 3 2km hr 2 0 mph The user may press SPEED UP or SPEED DOWN to adjust the running speed The user may press INCLINE UP or...

Страница 39: ...e P4 program and presses ENTER Level and Duration Time need to be setup to start the program After selecting the P4 program L1 will first be blinking and the user must use UP DOWN to select a Performance Level between L1 and L12 and then press ENTER to confirm the setting After setting the preferred Performance Level the LCD will blink 24 00 min workout time the user must use UP DOWN to setup tota...

Страница 40: ... 4 8 2 2 0 3 4 3 2 5 4 3 2 2 3 8 3 5 6 1 4 2 4 4 2 3 8 6 7 5 2 6 4 6 4 2 7 4 6 2 8 5 0 4 5 8 0 7 3 0 5 4 4 8 8 6 8 3 2 5 8 5 1 9 3 9 3 4 6 2 5 4 9 9 10 3 6 6 6 5 8 10 6 11 3 8 7 0 6 1 11 2 12 4 0 7 2 6 4 11 5 P6 WEIGHT LOSS PROGRAM If the user selects P6 and presses ENTER L1 will first be blinking and the user must select a Performance Level between L1 and L12 using UP DOWN to set the min and max ...

Страница 41: ...ssion for example with the goal to achieve a faster time and or a higher level of calories spent As previously described in Program P1 the user may at any time during the workout period alter the speed with SPEED UP SPEED DOWN angle with INCLINE UP INCLINE DOWN The User may also pause STOP or STOP 2x the workout and will at the conclusion of any given program enter the COOL DOWN program as detail ...

Страница 42: ...period the Threshold Heart Rate approx 75 Target Heart Rate is not met then the display will give an indication that the HEART RATE CONTROL Program has frail shows the word FAIL at the top of the display and after blinking 10 seconds will return to the POWER ON MODE If during the extended monitoring period of 3 minutes the Threshold Heart Rate is achieved the program will switch over to HEART RATE...

Страница 43: ...ing the duration of the CUSTOM COURSE program it will toggle between EXTENDED and REDUCED MODE Extended Mode Pressing START from within the workout period or during COOL DOWN allows the user to enter extended mode and then continue to alter speed and incline settings until a maximum of 60 00 min is reached Reduced Mode Toggling with START to Reduced Mode and then pressing STOP ends the workout and...

Страница 44: ... of your maximum heartrate Health Fat Burning 50 70 of your max heartrate Fitness Bodyshaping 70 80 of your max heartrate Performance 80 90 of your max heartrate Example You are 25 years old and want to train for the target Fitness 220 25 195 70 of 195 136 5 80 of 195 156 Your target heartrate should be between 136 5 and 156 beats per minute This information is for your reference only To determine...

Отзывы: