background image

ERROR 1 CODE

This is a safety feature that can stop the treadmill from functioning.  This error can occur

because the computer is not receiving the correct information from the speed sensor located

near the motor.  As a precaution the computer stops the treadmill until it begins to receive

the correct feedback.

By performing a few simple checks, the error can be cleared quickly and easily, 

and the treadmill can be ready for use.

 SHOULD YOU REQUIRE ANY ASSISTANCE REGARDING THIS PRODUCT PLEASE CONTACT YORK DIRECTLY. 

*

*

The treadmill does not

move and displays

“ERROR 1”

Switch off the treadmill at

the mains, and then switch

it on again.

If “ERROR 1” still shows

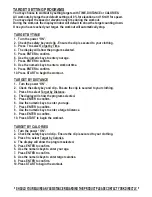
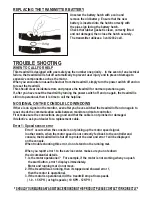
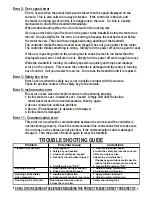
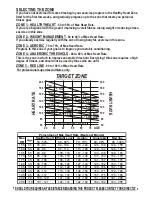
switch off and push the

running mat round

(1 cycle) using your feet.

Then switch back on.

If “ERROR 1” still shows,

then UNPLUG from the

mains and check all of the

wire connections made

during the assembly.

(SEE BOLD PRINT)

UNPLUG

If the treadmill still does

not move, then please

contact the helpline.

Doing this may reset the

program error, and the treadmill 

will be ready to use.

This should reset the sensor,

and the treadmill will be ready

to use.

Once the cables have been

checked, turn on the treadmill

again.  This should eradicate

the problem.

1.

2.

3.

When assembling, there are several cables that need to be connected.

It is very common for these cables to look like they are connected 

when they are in fact not fully connected.

Make sure that these cables are connected as tightly as possible.

The connections may have come apart whilst assembling the treadmill.

Содержание Pacer 5000 HRC

Страница 1: ...1 2002 TWN Product may vary slightly from the item pictured COMPLIESWITHEUROPEANSTANDARDEN957PT1 6CLASSHC An electronic voice guides you through setting the treadmill computer H E A R T R A T E C O N T R O L F O L D A B L E T R E A D M I L L ...

Страница 2: ...of the treadmill To prevent shock keep all electric component such as the motor cable and switch away from water Do not use any accessories that aren t specifically recommended by the manufacturer these might cause injuries or cause the unit to fail Work within your recommended exercise level do NOT work to exhaustion If you feel any pain or abnormal systems STOP YOUR WORKOUT IMMEDIATELY Consult y...

Страница 3: ...BAR WITH FOAM GRIP MAIN FRAME FOUR WHEELS TRANSPORTATION SYSTEM ALLOWS YOU TO MOVE THE TREADMILL EASILY WHEN FOLDED HANDLE BAR POST 10 PROGRAMS USER A USER B SPEED INTERVAL AEROBIC WEIGHT LOSS HILL CLIMB HR CONTROL TARGET TIME TARGET DIST TARGET CAL COMPUTER SHOWS ELEVATION TIME CALORIE PULSE DISTANCE SPEED MAX HEART RATE SAFETY KEY BELT ADJUSTING BOLTS ADJUST BELT TENSION TO CENTRALIZE MAT RUNNIN...

Страница 4: ...R PACER 5000 HRC TREADMILL GENERAL ASSEMBLY INSTRUCTIONS 1 2 Ask someone to help you remove all the parts of your YORK PACER 5000 HRC from the carton and place them on the floor carefully Rest the left handle bar post on the main frame carefully as shown Connect the sensor wire socket to the middle wire plug protruding at the base of the left handle bar post LEFT HANDLE BAR POST SENSOR WIRE SOCKET...

Страница 5: ... NOT TRAP CABLE DO NOT FULLY TIGHTEN BOLTS YET Insert the handle bar into the handle bar post as shown NOTE One end of the handle bar protrudes from the end of the foam grip this end must be inserted into the hole on the right handle bar post first 5 Secure the handle bar to the left handle bar post by using one long allen head bolt and star washer INSERT THIS SIDE FIRST RIGHT HANDLE BAR POST LONG...

Страница 6: ...attach the computer console If the console will not align and fit easily loosen all the bolts fitted so far and try again RECHECK Recheck that all of the bolts are tightened securely for your safety and comfort Plug the power cable into a suitable AC outlet 220 240 Volt 50Hz Before you use the treadmill for the first time turn on the power switch and connect the magnetic safety key Allow the tread...

Страница 7: ...DESCRIPTION ...
Страница 8: ... 5518 28 6 M8 X 20mm SOCKET HEAD SCREW 29 5518 29 2 LINKAGE SUPPORT SLEEVE 30 5518 30 1 INCLINE SUPPORT LINK 31 5518 31 2 INCLINE MOVING WHEEL 32 5518 32 6 M8 X 30mm DOME HEAD SCREW 33 5518 33 1 INCLINE WHEEL LINKAGE 34 5518 34 2 E RING 35 5518 35 1 INCLINE LINKAGE SHAFT 36 5518 36 2 TRACK SLIDER 37 5518 37 2 BUSHING SPACER 38 5518 38 4 CONNECTION TUBE BUSHING 39 5518 39 1 MOVING SHAFT 40 5518 40 ...

Страница 9: ... 92 2 M8 X 65mm SOCKET HEAD SCREW 93 5518 93 1 REAR END CAP TOP R 94 5518 94 1 REAR END CAP BOTTOM R 95 5518 95 6 M4 X 20mm DOME HEAD SCREW 96 5518 96 2 M6 X 10mm DOME HEAD SCREW 97 5518 97 1 REAR END CAP TOP L 98 5518 98 1 REAR END CAP BOTTOM L 99 5518 99 2 M6 X 1 5mm SPRING WASHER 100 5518 100 1 MOTOR COVER 101 5518 101 2 M5 X 16mm DOME HEAD SCREW 102 5518 102 17 M8 X 15mm ALLEN HEAD BOLT 103 55...

Страница 10: ...electronic voice guides you though setting the treadmill computer TIPS ON STEPPING ONTO THE TREADMILL Once the treadmill is running at a low speed place your weight on your right foot extend your left foot onto the running mat one normal step ahead of you Allow your left leg to follow the running mat movement Repeat this manoeuvre several times until you become familiar with the required pace Once...

Страница 11: ...TD CHURCHILLWAY DAVENTRY NORTHANTS NN11 4YB ENGLAND TEL 01327 701 824 FAX 01327 706 704 E MAIL helpdesk yorkfitness co uk HELP LINE 8 30am 4 30pm YORK BARBELL AUST LTD UNIT 1 LOT 2 SWAFFHAM ROAD MINTO N S W 2566AUSTRALIA TEL 02 9603 8444 FAX 02 9603 8555 E MAIL paulyork ozemail com au HELP LINE 8 30am 4 30pm STOP STOP PAUSE PAUSE 5 Press STOP key to stop the treadmill and disconnect the safety key...

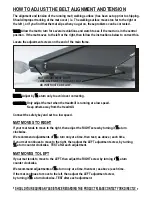
Страница 12: ...to the left or the right then follow the instructions below to correct this Locate the adjustment screws on the end of the main frame TEST NOTE Adjust by a turn only to avoid over correcting CAUTION Only adjust the mat when the treadmill is running at a low speed Keep others away from the treadmill Connect the safety key and set to a low speed NOTE CAUTION If the mat continues to move to the left ...

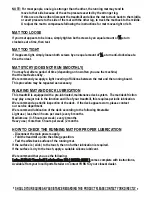
Страница 13: ... running board This procedure may be repeated as necessary WALKING MAT AND DECK LUBRICATION This treadmill is equipped with a pre lubricated maintenance deck system The mat deck friction may play a major role in the function and life of your treadmill this requires periodic lubrication We recommend a periodic inspection of the deck If the deck appears worn please contact our service department We ...

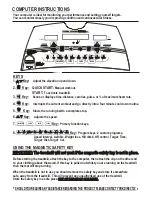
Страница 14: ... Scans or displays time distance calories pulse or of maximum heart rate 2 Key QUICK START Manual workout START To activate treadmill 1 Key Adjust the elevation up and down QUICK START QUICK START START START COOL DOWN COOL DOWN STOP STOP PAUSE PAUSE VIEW VIEW 7 Key Primary function keys ELEVATION SPEED ENTER CLEAR 8 Key Program keys 2 custom programs Speed interval Aerobic Weight loss Hill climb ...

Страница 15: ...cted 5 Press ENTER to confirm 6 Use the numeric keys to enter your age 7 Press ENTER to accept 8 Use the numeric keys to enter a workout time 9 Press ENTER to accept 10 Press START to begin your workout 11 The workout will start at 0 elevation and 1 Km H You may adjust the speed and elevation throughout your workout When your workout time is up the treadmill will memorize all your workout settings...

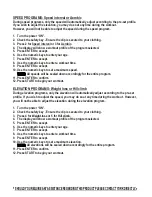
Страница 16: ...speeds will be scaled down accordingly for the entire program 11 Press ENTER to confirm 12 Press START to begin your workout ELEVATION PROGRAMS Weight loss or Hill climb During elevation programs only the elevation will automatically adjust according to the pre set profile If you wish to adjust the speed you may do so at any time during the workout However you will not be able to adjust the elevat...

Страница 17: ...37 153 154 170 175 45 88 105 106 123 124 140 141 157 158 175 180 40 90 108 109 126 127 144 145 162 163 180 185 35 93 111 112 129 130 147 148 166 167 185 190 30 95 114 115 133 134 152 153 171 172 190 195 25 98 117 118 137 138 156 157 175 175 195 200 20 100 120 121 140 141 160 161 180 181 200 205 18 101 121 122 141 142 162 162 182 183 205 Percentage of Max Heart Rate Beats per Minute Max HR Age NOTE...

Страница 18: ...7 Press ENTER to confirm 8 Use the numeric keys to enter a target distance 9 Press ENTER to confirm 10 Press START to begin the workout TARGET BY CALORIES 1 Turn the power ON 2 Check the safety key and clip Ensure the clip is secured to your clothing 3 Press 9 to select Target by Calories 4 The display will show the program selected 5 Press ENTER to confirm 6 Use the numeric keys to enter your age...

Страница 19: ...t which may need adjusting The rubber electrodes must be flat against the skin and the belt must be in the correct position on the chest Not too low Check the electrodes are wet Moisten the rubber electrodes on the underside of the belt as shown Water or saliva can be used The transmitter is activated automatically when on the body and is deactivated automatically when removed Adjust the strap to ...

Страница 20: ...till not operational then it is time to call the helpline NO SIGNAL ON THE CONSOLE LCD WINDOWS If there is no signal on the monitor even after you have switched the treadmill off and on again to reset check the communication cable between monitor and motor controller First make sure the connections are good and that the cable is not pinched or damaged If defective ask your dealer for a replacement...

Страница 21: ...rror 2 on the console This means the controller is damaged and the motor is running out of control Call your dealer for service Do not use the treadmill until it is repaired If the user is pushing hard on the running mat to cause the mat to run faster than the displayed speed error 2 will also occur Simply turn the power off and on again to reset If you see error 2 when you first turn on the power...

Страница 22: ...e wire connections made during the assembly SEE BOLD PRINT UNPLUG If the treadmill still does not move then please contact the helpline Doing this may reset the program error and the treadmill will be ready to use This should reset the sensor and the treadmill will be ready to use Once the cables have been checked turn on the treadmill again This should eradicate the problem 1 2 3 When assembling ...

Страница 23: ...ROVE YOUR FITNESS Like any muscle in your body your heart can be strengthened by systematic physical exercise which requires an increased blood flow and heart rate You can measure your heart rate by taking a pulse reading Your heart of pulse rate corresponds directly to your exertion level and exercise efficiency To improve your fitness in a safe and effective way you need to exercise at a high en...

Страница 24: ...ersonal target heart zone you will need to Calculate your maximum heart rate Select a zone based on your current fitness level Calculating your maximum heart rate The standard method for calculating heart rate training zone is based on estimating maximum heart rate using the formula 220 minus the persons age in years Some practitioners believe that a woman estimated maximum heart rate can be calcu...

Страница 25: ...0 to 59 of Max Heart Rate If you are a beginner with the goal of improving overall fitness losing weight or reducing stress exercise in this zone HEART RATE 200 180 160 140 120 100 80 60 200 180 160 140 120 100 80 60 20 30 40 50 60 70 AGE ANAEROBIC THRESHOLD ZONE 80 90 MHR RED LINE ZONE 90 100 MHR WEIGHT MANAGEMENT ZONE 60 70 MHR AEROBIC ZONE 70 80 MHR HEALTHY HEART ZONE 50 60 MHR Maximum Heart Ra...

Страница 26: ...ulse rate it is determined by two thing 1 Rate How fast you exercise e g Speed you cycle run or step 2 THE PULSE RATE RULES If your pulse rate is too low exercise faster or increase load If your pulse rate is too high exercise slower or decrease load If your pulse rate goes up towards the end of your exercise you are trying to exercise for too long shorten the time If your pulse rate does not quic...

Страница 27: ...ur computer to control your exercise intensity and to monitor your progress The time it takes for your pulse to return to normal after exercise is an indicator of your fitness level During the first minute of your cool down phase you will experience a drop in your pulse rate The bigger the drop in that minute the fitter you are TO CHECK YOUR PROGRESS 1 Monitor your pulse rate the moment you end th...

Страница 28: ...r no circumstances will returns be allowed without the Return Authorization by our Customer Service Department Returns must be sent pre paid with the original packaging or equivalent This warranty does not apply when the product is used for rental or commercial use This warranty gives you specific legal rights and you may also have other rights which vary from state to state WARRANTY YORK BARBELL ...

Страница 29: ...for replacement parts Date of purchase Name of location where purchased Model number Last name First name Telephone number Address City State Zip Postcode Send your order to YORK BARBELL AUST LTD UNIT 1 LOT 2 SWAFFHAM ROAD MINTO N S W 2566 AUSTRALIA YORK BARBELL U K LTD CHURCHILL WAY DAVENTRY NORTHANTS ENGLAND NN11 4YB Part ...

Отзывы: