Yolink Garage Door Kit 3 Скачать руководство пользователя страница 6

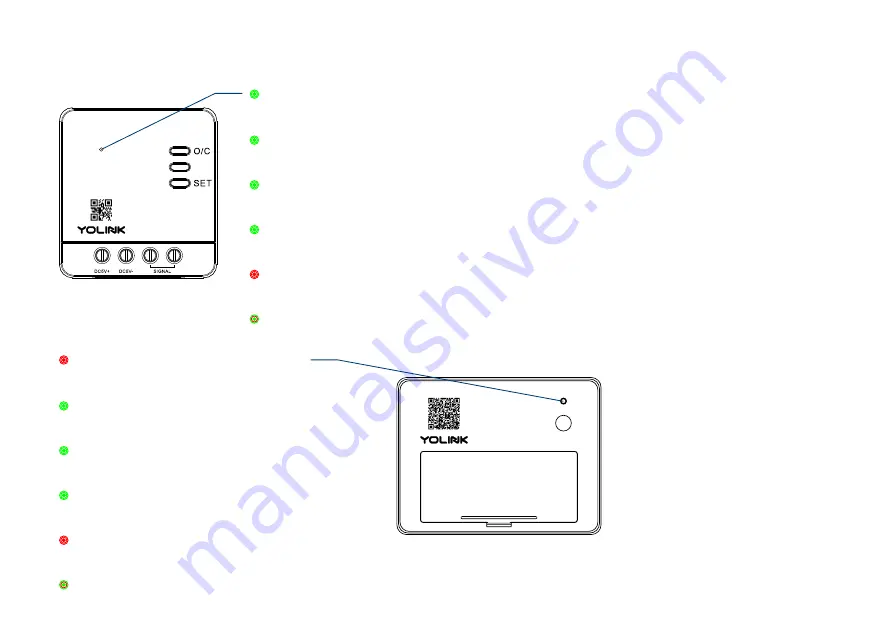
The LED light indicates the current status of the controller and sensor:

Green Once

Opening / Closing the door

Slow Blinking Green

Upda ng

Fast Blinking Red

Removing Connec on to YoLink System

Blinking Red And Green Alternately

Restoring to Factory Defaults

Fast Blinking Green

Establishing Connec on with YoLink System

Blinking Green

Connec ng to Cloud


4

Red Once

Alert Mode (Door is Opened or Closed)

Slow Blinking Green

Upda ng

Fast Blinking Red

Removing Connec on to YoLink System

Blinking Red And Green Alternately

Restoring to Factory Defaults

Fast Blinking Green

Establishing Connec on with YoLink System

Blinking Green

Connec ng to Cloud


SET

Содержание Garage Door Kit 3

Страница 1: ...Garage Door Kit 3 YS4906 UC_YS7706 UC Installa on User Guide Rev 1 0 Garage Door Controller SET Garage Door Sensor 2...

Страница 2: ...2 Introduc on 3 Set Up 5 Installa on 8 Using the YoLink App 19 About YoLink Control 29 Maintenance 35 Speci ca ons 40 Garage Door Controller Troubleshoo ng 41 Garage Door Sensor 2 Troubleshoo ng 42 Wa...

Страница 3: ...In the Box A Garage Door Controller B Garage Door Sensor 2 C Power Adapter D USB Cable Signal Wire E F Quick Start Guide 1 F E D C A B SET...

Страница 4: ...ontrol it via the app without adult supervision Important No ce If you are uncomfortable working with wiring or electricity please consult or hire a quali ed electrician Due to the di erent control ci...

Страница 5: ...2 Supervises the posi on of your garage door detec ng when it is opened or closed and can send alerts or trigger an automa on based on the door opening closing or being le open too long Garage Door Co...

Страница 6: ...ly Restoring to Factory Defaults Fast Blinking Green Establishing Connec on with YoLink System Blinking Green Connec ng to Cloud 4 Red Once Alert Mode Door is Opened or Closed Slow Blinking Green Upda...

Страница 7: ...oogle Play Store Log in or create a new account if required Download and log in to YoLink app 1 Make sure your hub is connected to the internet green LED indicator is blinking blue LED indicator is al...

Страница 8: ...nce we suggest you pair your Garage Door Sensor 2 with a status of your Garage Door Sensor 2 signal level between Garage Door Controller or Garage Door Sensor 2 and the YoLink Hub and real me opened o...

Страница 9: ...device is online and ready to use Turn on power a er installa on 2 If the controller is powering on press the SET bu on once the Status LED will blink green your device is ready to use Status LED will...

Страница 10: ...when the door is opened to func onally test the status change of the door proceed to the following steps for informa on on crea ng automa ons then return to this step Test the Controller and Sensor Lo...

Страница 11: ...g of your garage or the bu on typically on the wall For connec ons to the operator Method A you may install the Garage Door Controller on the garage door operator itself near it on the ceiling or on t...

Страница 12: ...strip o insula on as needed Insert the wire into the terminal then ghten the screw terminal Gently tug on the wire to ensure a ght connec on For Method A Connec ng to the Garage Door Operator proceed...

Страница 13: ...tor a er making a note or taking a picture of their loca ons Twist together one exis ng wire to one new signal wire install under the exis ng wire s original terminal Repeat for the other exis ng wire...

Страница 14: ...controller 6 Test your garage door operator as you would normally use it If it is not working properly double check or re do steps 3 through 6 as needed Do not proceed to the next step un l your gara...

Страница 15: ...is ng wire to one new signal wire install under the exis ng wire s original terminal Repeat for the other exis ng wire and new control wire If the wires are not twisted together it is important to ens...

Страница 16: ...Power on the controller Verify your exis ng garage door controller bu on func ons normally Otherwise double check or re do step 5 Power on the controller 6 14...

Страница 17: ...ge Door Sensor 2 with double sided tape on the back of the device Find a suitable area on the top panel le or right side suggested Ensure the sensor will not come in contact with moving parts of the g...

Страница 18: ...at the desired loca on pressing rmly for at least 5 seconds 3 SET SET Keep the longer side parallel to the oor Keep the SET bu on of the Garage Door Sensor 2 at the top and the longer side parallel t...

Страница 19: ...o the moun ng holes on the back of the Sensor Keep the longer side of the Garage Door Sensor 2 parallel to the oor mount the sensor to the top panel le or right side suggested of the garage door using...

Страница 20: ...The door is closed The door is opened Top Panel Reinstall the ba eries and close the ba ery cover 3 SET SET Reinstall the ba eries and close the ba ery cover 18...

Страница 21: ...e name Edit name on Details page Real me status Opened or closed or inaccurate status Device history Door opened and closed logged with date me Tap to open close the garage door Ba ery level current b...

Страница 22: ...Details Tap to go to Details page refer to page 22 Device name Edit name on Details page Unknown status of door Pair with a sensor to obtain the status of door Device history Door controlled no statu...

Страница 23: ...e Edit name on Details page Device history Door opened and closed logged with date me Real me status Opened or closed or inaccurate status Ba ery level current ba ery level Shown red if replacement is...

Страница 24: ...t to Alert When Door is Opened or Closed Choose a room for device Device SN unique Send no ca on to you when the door is le open for a set me Default is set to 30 minutes A er the rst no ca on there w...

Страница 25: ...23 Tap to unpair the sensor with the controller Connec on status of sensor and Hub Device type Device model Firmware version indicates a ready now new update is available refer to page 33 Rename the d...

Страница 26: ...n indicates a ready now new update is available refer to page 34 Unknown status of door Pair with a sensor to obtain the status of door Tap to delete the device from your YoLink account Add remove fro...

Страница 27: ...Default is set to 30 minutes A er the rst no ca on there will be con nuously no ca on at a default interval of 30 minutes Rename the device Connec on status of sensor and Hub Firmware version indicate...

Страница 28: ...Device Alerts Upon the opening or closing or le open for a set me of the garage door an alert will be sent to your YoLink account Door is closed Door is opened Door is s ll open for a set me 26...

Страница 29: ...o edit the automa on Swipe le to view the history logs and to edit or delete the automa on Edit trigger Edit behavior You must have at least one ac on device or you cannot set a behavior Edit when Set...

Страница 30: ...ner to go to My Pro le Connect YoLink with third party voice assistants service to monitor the status of your devices through voice commands Garage Door Kit 3 is integrated with Alexa and Google Assis...

Страница 31: ...r or Water Leak Sensor while examples of a responder are a Siren or a YoLink Plug Mini To con gure your Garage Door Sensor 2 as a controller turn the sensor into opened status verify the door is opene...

Страница 32: ...er turn Mini on or turn o the YoLink Plug when the door is opened Mini If you want to turn on or o the Mini when the door is closed YoLink Plug turn the sensor into closed status verify the door is cl...

Страница 33: ...on Turn on the plug verify the Status LED of YoLink Plug Mini Refer to the YoLink displays blue Plug Mini manual for more informa on YS6604 UC_YoLink Plug Mini Open the door rst or just keep the fron...

Страница 34: ...main turned on un l turned o using the POWER bu on or via the app More advanced sequences controlling mul ple outputs e g turn o plug and ac vate siren are available via the YoLink app Opera on When t...

Страница 35: ...ink Plug Mini LED will stop blinking and return to the previous color blue for turned on red for turned o At the YoLink Plug Mini responder press and hold the POWER bu on for 10 15 seconds un l the LE...

Страница 36: ...0 15 seconds until the red light blinks quickly POWER Bu on Plug is either turned on or turned o Hold the SET button for 10 15 seconds until the red light blinks quickly 1 Open the door rst or just ke...

Страница 37: ...mware will be updated automa cally within 4 hours maximum To force an immediate update press the SET bu on on the device once to make the device enter update mode In Firmware if a new version is liste...

Страница 38: ...n an update is available In Firmware if a new version is listed as available ready now click it to start the rmware update process You may use your device during the update as it is performed in the b...

Страница 39: ...ck it to start the rmware update process The device s rmware will be updated automa cally within 4 hours maximum To force an immediate update press the SET bu on on the device once to make the device...

Страница 40: ...count 38 Factory reset will be complete when the status light stops blinking You may factory reset the sensor following the same procedure SET Bu on SET SET Bu on Hold the SET bu on for 20 25 seconds...

Страница 41: ...eries Install new and then close the ba ery cover two AAA ba eries alkaline non rechargeable Using the app check the online status of the sensor and verify there is no low ba ery indicator Note do no...

Страница 42: ...e Door Controller Dimensions 2 09 x 1 93 x 0 98 inch L x W x D Environment Working Temperature 32 F 104 F 0 C 40 C Working Humidity 10 90 non condensing Environment Working Temperature 32 F 104 F 0 C...

Страница 43: ...ed to the cloud press the SET bu on on controller once If Hub is o ine reconnect the Hub to the Internet and press the SET bu on on controller once If Hub is not on power on the Hub again and press th...

Страница 44: ...ct the Hub to the Internet and press the SET bu on on senor once If Hub is not on power on the Hub again and press the SET bu on on senor once If senor is out of range with Hub reloca ng the senor or...

Страница 45: ...Garage Door Controller or Sensor 2 gets dirty please clean it by wiping it down with a clean dry cloth Do not use strong chemicals or detergents which may discolor or damage the exterior and or damag...

Страница 46: ...explode Please follow local ba ery disposal procedures To avoid damaging the device if storing the device for an extended period remove the ba eries Please contact Customer Service before a emp ng to...

Страница 47: ...oducts used in commercial applica ons This warranty does not apply to Garage Door Kit 3that have been improperly installed modi ed put to a use other than designed or subjected to acts of God such as...

Страница 48: ...can be determined by turning the equipment o and on the user is encouraged to try to correct the interference by one or more of the following measures Reorient or relocate the receiving antenna Connec...

Страница 49: ...pplicable to only Mobile Con gura ons The antennas used for this transmi er must be installed to provide a separa on distance of at least 20 cm from all persons and must not be co located or opera ng...

Отзывы: