


Getting Started
19
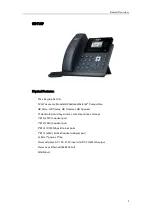
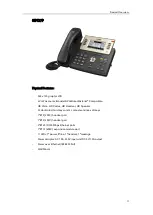
This chapter provides basic information and installation instructions of SIP
VP-T49G/SIP-T48G/T46G/T42G/T41P/T40P/T29G/T27P/T23P/T23G/T21(P) E2/T19(P) E2/CP860
IP phones.
This chapter provides the following sections:
Initialization Process Overview
Obtaining Configuration Files and Resource Files
Configuring Basic Network Parameters
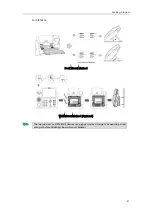
This section introduces how to install SIP
VP-T49G/SIP-T48G/T46G/T42G/T41P/T40P/T29G/T27P/T23P/T23G/T21(P) E2/T19(P) E2/CP860
IP phones with components in packaging contents.
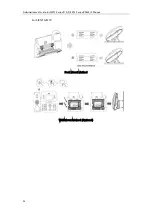
1.
Attach the stand and the optional wall mount bracket (not applicable to CP860 IP
phones)
2.
Insert the camera (only applicable to SIP VP-T49G IP phones)
3.
Connect the handset and optional headset (not applicable to CP860 IP phones)
4.
Connect the power and network
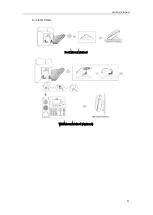
5.
Connect the optional extension microphones kit (only applicable to CP860 IP
phones)
6.
Connect the optional USB flash drive (only applicable to SIP VP-T49G and CP860 IP
phones)
7.
Connect the optional PC or mobile device (only applicable to CP860 IP phones)
8.
Connect the optional external monitor (only applicable to SIP VP-T49G IP phones)
Note
The optional accessories are not included in packaging contents. You need to purchase
them separately if required.
Содержание CD860
Страница 1: ......
Страница 45: ...Getting Started 23 For SIP T42G T41P T40P Desk Mount Method Wall Mount Method Optional ...
Страница 47: ...Getting Started 25 For SIP T23P T23G Desk Mount Method Wall Mount Method Optional ...
Страница 122: ...Administrator s Guide for SIP T2 Series T19 P E2 T4 Series CP860 IP Phones 100 ...
Страница 840: ...Administrator s Guide for SIP T2 Series T19 P E2 T4 Series CP860 IP Phones 818 ...
Страница 995: ...Appendix 973 ...


