Marquee™ Bridge 49
Quick Start Guide
PRELIMINARY
Aug
2004
4
MNL-500267-001 – Rev ED2
•
Read/Write password
•
Radio frequency channel
1. Connect a crossover Ethernet cable from the Cat 5
DC Power Injector to your computer or PC.
2. The installation process should have placed two
new icons on your computer’s desktop: a
Configurator icon and a PTP Configurator icon. The
Configurator is the full-size version of the
management program and is used for all type of
configurations. The PMP Configurator is a
compressed version of the program and is
exclusively used for p-p configurations. Double click
the Configurator icon. Alternatively, you may open
the directory where the program has been installed
(the default is
\Program Files\Configurator
) and
run the program
Config.exe
.
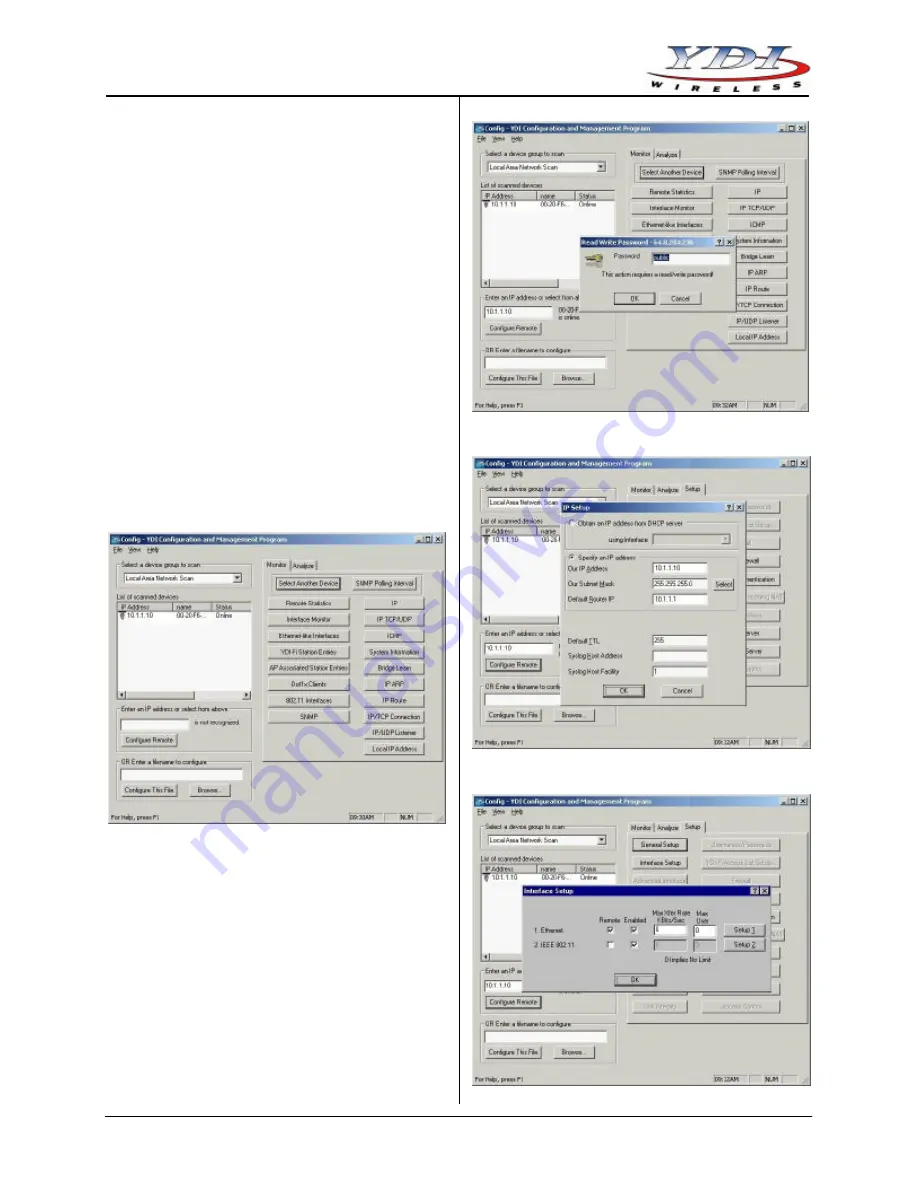
3. The Main Screen shown in Figure 11 appears. To
scan for devices on the network, place the cursor in
the
List of Scanned Devices
text box and right-click
the mouse. A
Re-scan local network
button will
appear. Click on the button. A list of devices will
appear.
Figure 11 – YDI Configurator Main Screen
4. Click on the device you wish to configure. The
selected device IP address will appear in the text
box above the
Configure Remote
button
(alternatively, you can enter the IP address of the
Marquee Bridge 49 unit). Click this button.
5. A
Read/Write Password
text box will appear (see
Figure 12). The default password is
public
. Click the
OK
button. It is suggested that you change the
password later, write it down and keep it in a safe
place.
6. After you login successfully, the
Setup
screen
appears. Click on the
IP Host
button. The
IP Setup
screen appears (see Figure 13). Enter the IP
Address, Subnet Mask, and Default Router IP
Address. Click
OK
.
Figure 12 – Read/Write Password Screen
Figure 13 – IP Setup Screen
Figure 14 – Interface Setup Screen


