background image

8 MECHATROLINK-II Commands

YASKAWA

SIEP C730600 86F MECHATROLINK-II Technical Manual

25

8

MECHATROLINK-II Commands

Main Commands

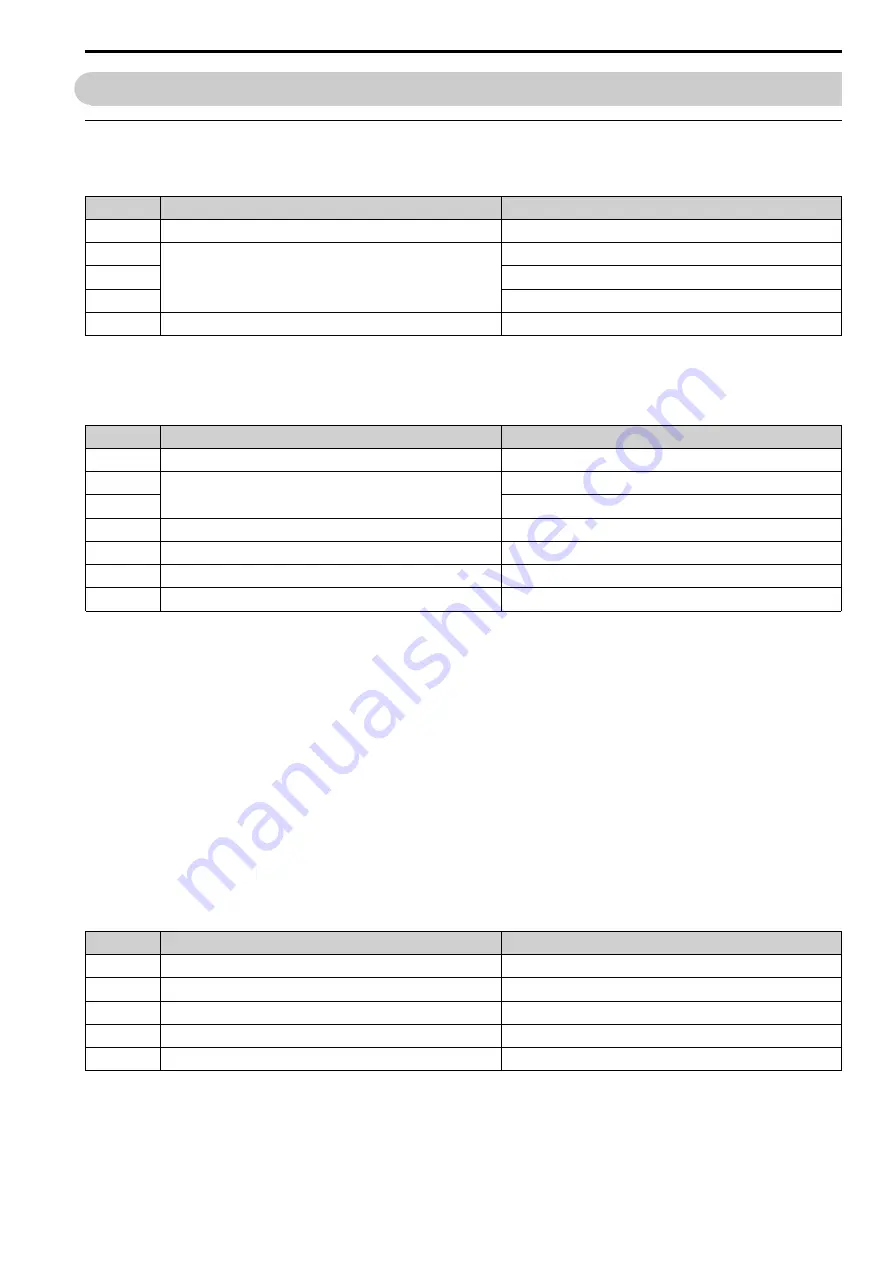
NOP: 00 (Hex.) (No Operation)

Byte

Command

Response

1

NOP

NOP

2

0

ALARM

3, 4

STATUS

5 - 15

0

16

WDT

RWDT

Only the ALARM and STATUS fields of the response data can be monitored. This command can be used in all
phases.

PRM_RD: 01 (Hex.) (Read Parameter)

Byte

Command

Response

1

PRM_RD

PRM_RD

2

0

ALARM

3, 4

STATUS

5, 6

NO

NO

7

SIZE

SIZE

8 - 15

0

PARAMETER

16

WDT

RWDT

The PRM_RD command is used to read the Drive internal parameters. For offline parameters, it reads the most
recently updated setting values. This command can be used in all phases.

In the following cases, a warning (STATUS (WARNG) = 1) is generated and the command is ignored. If a
warning is generated, the values that are read are undefined.

If a register number (NO) fault occurs: Data setting warning (A.94)

If SIZE is an odd number or is not between 2 and 8: Data setting warning (A.94)

The register number (NO) is the same as the register number that is set and referenced in MEMOBUS/Modbus
transfers. Set the lower byte (LSB) before you set the upper byte (MSB). The SI-T3 stores the data read for
PARAMETER from lower byte (LSB) to upper byte (MSB). Refer to the drive technical manual for more
information.

For SIZE, set the number of bytes to be read as an even numbers. You can specify eight bytes.

The values for the number (NO) and the size (SIZE) in the response data are copies of the values in the command
data.

Example when reading C1-01 (200 (Hex.))

Table 8.1 Example when reading C1-01 (200 (Hex.))

Byte

Command (Hex.)

Response (Hex.)

5

00

00

6

02

02

7

02

02

8

00

Lower byte of C1-01

9

00

Upper byte of C1-01

Содержание SI-T3 MECHATROLINK-II A1000 Series

Страница 1: ...6F YASKAWA AC Drive Option MECHATROLINK II Technical Manual Model SI T3 To properly use the product read this manual thoroughly and retain for easy reference inspection and maintenance Ensure the end user receives this manual ...

Страница 2: ...This Page Intentionally Blank 2 YASKAWA SIEP C730600 86F MECHATROLINK II Technical Manual ...

Страница 3: ...or 9 MECHATROLINK II Option LED Display 10 Defining Option LED States 10 5 Installation Procedure 10 Section Safety 10 Procedures for Installing and Wiring Options on a Drive 11 Procedure A 11 Procedure B 16 MECHATROLINK II Communications Cables 18 Option Connection Diagram 19 6 MECHATROLINK Option Drive Parameters 19 7 Transmission Interface 21 MECHATROLINK II Cyclic Transmissions 21 Basic Format...

Страница 4: ...ub Commands 34 NOP 00 Hex No Operation 34 PRM_RD 01 Hex Read Parameter 34 PRM_WR 02 Hex Write Parameter 34 ALM_RD 05 Hex Read Alarm and Warning 35 INV_I O 41 Hex Drive I O Control 35 Status 35 STATUS Field 36 SUBSTATUS Field 36 9 Troubleshooting 37 Fault Detection Processing 37 Alarm Processing 37 SI T3 Communications Fault Detection 37 Other Faults 38 Drive Fault Notification 38 Drive Side Error ...

Страница 5: ...y to install the option and set related drive parameters YASKAWA AC Drive Option MECHATROLINK II Technical Manual Manual No SIEP C730600 86 This book The technical manual contains detailed information about the option Access the following sites to obtain the technical manual U S http www yaskawa com Europe http www yaskawa eu com Japan http www e mechatronics com Other areas Check the back cover o...

Страница 6: ...otice to improve the product and or the manual Contact Yaskawa or a Yaskawa representative and provide the manual number shown on the front cover to order new copies of the manual DANGER Do not ignore the safety messages in this manual If you ignore the safety messages in this manual it will cause serious injury or death The manufacturer is not responsible for injuries or damage to equipment WARNI...

Страница 7: ...d PRG four digit number or the option labeling in the field designated C N S four digit number to identify the option software version For Yaskawa customers in the North or South America region If your product is not listed in Table 2 1 refer to the web page below to confirm this manual is correct for your product The web page provides a list of option manuals by product and a direct link to downl...

Страница 8: ...der are the same Refer to Figure 4 1 for more information Contact the distributor where the option was purchased or contact Yaskawa or a Yaskawa representative about any problems with the option Contents and Packaging Table 3 1 Contents of Package Description Option Ground Wire 1 Screws M3 LED labels Installation Manual 1000 Series GA500 GA700 GA800 CR700 and CH700 Quantity 1 1 3 2 1 1 1 1 GA700 G...

Страница 9: ...s 1 Refer to MECHATROLINK II Option LED Display on page 10 for details on the LEDs 2 Connect the provided ground wire during installation Installation on GA700 GA800 CR700 and CH700 drives does not require the ground wire Communication connector Table 4 1 Communication Connector Connector Connector Pin No Signal Name I O Function A A1 NC A2 SRD I O Send receive data A3 SRD I O Send receive data A4...

Страница 10: ...a minimum The internal capacitor stays charged after the drive is de energized The charge indicator LED extinguishes when the DC bus voltage decreases below 50 Vdc When all indicators are OFF measure for dangerous voltages to make sure that the drive is safe If you do work on the drive when it is energized it will cause serious injury or death from electrical shock WARNING Electrical Shock Hazard ...

Страница 11: ...els Refer to the following table to check the procedures to install and wire the option on a drive Product Series Procedures for Installing and Wiring Options on a Drive Page A1000 Procedure A 11 U1000 Procedure A 11 Z1000U Procedure A 11 GA500 1 2 GA700 Procedure B 16 GA800 Procedure B 16 CR700 Procedure B 16 CH700 Procedure B 16 1 To install the option on GA500 drives use the option card mountin...

Страница 12: ...k Hazard Do not examine connect or disconnect wiring on an energized drive Before servicing disconnect all power to the equipment and wait for the time specified on the warning label at a minimum The internal capacitor stays charged after the drive is de energized The charge indicator LED extinguishes when the DC bus voltage decreases below 50 Vdc When all indicators are OFF measure for dangerous ...

Страница 13: ...luded screws B to put it in place A Option B Included screws C Connector CN5 A Figure 5 4 Insert the Option 4 Connect one end of the ground wire C to the ground terminal B using one of the remaining provided screws D Connect the other end of the ground wire C to the remaining ground terminal and installation hole on the option A using the last remaining provided screw D Tighten the screws to 0 5 t...

Страница 14: ...ectrical interference Connect the terminator model No JEPMC W6022 E to the option modular connector CN3 on the end drive of the communication lines A Route wires through the openings provided on the left side of the front cover 1 B Use the open space provided inside the drive to route option wiring Figure 5 7 Wire Routing Examples 1 If wiring is exposed outside the enclosure the drive will not mee...

Страница 15: ...0 86F MECHATROLINK II Technical Manual 15 A Drive front cover B Keypad C Drive terminal cover Figure 5 8 Replace the Front Covers and Keypad 8 Set drive parameters in MECHATROLINK Option Drive Parameters on page 19 for correct option performance ...

Страница 16: ...for communication option installation Figure 5 9 Drive Components with Option Install the Option Remove the front covers of the drive before you install the option Refer to the drive manual for information about how to remove the front covers Different drive sizes have different cover removal procedures You can only install this option into the CN5 A connector on the drive control board DANGER Ele...

Страница 17: ...atus Ring board A and put it in the temporary placement holes B on the right side of the drive Refer to the manual packaged with the drive for information about how to remove the LED Status Ring board NOTICE Do not remove the LED Status Ring board cable connector If you disconnect the LED Status Ring board it can cause incorrect operation and damage to the drive A LED Status Ring board B Temporary...

Страница 18: ... the drive front cover C and the keypad D Refer to the manual packaged with the drive for information about how to reattach the LED Status Ring board NOTICE Do not pinch cables between the front cover or the LED Status Ring board and the drive Failure to comply could cause erroneous operation Note Replace the keypad connector then install the keypad At that time insert the keypad connector tab int...

Страница 19: ...ons to start and stop the drive Set b1 01 3 to use the master device to control the frequency reference of the drive The default setting is different for different drives Refer to the Peripheral Devices Options section of the drive instruction manual for more information 1 0 4 b1 02 0181 Run Command 1 Source Selects the input method for the Run command 0 Keypad 1 Digital Input 2 Memobus Modbus Com...

Страница 20: ...1 MultiStep References Enabled Note Default setting is 1 for GA500 0 0 1 F6 08 036A Comm Parameter Reset Initialize Selects whether communication related parameters F6 xx and F7 xx are set back to original default values when you use parameter A1 03 to initialize the drive 0 No Reset Parameters retained 1 Reset Back to factory default Note The drive will not change this setting value when you set ...

Страница 21: ...tion the SI T3 option exchanges control data and I O data with a control device The option sends response data timed to the reception of command data for the local station address from the master in each transmission cycle to communicate The command and response data formats follow the specifications for the MECHATROLINK Drive commands A Master MP2300 Controller Example B Drive A1000 Example C Dri...

Страница 22: ...te Data Transmission Figure 7 2 Basic Format of Data Transfer 32 Byte Data Transmission Communication Phases The SI T3 option changes status after it receives a command code or fault from the master as shown in the figure The communication phases determine the available commands Refer to Table 7 1 and Table 7 2 for more information ...

Страница 23: ...ications frame The phase moves to phase 3 when a SYNC_SET command is received and it moves to phase 1 when a DISCONNECT command is received If the drive receives the DISCONNECT command the phase moves to phase 1 Phase 3 Synchronous communications Watchdog timer faults in the communications frame are detected The phase moves to phase 1 if the DISCONNECT command is received The phase moves to phase ...

Страница 24: ...g a main command or a sub command the drive gives priority to the command being processed If there is a conflict between an INV_CTL main command and an INV_I O sub command the drive gives priority to the sub command Refer to MECHATROLINK II Commands on page 25 for more information about command formats Table 7 3 shows the combinations of main commands and sub commands Table 7 3 Main Commands and S...

Страница 25: ...command is ignored If a warning is generated the values that are read are undefined If a register number NO fault occurs Data setting warning A 94 If SIZE is an odd number or is not between 2 and 8 Data setting warning A 94 The register number NO is the same as the register number that is set and referenced in MEMOBUS Modbus transfers Set the lower byte LSB before you set the upper byte MSB The SI...

Страница 26: ...t Command warning A 95 The register number NO is the same as the register number that is set and referenced in MEMOBUS Modbus transfers Set the lower byte LSB before setting the upper byte MSB Refer to the drive technical manual for more information Set the values for DATA from lower byte LSB to upper byte MSB For SIZE set the number of bytes to be written as an even number You can specify eight b...

Страница 27: ...ing the region are represented by spaces 3 Identifies the voltage class 2 Three Phase 200 V 4 Three Phase 400 V 5 Three Phase 575 V 4 The portions showing the structure are represented by spaces 5 Four digits indicating any customized specifications 6 Identifies the SI T3 software version 7 Identifies the Drive software version 8 Identifies the Product series name Refer to the Model Number section...

Страница 28: ...o frequently If changing several parameters carry out the CONFIG command only after all the parameters have been changed ALM_RD 05 Hex Read Alarm and Warning Byte Command Response 1 ALM_RD ALM_RD 2 0 ALARM 3 4 STATUS 5 ALM_RD_MOD ALM_RD_MOD 6 15 0 ALM_DATA 16 WDT RWDT Table 8 7 ALM_RD_MOD Byte ALM_RD_MOD 0 ALM_RD_MOD 1 ALM_RD_MOD 2 5 00 Hex 01 Hex 02 Hex 6 U2 01 U3 01 Alarm Index 7 U2 02 U3 02 Low...

Страница 29: ...lave station it does not remove the cause of a fault After the cause of the alarm or warning has been removed this command is then used to clear the status of the alarm or warning In the following case a warning is generated and the command is ignored If ALM_CLR_MOD is other than a set value Data setting warning A 94 If not in phase 2 or 3 Command warning A 95 Table 8 9 ALM_CLR_MOD ALM_CLR_MOD Des...

Страница 30: ...ata transfer mode SYNCMOD Transmission Synchronization 0 Move to phase 2 1 Move to phase 3 Note If Bit6 Bit5 Bit4 or Bit0 is set to 1 a warning will be generated Data setting warning A 94 COM_TIM Set the factor of the transmission cycle to COM_TIM communications time so that the setting range satisfies the following formulas When the transmission cycle is equal to the communications time COM_TIM 1...

Страница 31: ...d releases the connection The communication phase shifts to communication phase 1 after this command is completed After moving to phase 1 no check for transmission faults is executed The command can be used in communication phases 2 and 3 If this command is received while in phase 2 or 3 the data for the control command to the Drive is cleared to 0 and a fault reset command is carried out for the ...

Страница 32: ... command 1 8 External fault EF0 1 External fault EF0 9 Fault reset 2 3 1 Fault reset A Multi function terminal input 9 Terminal S9 input function 0 Terminal S9 function OFF 1 Terminal S9 function ON H1 09 1 B Multi function terminal input 10 Terminal S10 input function 0 Terminal S10 function OFF 1 Terminal S10 function ON H1 10 1 C D Reserved E Fault history trace clear 1 Fault history trace clea...

Страница 33: ... enable A F Not used 1 Terminals are different for different drive models YASKAWA AC Drive 1000 Series CIMR xAx CIMR xTx CIMR xKx CIMR xBx CIMR xDx P1 PC CIMR xUx CIMR xCx M3 M4 YASKAWA AC Drive GA700 GA800 CIPR GAxAx CIPR GAxTx CIPR GAxUx CIPR GAxCx CIPR GAxBx CIPR GAxKx CIPR GAxDx M3 M4 YASKAWA AC Drive CR700 CH700 CIPR CR70Ax CIPR CR70Tx CIPR CH70Bx M3 M4 2 Terminals are different for different...

Страница 34: ...s This sub command functions in the same way as the PRM_RD main command In the following case a warning is generated and the command is ignored If a warning is generated the values that are read are undefined If a register number NO fault occurs Data setting warning A 94 If SIZE is an odd number or is not between 2 and 8 Data setting warning A 94 If a main command is PRM_RD or PRM_WR Command warni...

Страница 35: ...cted by SEL MON5 29 30 Reference selected by SEL REF6 Monitor selected by SEL MON6 The INV_I O sub command is used to select the type of output from the Drive s terminals and refers to the values from the Drive s internal monitors These settings do not need to be set every scan The settings are saved in the Drive until the next data is received or until the power is turned OFF Use the SEL REF3 4 c...

Страница 36: ...gnal input 0 1 Fault reset signal input 9 AGREE Speed agreement 0 1 Speed agreement A INV_READY Drive ready 0 1 Drive ready B OPE oPE fault 0 1 oPE fault C UV_R Recovery after power loss or recovery after momentary power loss 0 Recovery after power loss 1 Recovery after momentary power loss D REMOTE Local or Remote 0 Local 1 Remote Transfer E SEL_M Motor Selection 0 Motor 1 motor 3 1 Motor 2 F 0_S...

Страница 37: ... Processing ALARM STATUS WARNG ALM Drive alarm CODE 1 1 No special processing Required Communications alarm 1 ON Notification to drive Required Drive warning 1 No special processing Required Communications warning 1 No special processing None Not required 1 Refer to Drive Fault Notification on page 38 for detail Note No change Fault notification from Drive When consecutive alarms occur the SI T3 p...

Страница 38: ...rning Communications warning Received commands are ignored 95 Command warning Communications warning Received commands are ignored EC WDC fault with drive Communications alarm Waits for power supply to be reset ED Drive access permission fault Access not possible 10 consecutive times Communications alarm Waits for power supply to be reset EE Drive monitor timer over 1 s elapsed Communications alar...

Страница 39: ...21 CE Modbus Communication Error 25 CF Control Fault 26 SvE Zero Servo Fault 27 EF0 Option Card External Fault 28 FbL PID Feedback Loss 29 UL3 Undertorque Detection 1 2A UL4 Undertorque Detection 2 2B oL7 High Slip Braking Overload 32 dv1 Z Pulse Fault 33 dv2 Z Pulse Noise Fault Detection 34 dv3 Inversion Detection 35 dv4 Inversion Prevention Detection 36 LF2 Output Current Imbalance 37 STo Motor ...

Страница 40: ... 94 95 96 97 CPF22 Hybrid IC Error 98 CPF23 Control Board Connection Error 99 CPF24 Drive Unit Signal Fault 9B CPF26 CPF38 Control Circuit Error Note When using YASKAWA AC Drive 1000 Series CPF36 CPF38 ALRM code A5 A7 will not be displayed 9C 9D 9E 9F A0 A1 A2 A3 A4 A5 A6 A7 E5 E5 MECHATROLINK Watchdog Timer Error E6 bUS Option Communication Error FA oFA00 oFA43 Option Card Error Table 9 9 Drive M...

Страница 41: ...bH Excessive PID Feedback 2A dnE Drive Disabled 2B PGoH Encoder PG Hardware Fault 32 AEr Station Address Setting Error 33 CyC MECHATROLINK CommCycleSettingErr 34 HCA High Current Alarm 35 LT 1 Cooling Fan Maintenance Time 36 LT 2 Capacitor Maintenance Time 39 EF1 External Fault Terminal S1 3A EF2 External Fault Terminal S2 3B HbbF Safe Disable Signal Input Note SToF Safe Torque OFF will be display...

Страница 42: ...properly Duplicate Station Address Check if the option shares Station Address with at least one other node Check the setting values of F6 20 MECHATROLINK Station Address E5 MECHATROLINK Watchdog Timer Error The drive detected a watchdog circuit exception while it received data from the controller Check the MECHATROLINK cable connection Check for wiring and how to counteract noise according to the ...

Страница 43: ...board or the entire drive For instructions on replacing the control board contact Yaskawa or a Yaskawa representative CyPo Cycle Power to Active Parameters Comm Option Parameter Not Upgraded Re energize the drive to update the communication option parameters Note If the option software version is not compatible or if you install an incorrect option to the drive it will trigger an alarm Option Comp...

Страница 44: ... 2012 and complies with EMC guidelines The CE marking is declared based on the harmonized standards EMC Guidelines Installation Conditions Verify the following installation conditions to ensure that other devices and machinery used in combination with this option and drives also comply with EMC guidelines 1 Use dedicated shield cable for the option and external device encoder I O device master or ...

Страница 45: ...ing wood Harmful gas or fluids Salt Direct sunlight Falling foreign objects Altitude Up to 1000 m 3280 ft 1 For MECHATROLINK I a cycle is 2 ms For MECHATROLINK II a cycle is 1 ms to 8 ms for a 32 byte data transmission and 500 μs to 8 ms for a 17 byte data transmission 2 At the maximum transmission distance of 50 m 1969 0 in the maximum number of stations is 15 3 For MECHATROLINK I only a 17 byte ...

Страница 46: ...ified by applicable regional local and municipal laws and regulations WEEE Directive The wheelie bin symbol on this product its manual or its packaging identifies that you must recycle it at the end of its product life You must discard the product at an applicable collection point for electrical and electronic equipment EEE Do not discard the product with usual waste ...

Страница 47: ... 2019 4 All Addition Applicable product series Revision Reviewed and corrected entire documentation Chapter 12 Addition Disposal December 2018 3 All Addition Applicable product series Revision Reviewed and corrected entire documentation October 2017 2 All Addition Applicable product series Revision Reviewed and corrected entire documentation Chapter 2 Addition Note in Table 1 October 2016 1 All Ad...

Страница 48: ...venida Piraporinha Diadema São Paulo 09950 000 Brasil Phone 55 11 3585 1100 Fax 55 11 3585 1187 http www yaskawa com br YASKAWA EUROPE GmbH Hauptstraβe 185 65760 Eschborn Germany Phone 49 6196 569 300 Fax 49 6196 569 398 E mail info yaskawa eu com http www yaskawa eu com YASKAWA ELECTRIC KOREA CORPORATION 35F Three IFC 10 Gukjegeumyung ro Yeongdeungpo gu Seoul 07326 Korea Phone 82 2 784 7844 Fax 8...

Отзывы: