background image

model no. 060-2342-0  |  contact us: 1.866.523.5218

model no. 060-2342-0  |  contact us: 1.866.523.5218

13

FLOWER GUARD (SEE FIG. F1, F2)

Push the Flower Guard (6) out before trimming, as shown in Fig. F1, F2. 

Operation

!

  WARNING: Use only 0.065” (1.65 mm) diameter cutting line. 

Other sizes of line will not feed properly and will result in 

improper cutting head function or can cause serious injury. Do 

not use other material such as wire, string, rope, etc. Wire can 

break off during cutting and become a dangerous projectile 

that can cause serious injury.

!

  WARNING: Make sure that the line is fed out before operation. 

Make sure the motor is up to full speed before trimming. 

!

  WARNING: Always wear eye protection. Never lean over the trimmer 

head. Rocks or debris can ricochet or be thrown into your eyes and face, 

causing blindness or other serious injury. 


Wear eye protection and heavy clothing. Hold front handle with one 

hand and auxiliary handle with the other hand. Keep unit below waist 

level. Work only from your right to your left to ensure debris is thrown 

away from you. Without bending over, keep line near and parallel to the 

ground (perpendicular when edging) and not crowded into the material 

being cut.

F1

G

F2

Содержание 060-2342-0

Страница 1: ...0 contact us 1 866 523 5218 IMPORTANT Read and follow all safety rules and operating instructions before using this product Instruction Manual Grass Trimmer Conforms to UL STD 82 Certified to CAN CSA...

Страница 2: ...065 1 65 mm Spool length 10 3 m Charging time Machine Weight 5 7 hours 4 lb 2oz 1 88 kg Charger Protection class II Voltage measured without workload Initial battery voltage reaches maximum of 20 V No...

Страница 3: ...ppliance with care Follow instructions for lubricating and changing accessories Keep handles dry clean and free from oil and grease Check damaged parts Before using the appliance make sure the safety...

Страница 4: ...ries in one s mouth If swallowed contact local poison control centre immediately CAUTION The battery used in this device may present a risk of fire or chemical burn if mishandled Replace battery with...

Страница 5: ...l interference and 2 this device must accept any interference received including interference that may cause undesired operation WARNING Changes or modifications on this unit not expressly approved by...

Страница 6: ...Release Latch 10 Spool 11 Trimmer Head 12 Eyelet 13 Main Handle We recommend that you purchase your accessories from the same store that sold you the tool Choose the type according to the work you int...

Страница 7: ...model no 060 2342 0 contact us 1 866 523 5218 7 Exploded View 1 1 2 3 4 5 6 12 13 14 15 13 38 14 10 16 17 18 18 11 20 21 22 23 24 25 26 19 28 29 30 31 33 35 34 36 37 9 7...

Страница 8: ...Bolt M6 1 13 Handle 1 14 Knob II 1 15 Nut M6 1 16 Inner 1 17 Aluminium Tube 1 18 Left Right Housing 1 19 Motor 1 20 Adapter Sleeve 1 21 Fixing Block 1 22 Screw washer assembly 2 23 Line Feeder 1 24 Co...

Страница 9: ...LE SEE FIG A1 A2 Insert the shaft onto the upper housing Hand grab area should face down See Fig A1 Attach the screw to the housing unit and then to the knob Finally rotate the knob until it is hand t...

Страница 10: ...HE SAFETY GUARD SEE FIG B1 B2 Remove the screw b from the guard See Fig B1 Attach the safety guard to the trimmer head Align the guard so it slides into the slots located on the trimmer head See Fig B...

Страница 11: ...ger 2 CHARGING YOUR BATTERY PACK SEE FIG C The Li on battery is protected against deep discharging When the battery is empty the machine will switch off by means of a protective circuit The trimmer he...

Страница 12: ...e sufficient until a click is heard Note When removing the battery pack hold it firmly to avoid potential accidents 4 SAFETY ON OFF SWITCH SEE FIG E The safety switch is locked off to prevent accident...

Страница 13: ...rious injury WARNING Make sure that the line is fed out before operation Make sure the motor is up to full speed before trimming WARNING Always wear eye protection Never lean over the trimmer head Roc...

Страница 14: ...t 30 to the ground when trimming Avoid pressing it against the ground as this can ruin the lawn and damage the trimmer head If you find that the nylon line is too short follow the instruction as in Au...

Страница 15: ...all areas of the cap and spool holder clean Replace the cap pressing firmly down towards the spool holder to ensure cap is fully located Check that the cap is correctly fitted by trying to remove it w...

Страница 16: ...t 15mm of line into the spool holes and wind line in the direction of the arrows on the top of the spool See Fig L1 L2 Leave approximately 100 mm of line unwound and place it into the cleat Care shoul...

Страница 17: ...nance There are no user serviceable parts in your power tool Never use water or chemical cleaners to clean your power tool Wipe clean with a dry cloth Always store your power tool in a dry place Keep...

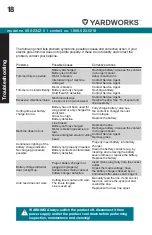
Страница 18: ...ger manual Contact Service Agent Remove grass Continuous lighting of the battery charge indicator No charging procedure possible Battery not properly inserted Battery contacts contaminated Battery def...

Страница 19: ...nt Hz Hertz Frequency cycles per second W Watts Power min Minutes Time Alternating Current Type of current Direct Current Type of current Class II Construction Double insulated construction min Per Mi...

Страница 20: ...are defined as blade adaptors blades grass bags and tires These parts are warranted to the original purchaser to be free from defects in material and workmanship for a period of one hundred twenty 12...

Страница 21: ...Made in China Imported by Yardworks Canada Toronto Canada M4S 2B8...

Отзывы: