background image

Carefully read through this entire operator’s manual 
before using your new Concrete mixer. Pay attention 
to all cautions and warnings.

MODEL AND SERIAL NUMBERS

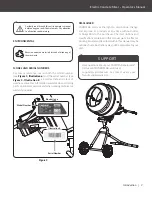
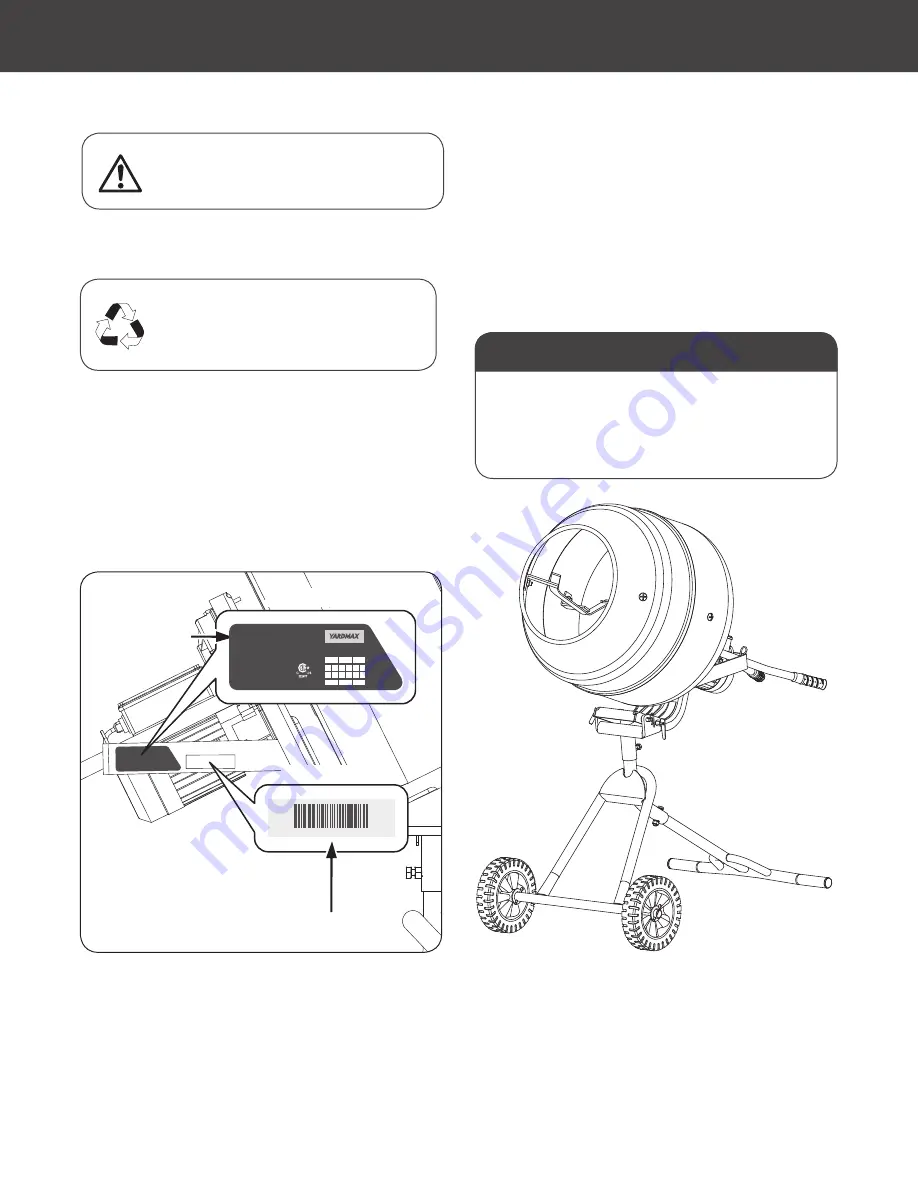
For future reference, record both the model number 
(see 

Figure 1, Illustration a

) and the serial number (see 

Figure 1, Illustration b

), as well as date and place of 

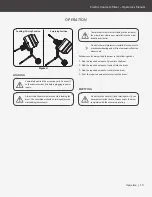
purchase. Have this information available when ordering 
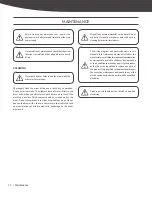
parts, optional accessories and when making technical or 
warranty inquiries.

DISCLAIMER

YARDMAX reserves the right to discontinue, change, 
and improve its products at any time without notice 
or obligation to the purchaser. The descriptions and 

specifications contained in this manual were in effect at 

printing. Equipment described within this manual may be 
optional. Some illustrations may not be applicable to your 
unit.

ENVIRONMENTAL

Recycle unwanted materials instead of disposing of 
them as waste. 

SUPPORT

Have questions about your YARDMAX equipment?
Call us at 844-YARDMAX, email us at 
[email protected], or contact us via your 
favorite social media site.

Illustration a

Model Number

5.0 Cuft Electric Concrete Mixer

YM0146

Manufacture Date:

11~20

1~10

2017

2018

2019

1

2

3

4

5

6

7

8

9 10 11 12

21~30

Manufactured in China

120V~ 60Hz,  560W
.75HP
5.0
15.2”
2
25 r/min  
117 lbs
350 lbs

Motor:
Horsepower
Cubic Feet:
Opening Diameter:
Number of Blades:
Drum Speed:
Weight:
Weight Capacity:

Serial Number

Illustration b

0146100010117

2

Electric Concrete Mixer   

»


Operator’s Manual


Introduction    

|

Figure 1

74109US25M101.indd   2

2017/7/4   17:22:32

Содержание YM0146

Страница 1: ...NUMBER YM0146 SERIAL NUMBER PURCHASE DATE Both model number and serial number may be found on the main label see Page 2 Figure 1 You should record both of them in a safe place for future use FOR YOUR...

Страница 2: ...of responsibility When duty calls and you need to respond will you have what it takes to tame the great outdoors When looking for outdoor power equipment OPE to get the job done right at the right pr...

Страница 3: ...contained in this manual were in effect at printing Equipment described within this manual may be optional Some illustrations may not be applicable to your unit ENVIRONMENTAL Recycle unwanted material...

Страница 4: ...xer fromtippingover onlyuseoroperatethemixer onsolid flat levelgroundcapableofsupporting boththeweightofthemixeranditscontents Do not attempt to move the mixer when it is loaded and or in operation Ch...

Страница 5: ...ot replace safety glasses Z87 rated glasses are recommended PROTECT YOUR BODY Always stand behind the concrete mixer and stay alert KEEP VISITORS AND CHILDREN AWAY Keep unauthorised persons away from...

Страница 6: ...Unplug your concrete mixer when not in use and before making adjustments changing parts cleaning or servicing Consult the technical manual before servicing PROTECT THE ENVIRONMENT Take left over mate...

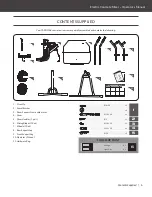
Страница 7: ...4 M10 60 1 3 1 2 M10 25 1 3 M12 25 4 4 3 5 2 5 1 2 7 8 9 3 4 5 6 HARDWARE KIT 11 10 1 Pivot Pin 2 Swivel Bracket 3 Drum Support Frame with motor 4 Drum 5 Drum Handles 1 pair 6 Mixing Blades 1 Pair 7 W...

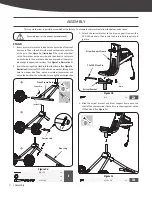
Страница 8: ...e SeeFigure1a Illustration 3 Insert an M10x60 bolt with arc washer through the hole from upper side Then put an arc washer lock washer and nutontheboltfromtheotherside Securetightlywithwrenches 4 Slid...

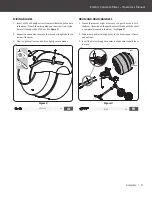
Страница 9: ...e blades 1 Mount the cement mixer drum onto the gear box shaft Turn the drum clockwise on the gear box shaft thread until the shaft is completely located in the drum See Figure 3 2 Slide drum handles...

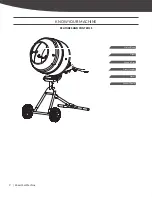
Страница 10: ...KNOW YOUR MACHINE FEATURES AND CONTROLS Drum Mixing Blade Support Arm Drum Handles Support Frame Motor 9 Know Your Machine...

Страница 11: ...concrete or mortar sticking to the insides of the mixer drum slowly pour material into the mixer steadily over the rim Always start the motor before you start loading the drum The mixer blades should...

Страница 12: ...ower supply On completion of maintenance check that the mixer functions correctly and that all guard are correctly fitted Wipe off any external material on the motor Do not use petrol turpentine lacqu...

Страница 13: ...stops working Thermal protector works Stop working for a while until motor cools Drum fails to rotate Motor stops working due to overheat Stop working for a while until motor cools Wiring Diagram Tro...

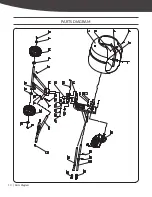
Страница 14: ...PARTS DIAGRAM Parts Diagram 13...

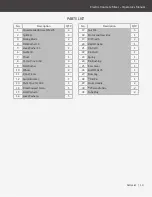
Страница 15: ...cket 1 13 Pivot Pin 12 240 1 14 Drum Support Frame 1 15 Flat Washer 6 5 16 Lock Washer 6 5 No Description QTY 17 Nut M6 5 18 Motor and Gear Box 1 19 R Pin 3 5 2 20 Bolt M10x60 1 21 Pin 3x10 1 22 Pin S...

Страница 16: ...844 YARDMAX 844 927 3629 info yardmax com yardmax com Tame the Great Outdoors...

Отзывы: