background image

SAFETY INFORMATION

• Carefully read all instructions on the mower and in the manual before attempting to assemble and 

operate the mower. Keep this manual in a safe place for future reference, and consult it regularly.

• Become familiar with all controls and their proper operation. Know how to stop the mower and 

how to disengage the power in an emergency.

• In order to avoid contact with the blade or injury caused by a thrown object, stay in the 

operating zone behind the handles, and keep children and bystanders at least 100’ (30 m) 

away from the mower while it is in operation. Stop the motor immediately if someone enters 

the mowing area.

• Thoroughly inspect the area where the mower is to be used. Remove all stones, sticks, wire, 

bones, toys, and other objects that could be tripped over or thrown by the blade. Thrown 

objects can cause serious personal injury.

• Plan your mowing pattern in such a way as to avoid discharging material toward roads, 

sidewalks, bystanders, etc. Do not discharge material against a wall or obstruction. Doing so 

may cause the discharged material to ricochet back toward the operator.

• Always wear proper eye protection that complies with ANSI Z87.1 in order to protect your 

eyes while operating or performing any adjustment or repair. Thrown objects that ricochet can 

cause serious eye injury.

• Always wear a face mask or a dust mask when operating the mower in a dusty environment.
• Dress properly. Do not wear loose clothing or jewellery that can get caught in moving parts. 

The wearing of protective gloves and safety footwear is recommended.

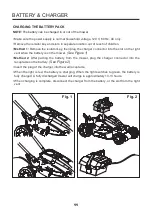
• Ground Fault Circuit Interrupter (GFCI) protection should be provided on the circuit(s) or 

outlet(s) that will be used to charge the lawn mower battery. Outlets with built-in GFCI 

protection are available, and may be used as an added safety measure.

• Many injuries occur as a result of the mower being pulled over the operator’s foot during a 

fall caused by slipping or tripping. Do not operate this mower in bare feet, or while wearing 

sandals or lightweight (e.g., canvas) shoes. Do not hold on to the mower if you are falling. 

Release the handle immediately.

• Never pull the mower back toward you while you are walking. If you must back the mower 

away from a wall or an obstruction, first look down and behind in order to avoid tripping, and 

then follow these steps:

• Step back from the mower in order to fully extend your arms.
• Be sure that you are well balanced.
• Pull the mower back slowly.

• Do not use the mower for any job except that for which it is intended. Do not force the mower.
• Do not operate the mower while under the influence of alcohol or drugs.
• Stay Alert: Do not operate the mower when you are tired. Pay attention to what you are doing. 

Use common sense.

• Do not put hands or feet near rotating parts or under the cutting deck. Contact with the blade 

can amputate hands and feet.

• Do not attempt to adjust the wheels or the cutting height while the motor is running.
• Avoid dangerous environments. Do not operate the mower in the rain or in wet or damp grass.
• Mow only in daylight or in good artificial light. Do not rush a mowing job.

44

Содержание 270-1252

Страница 1: ...Self propelled Lawn Mower OPERATOR S MANUAL Item No 270 1252 For parts or service please call toll free helpline at 1 888 266 7096 Read safety rules and instructions carefully before operating equipme...

Страница 2: ...ntally safe battery disposal 28 Service 29 Troubleshooting 30 Warranty 31 Exploded View 32 Parts List 33 35 PRODUCT SPECIFICATIONS 19 CORDLESS SELF PROPELLED LAWN MOWER Battery type 36V 10 Ah sealed l...

Страница 3: ...es for safe operation that are contained in this manual As with any type of power equipment carelessness or error on the part of the operator can result in serious injury This mower is capable of ampu...

Страница 4: ...ewellery that can get caught in moving parts The wearing of protective gloves and safety footwear is recommended Ground Fault Circuit Interrupter GFCI protection should be provided on the circuit s or...

Страница 5: ...erformance If lawn mower strikes a foreign objects follow these steps Stop lawn mower release the switch Remove the key and battery Inspect for damage Repair any damage before restarting and operating...

Страница 6: ...mpatible battery pack may create a risk of fire Use battery pack only with charger listed Use only battery pack intended specifically for the machine Use of any other battery packs may result in a ris...

Страница 7: ...r the charger unless absolutely necessary Use of improper extension cord could result in a risk of fire and electric shock If extension cord must be used make sure That pins on plug of extension cord...

Страница 8: ...ad Class II Construction Double insulated construction min Per Minute Revolutions strokes surface speed orbits etc per minute Wet Conditions Alert Do not expose to rain or use in damp locations Read T...

Страница 9: ...letely If you do not understand the warnings and instructions in this Owner s Manual do not use this product Call the Toll free Helpline 1 888 266 7096 for assistance WARNING The operation of any powe...

Страница 10: ...C and 40 C Charge the battery pack only with the charger provided The battery pack may be charged while it is connected to the mower or while it is disconnected from the mower Allow at least 10 13 hou...

Страница 11: ...when the battery is on the mower See Figure 1 Method 2 After parting the battery from the mower plug the charger connector into the receptacle on the battery See Figure 2 Insert the plug of the charge...

Страница 12: ...y will soon require charging It is recommended that the battery be charged at this point The battery is at 5 30 charge when one light illuminates If no light illuminates the battery must be charged im...

Страница 13: ...ower in order to familiarize yourself with the location of various controls and adjustments Save this manual for future reference Height adjustment lever Battery Side discharge cover Wheel Rear chute...

Страница 14: ...serious personal injury WARNING Do not attempt to modify this product or create accessories not recommended for use with this product Any such alteration or modification is misuse and could result in...

Страница 15: ...NG HANDLE See Figure 4 Pull up and back on the upper handle to raise the handle into operating position Make certain the handles snap into place securely Tighten the upper handle with the cam locks on...

Страница 16: ...le 2 and place under the chute cover so that the hooks 3 on the grass catcher frame are seated into the slots in the handle bracket Release the chute cover When installed correctly the hooks on the gr...

Страница 17: ...gn the grooves on the discharge chute 2 with the pins on the underside of the discharge cover 1 Lower the discharge chute 2 until the hooks on the mower deck are secured in the openings in the dischar...

Страница 18: ...dle 2 of the mulching plug and pull the mulching plug out using the handle The mulching plug 3 is inserted on an angle so it requires some force to remove it The mulching plug must be removed in order...

Страница 19: ...propelled feature is engaged by pulling the self propel lever upward to meet the handle To disengage the self propelled feature release the self propel lever CAUTION Do not attempt to override the op...

Страница 20: ...ght best suited for your lawn The average lawn should be between 1 1 2 to 2 3 8 to 5 cm during cool months and between 2 and 3 1 2 5 cm to 8 9 cm during hot months To adjust the blade height To raise...

Страница 21: ...PPER HANDLE HEIGHT See Figure 10 Loosen the upper handle knob Adjust the upper handle to the most comfortable of the 2 positions Snug the upper handle knob and lock the cam lock handle to secure Upper...

Страница 22: ...Stop mower allow blades to completely stop and remove key Lift the rear chute cover Lift the grass catcher bag by its handle to remove from mower Empty grass clippings Lift the rear chute cover and r...

Страница 23: ...ter than 15 degrees Mow across the face of slopes not up and down Exercise extreme caution when changing direction on slopes Watch for holes ruts rocks hidden objects or bumps which can cause you to s...

Страница 24: ...TIPS NOTE ALWAYS INSPECT AREA WHERE MOWER IS TO BE USED AND REMOVE ALL STONES STICKS WIRE BONES AND OTHER DEBRIS WHICH MIGHT BE THROWN THE ROTATING BLADE Release switch to turn mower OFF when crossin...

Страница 25: ...loosen the blade nut 1 and remove the blade 4 Turn the nut COUNTER CLOCKWISE to loosen it and CLOCKWISE to tighten it Remove the blade nut 1 the square washer 2 the insulator washer 3 and the blade To...

Страница 26: ...Charge the new battery pack before use See Battery Charger of this manual TO INSTALL A NEW BATTERY Remove the isolator key Carefully lift the old battery by the handle Install the new battery pack Tak...

Страница 27: ...to the Maintenance section Store the mower in a dry clean location Do not store it next to corrosive materials such as fertilizer or rock salt Store the mower indoors in a cool dry place out of the re...

Страница 28: ...it and replace with a new battery pack DO NOT ATTEMPT TO REPAIR IT To avoid injury and risk of fire explosion or electric shock and to avoid damage to the environment Cover the battery s terminals wit...

Страница 29: ...and safest performance maintain the mower with care Keep the mower blade sharp and clean Mower blades are sharp and can cut Wrap the blades or wear gloves and use extra caution when servicing Keep all...

Страница 30: ...o tall or the cutting height is too low The rear of the mower housing and the blade are dragging in thick grass The motor shaft is bent The blade is unbalanced Charge the battery Replace the switch ca...

Страница 31: ...ecifically recommended Repairs necessary because of operator abuse or negligence or the failure to install operate maintain and store the product according to the instructions in the owner s manual Da...

Страница 32: ...EXPLODED VIEW 32 32...

Страница 33: ...14 3220346 Screw ST3 5X20 C 2 3 15 34116250 Lower cover II motor engagement box 1 3 16 32204113 Screw ST4 2 20 C 2 3 17 31902250 Start cable long 1 3 18 33318250 Compressed spring 1 4 33305469 2 Powe...

Страница 34: ...Bolt M6X8 2 33 33332250 Spring 1 34 31106250 3 Switch box assy 1 34 1 34134250 1 Upper cover switch box 1 34 2 34114250 Switch box slide block 1 34 3 36302470 Switch 1 34 4 34113250 Lower cover switch...

Страница 35: ...stment plate right 1 67 33303234 Spring plate 1 68 33304234 Height adjustment lever 1 69 34114227 4 Height adjustment knob lower 1 70 34113227 4 Height adjustment knob upper 1 71 31101463 2 Wheel 2 72...

Отзывы: