background image

7

ASSEMBLY INSTRUCTIONS

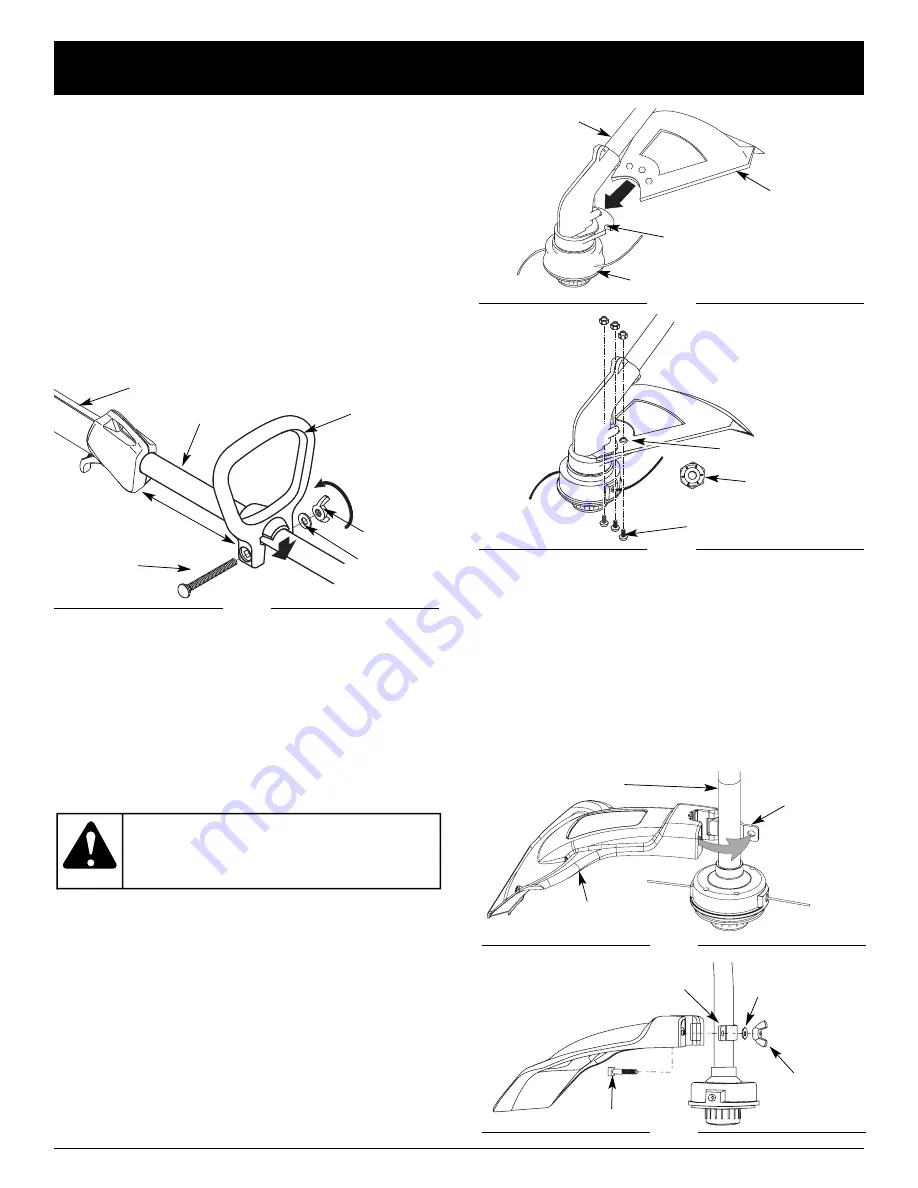
Fig. 1

INSTALLING THE CUTTING ATTACHMENT SHIELD

Use the following instructions if the cutting attachment
shield on your unit is not installed or if you ever need to
re-install it.

Install on a Straight Shaft (YM1500)

1. Slide the cutting attachment shield into the shield

mount on the cutting attachment. Align the screw
holes in the shield with the holes in the cutting
attachment (Fig. 2).

2. Place a hex lock nut into one of the three  recessed

holes on the top of the cutting attachment shield (Fig 3).

3. Install a screw into the hole from the bottom of the

cutting attachment shield and screw it into the nut
installed in step 2 (Fig 3). Do not tighten.

4. Repeat steps 2 and 3 until all three screws have

been started, then tighten securely.

Fig. 2

Fig. 3

Screws (3)

Shaft Housing

Hex Lock Nut

Cutting

Attachment

Shield

Cutting Attachment

Recessed Holes

Shield Mount

Install on a Curved Shaft (YM400)

1. Place the cutting attachment shield onto the shaft

housing. Be sure the guard mounting bracket slides
into the slot on the edge of the cutting shield. Rotate
the shield into place, counterclockwise. The holes in
the guard mounting bracket and cutting attachment
shield will line up (Fig. 4).

2. From inside the cutting attachment shield, push the

square bolt through the hole until the threaded end
protrudes through the guard mounting bracket (Fig. 5).

3. Put the washer on the bolt, then screw the wing nut

onto the bolt and tighten (Fig. 5).

Never operate the
trimmer without the

cutting attachment shield in place to
prevent serious personal injury.

WARNING:

Bolt

Washer

Wing Nut

Tighten

Shaft Grip

D-Handle

INSTALL AND ADJUST THE D-HANDLE

1. Push the D-handle down onto the shaft housing so

that the handle slants towards the shaft grip. Make
sure the squared bolt hole in the handle is to the right
(Fig. 1).

2. Insert the shoulder bolt into the squared hole in the

handle and push through. On the left side of the
handle, place the washer on the bolt, then screw the
wing nut onto the bolt. Do not tighten until you make
the handle adjustment.

3. Rotate the D-handle until the grip is above the top of

the shaft housing. Place it a minimum of 6 inches
(15.24 cm) from the end of the shaft grip.

Minimum 6 inches

(15.24 cm)

Shaft Housing

4. While holding the unit in the operating position (Fig. 9),

arrange the D-handle in the location that provides
you the best grip.

5. Tighten the wing nut until the D-handle is secure.

Guard

Mounting

Bracket

Shaft Housing

Square Bolt

Cutting Attachment

Shield

Guard

Mounting

Bracket

Wing Nut

Washer

Fig. 5

Fig. 4

Содержание YM400

Страница 1: ...SAVE THESE INSTRUCTIONS DO NOT THROW AWAY Operator s Manual 2 Cycle Trimmers Models YM400 YM1500 P N 769 02480A 12 06 ...

Страница 2: ...ils about your unit visit our website at www Yardman com DO NOT RETURN THE UNIT TO THE RETAILER PROOF OF PURCHASE WILL BE REQUIRED FOR WARRANTY SERVICE Before beginning locate the unit s model plate It lists the model and serial numbers of your unit Refer to the sample plate below and copy the information for future reference S N ITEM MODEL Make sure you carefully read and understand this manual b...

Страница 3: ...under the age of 15 must not use the unit except for teens guided by an adult All guards and safety attachments must be installed properly before operating the unit Inspect the unit before use Replace damaged parts Check for fuel leaks Make sure all fasteners are in place and secure Replace parts that are cracked chipped or damaged in any way Do not operate the unit with loose or damaged parts Car...

Страница 4: ...AVE THESE INSTRUCTIONS Always stop the engine and allow it to cool before filling the fuel tank Never remove the cap of the fuel tank or add fuel when the engine is hot Never operate the unit without the fuel cap securely in place Loosen the fuel tank cap slowly to relieve any pressure in the tank Mix and add fuel in a clean well ventilated outdoor area where there are no sparks or flames Slowly r...

Страница 5: ...protection meeting ANSI Z87 1 standards and ear protection when operating this unit Use a full face shield when needed KEEP BYSTANDERS AWAY WARNING Keep all bystanders especially children and pets at least 50 feet 15 m from the operating area UNLEADED FUEL Always use clean fresh unleaded fuel OIL Refer to operator s manual for the proper type of oil SYMBOL MEANING THROWN OBJECTS AND ROTATING CUTTE...

Страница 6: ...ass and light weeds Edging Decorative trimming around trees fences etc Fuel Cap Throttle Control D Handle Shaft Grip Shaft Tube Starter Rope Grip Line Cutting Blade On Off Stop Control Cutting Attachment Primer Bulb Blue EZ Start Lever Air Filter Muffler Cover Muffler Spark Plug ...

Страница 7: ...achment shield will line up Fig 4 2 From inside the cutting attachment shield push the square bolt through the hole until the threaded end protrudes through the guard mounting bracket Fig 5 3 Put the washer on the bolt then screw the wing nut onto the bolt and tighten Fig 5 Never operate the trimmer without the cutting attachment shield in place to prevent serious personal injury WARNING Bolt Wash...

Страница 8: ...engines along with a fuel additive such as STA BIL Gas Stabilizer or an equivalent Add 0 8 oz 23 ml of fuel additive per gallon of fuel according to the instructions on the container NEVER add fuel additives directly to the unit s fuel tank Thoroughly mix the proper ratio of 2 cycle engine oil with unleaded gasoline in a separate fuel can Use a 40 1 fuel oil ratio Do not mix them directly in the e...

Страница 9: ... 4 Push the blue EZ Start Lever towards the primer bulb until it clicks and locks into place Fig 7 5 Crouch in the starting position and do not squeeze the throttle control Fig 8 Pull the starter rope out with a controlled and steady motion until the engine attempts to start Repeat until the engine starts NOTE The unit uses EZ Pull Version 3 which significantly reduces the effort required to start...

Страница 10: ...proper clothing With a slightly bent right arm the operator s hand is holding the shaft grip The operator s left arm is straight the left hand holding the D handle The unit is at waist level The cutting attachment is parallel to the ground and easily contacts the grass without the need to bend over ADJUSTING TRIMMING LINE LENGTH The Bump Head cutting attachment allows you to release trimming line ...

Страница 11: ...nd re oil air filter Page 13 Every 25 hours Check and clean spark arrestor Check spark plug condition and gap Page 14 Page 15 Every 50 hours Inspect exhaust port and spark arrestor screen for clogging or obstruction to assure maximum performance levels Page 14 To prevent serious injury never perform maintenance or repairs with unit running Always service and repair a cool unit Disconnect the spark...

Страница 12: ...ll the line tight to make the loop as small as possible Fig 18 10 Before winding split the line back about 6 inches 11 Wind the line in tight even layers in the direction indicated on the inner reel NOTE Failure to wind the line in the direction indicated will cause the cutting attachment to operate incorrectly 12 Insert the ends of the line into the two holding slots Fig 19 7 Wind the lines in ti...

Страница 13: ... the inner reel and outer spool together While holding the inner reel and outer spool grasp the ends and pull firmly to release the line from the holding slots in the spool 7 Hold the inner reel in place and install the bump knob by turning clockwise Tighten securely AIR FILTER MAINTENANCE Removing the Air Filter Muffler Cover 1 Remove the four 4 screws securing the air filter muffler cover Fig 17...

Страница 14: ...or flat blade screwdriver 3 Carefully pry up the left side spark arrestor hood Two tabs act as hinges on the right side of the hood Flip open the spark arrestor hood like a door and then pull its tabs out of the muffler slots 4 Using a small flat blade screwdriver carefully pry the spark arrestor screen out from the inside of the spark arrestor hood 5 Clean the spark arrestor screen with a wire br...

Страница 15: ...o fast turn the idle speed screw counterclockwise 1 8 of a turn at a time as needed to reduce idle speed Checking the fuel mixture cleaning the air filter and adjusting the idle speed should solve most engine problems If not and all of the following are true the engine will not idle the engine hesitates or stalls on acceleration there is a loss of engine power Have the carburetor adjusted by an au...

Страница 16: ...ored for more than 60 days Dispose of the old fuel oil mix in accordance to Federal State and Local regulations To avoid serious personal injury always turn your trimmer off and allow it to cool before you clean or service it WARNING 2 Start the engine and allow it to run until it stalls This ensures that all fuel has been drained from the carburetor 3 Allow the engine to cool Remove the spark plu...

Страница 17: ... gas tank and add fresh fuel mixture Fouled spark plug Replace or clean the spark plug Plugged spark arrestor Clean or replace spark arrestor Blue EZ Start lever wasn t flipped set Move lever to the starting position The outside temperature is below 40º F Pull the starter rope up to 10 15 times The outside temperature is above 90º F Squeeze the throttle control and pull the starter rope On Off Con...

Страница 18: ...ctronic Ignition Switch Rocker Switch Spark Plug Gap 0 025 in 0 635 mm Lubrication Fuel Oil Mixture Fuel Oil Ratio 40 1 Carburetor Diaphragm All Position Starter Auto Rewind Muffler Baffled with Guard Throttle Manual Spring Return Fuel Tank Capacity 15 oz 444 ml Drive Shaft Housing Steel Tube Throttle Control Finger Tip Trigger Approximate Unit Weight No fuel with cutting attachment shield and D h...

Страница 19: ...19 NOTES ...

Страница 20: ...is given by MTD LLC MTD with respect to new merchandise purchased and used in the United States its possessions and territories MTD warrants this product against defects in material and workmanship for a period of two 2 years commencing on the date of original purchase and will at its option repair or replace free of charge any part found to be defective in material or workmanship This limited war...

Страница 21: ...MANUEL IMPORTANT À NE PAS JETER Manuel de l utilisateur Désherbeuse à 2 temps Modèles YM400 YM1500 P N 769 02480A 12 06 ...

Страница 22: ...CHEZ QUI VOUS L AVEZ ACHETÉ TOUT SERVICE SOUS GARANTIE NÉCESSITE UNE PREUVE D ACHAT Avant d assembler votre nouvel équipement repérez la plaque signalétique de l appareil et copiez ses informations dans l espace ci dessous Ces informations sont essentielles si vous désirez obtenir de l aide auprès de notre service technique ou d un distributeur agréé Un exemple de plaque signalétique est présenté ...

Страница 23: ...Les enfants et adolescents de moins de 15 ans ne doivent pas utiliser l appareil exceptés les adolescents assistés d un adulte Inspectez l appareil avant utilisation Remplacez les pièces endommagées Regardez s il y a des fuites de carburant Assurez vous que les fixations sont solidement en place Remplacez les pièces de l accessoire de coupe qui sont fendillées ébréchées ou endommagées Assurez vous...

Страница 24: ...de démarrage et d arrêt Ne vous étirez pas Tenez vous toujours bien sur vos pieds en position d équilibre Tenez toujours l appareil des deux mains lorsque vous le faites marcher Agrippez fermement les poignées avant et arrière Gardez les mains le visage et les pieds éloignés des pièces mobiles Ne touchez pas et n essayez pas d arrêter l accessoire de coupe en rotation Ne touchez pas le silencieux ...

Страница 25: ...visière de norme ANSI Z87 1 1989 et des protège oreilles pendant l utilisation ÉLOIGNEZ LES SPECTATEURS AVERTISSEMENT éloignez tout spectateur les enfants et les animaux domestiques en particulier d au moins 15 m 50 pi de la zone de coupe CARBURANT SANS PLOMB Utilisez toujours du carburant sans plomb frais et propre NIVEAU D HUILE Voir le manuel de l utilisateur pour le type d huile approprié SYMB...

Страница 26: ...bes légères Coupe de bordures Tailler autour des arbres des clôtures etc Manette des gaz Poignée en D Lame coupante Accessoire de coupe Prise de l arbre Corps de l arbre Poignée de la corde de démarrage Bouchon du carburant Commande Marche Arrêt Stop Couvercle du filtre à air silencieux Silencieux Poire d amorçage Levier bleu de EZ StartMC ...

Страница 27: ...lignez les trous à vis du protecteur avec ceux de l accessoire de coupe Fig 2 2 Placez un écrou de blocage hex dans l un des trois trous encastré sur le dessus du protecteur d accessoire de coupe Fig 3 3 Introduisez une vis dans le trou du bas du protecteur d accessoire de coupe et vissez la dans l écrou posé à l étape 2 Fig 3 Évitez de serrer 4 Répétez les étapes 2 et 3 jusqu à ce que les trois v...

Страница 28: ...par 4 litres 1 gallon de carburant selon les instructions du récipient N ajoutez JAMAIS d additifs directement dans le réservoir de l appareil REMARQUE Éliminez le vieux mélange de carburant conformément aux règlements fédéral provincial et municipal en vigueur Mélangez soigneusement l huile moteur 2 temps avec de l essence sans plomb dans un bidon séparé Utilisez un rapport 40 1 d essence huile N...

Страница 29: ...rçage jusqu à ce qu il clique et se verrouille en place Fig 7 5 Accroupissez vous en position de départ et n appuyez pas sur la manette des gaz Fig 8 Tirez le cordon de démarrage d un mouvement contrôlé et ferme jusqu à ce que le moteur essaie de démarrer Répétez jusqu à ce que le moteur démarre REMARQUE La machine utilise la technologie EZ Pull Version 3MC qui réduit significativement l effort re...

Страница 30: ...e à ce que l accessoire de coupe soit à un angle de 30 par rapport au sol Fig 11 TENUE DE LA DÉSHERBEUSE Avant de faire marcher l appareil tenez vous en position de fonctionnement Fig 9 Vérifiez les points suivants L opérateur porte une visière et des vêtements appropriés Le bras droit est légèrement plié et la main tient l arbre par sa prise Le bras gauche est droit et la main tient la poignée en...

Страница 31: ...ez le filtre à air et lubrifiez le de nouveau Page F13 Toutes les 25 heures Vérifiez le pare étincelles et nettoyez le Vérifiez l état de la bougie et l écartement des électrodes Page F14 Page F15 Toutes les 50 heures Examinez l orifice d échappement et l écran pare étincelles pour détecter tout bouchage ou obstruction afin d assurer des niveaux de performance maximum Page F14 pour éviter tout acc...

Страница 32: ...gueur d environ 15 cm 6 po 11 Enroulez le fil en couches uniformes serrées dans le sens indiqué sur le moulinet intérieur REMARQUE ne pas enrouler le fil dans le sens indiqué entraînera un mauvais fonctionnement de l accessoire de coupe 12 Insérez les extrémités du fil dans les deux fentes de retenue Fig 19 7 Enroulez les fils en couches uniformes serrées sur le moulinet Fig 17 Enroulez le fil dan...

Страница 33: ...ncien moulinet intérieur Fig 13 4 Placez le ressort dans le moulinet intérieur neuf REMARQUE le ressort doit être installé dans le moulinet intérieur avant de remonter l accessoire de coupe 5 Insérez les extrémités du fil dans les œillets de la bobine extérieure Fig 20 6 Placez le moulinet intérieur neuf dans la bobine Poussez le moulinet et la bobine ensemble Tout en tenant le moulinet et la bobi...

Страница 34: ... Trouvez le vis sur la partie inférieure du pot d échappement Fig 26 Retirez le vis en vous servant soit d un tournevis torx 20 ou d un tournevis plat 3 Soulevez gentiment la couverture du pare étincelles du côté gauche Deux pattes servent de charnières sur le côté droit de la couverture Ouvrez le couvercle du pare étincelles comme une porte et faites sortir ses pattes des fentes dans le pot d éch...

Страница 35: ...eil Les réglages de carburateur doivent être faits par un concessionnaire agréé Vérification du mélange de carburant En général si l appareil ne fonctionne pas correctement c est que le carburant est vieux ou mal mélangé Videz puis remplissez le réservoir de carburant frais et bien mélangé avant d effectuer des réglages Voir la section Informations sur l huile et le carburant Nettoyage du filtre à...

Страница 36: ...il à l aide d une petite brosse N utilisez pas de détergents concentrés Les nettoyants ménagers contenant des huiles aromatiques tel que le pin et le citron et les solvants tel que le kérosène peuvent endommager le boîtier ou la poignée en plastique Essuyez toute trace d humidité à l aide d un tissu doux ENTREPOSAGE Ne rangez jamais l appareil plein de carburant dans un lieu où les vapeurs peuvent...

Страница 37: ...e encrassée Remplacez ou nettoyez la Pare étincelles colmaté Nettoyez ou remplacez le pare étincelles Le levier EZ StartMC n était pas dans la bonne poition Bougez le levier pour démarrer La température extérieure est inférieure à 40 F Tirez sur le cordon de démarrage entre 10 et 15 fois La température extérieure est supérieure à 90 F Appuyez sur la manette des gaz et tirez sur le cordon de démarr...

Страница 38: ...onique Contact d allumage Interrupteur à berceau Écartement de la bougie 0 635 mm 0 025 po Lubrification Mélange carburant huile Rapport carburant huile 40 1 Carburateur Membrane toutes positions Démarreur Rembobinage automatique Silencieux Chicane avec protection Accélérateur Rappel manuel Capacité du réservoir de carburant 444 ml 15 oz Logement de l arbre d entraînement Tube acier Manette des ga...

Страница 39: ...F19 REMARQUES ...

Страница 40: ...and OH 44136 0019 La garantie limitée énoncée ci après est accordée par MTD LLC MTD et concerne les marchandises neuves achetées et utilisées aux États Unis ainsi que dans leurs possessions et territoires MTD garantit ce produit contre tout vice de matière ou de façon pendant une période de deux 2 ans à compter de la date d achat initiale et elle se réserve le choix de réparer ou de remplacer à ti...

Страница 41: ...ESTE MANUAL ES IMPORTANTE NO LO DESECHE Manual del Operador Recortador de 2 Tiempos Modelos YM400 YM1500 P N 769 02480A 12 06 ...

Страница 42: ...dos cerca de usted Para obtener más detalles sobre su unidad visite nuestro sitio en www Yardman com NO REGRESE SU UNIDAD AL VENDEDOR PARA SOLICITAR SERVICIO POR LA GARANTIA DEBERA PRESENTAR PRUEBA DE SU COMPRA Antes de que empiece a ensamblar su nuevo equipo por favor ubique la placa que contiene el modelo de la unidad y escriba esa información en el espacio en blanco aquí debajo Aquí debajo se e...

Страница 43: ...e la unidad antes de utilizarla Cambie las partes dañadas Verifique si existen pérdidas de combustible Asegúrese de que los sujetadores estén bien colocados y asegurados Cambie las partes accesorias de corte que estén quebradas cascadas o dañadas de cualquier forma Asegúrese de que el accesorio de corte está bien instalado y ajustado con firmeza Asegúrese de que la protección accesoria de corte es...

Страница 44: ...enga siempre la unidad con ambas manos mientras esté en funcionamiento Sostenga con firmeza tanto el mango como la manija auxiliar Mantenga las manos la cara y los pies lejos de todas las partes móviles No intente tocar ni detener el accesorio de corte mientras gira No toque el silenciador ni el cilindro Estas partes se calientan mucho con la operación Luego de apagarlas permanecen calientes duran...

Страница 45: ......

Страница 46: ...sorio de corte Bastidor del eje Manjo del eje Mango de la cuerda de arranque Control de encendido y apagado APLICACIONES Como recortadora Corte de césped y hierbas delgadas Recorte de bordes Recorte decorativo alrededor de árboles cercos etc Bombilla del cebador Cubierta del silenciador filtro de aire Palanca azul de EZ StartMR Silenciador ...

Страница 47: ...ector del accesorio de corte empuje el perno cuadrado a través del orificio hasta que el extremo con roscas sobresalga a través del soporte de montaje de la guardera Fig 4 3 Ponga la arandela en el perno y después atornille la tuerca de mariposa y apriétela No opere nunca la recortadora sin el protector accesorio de corte colocado en su lugar para evitar graves lesiones personales ADVERTENCIA Pern...

Страница 48: ...mo por ejemplo el estabilizador de gasolina STA BIL o similar Agregue 23 mL 0 8 onzas de aditivo de combustible por galón de combustible de acuerdo con las instrucciones del envase NUNCA agregue aditivos directamente en el tanque de combustible de la unidad Mezcle bien la proporción correcta de aceite para motor de 2 ciclos y gasolina sin plomo en una lata de combustible por separado Use una propo...

Страница 49: ... que haga un clic y quede trabada en su lugar Fig 7 5 Colóquese en la posición de arranque y no apriete el control de aceleración Fig 8 Hale el cordón de arranque con un movimiento controlado y uniforme hasta que el motor trate de arrancar Repita hasta que el motor arranque NOTA La unidad usa EZ Pull Version 3 lo cual reduce considerablemente el esfuerzo requerido para arrancar el motor Debe halar...

Страница 50: ...etos como paredes o postes de cercos CONSEJOS PARA OBTENER MEJORES RESULTADOS AL RECORTAR El ángulo correcto para ubicar el accesorio de corte es paralelo al suelo No fuerce el accesorio de corte Permita que la punta de la línea realice el corte en especial a lo largo de paredes Si corta con más de la punta reducirá la eficacia del corte y puede sobrecargar el motor Corte césped de más de 200 mm 8...

Страница 51: ...eite y combustible Página E8 Cada 10 horass Limpie y vuelva a aceitar el filtro de aire Página E13 Cada 25 horass Examine el parachispas y límpielo Inspeccione la condición y la separación de la bujía de encendido Página E14 Página E15 Cada 50 horas Inspeccione si la lumbrera de escape y la rejilla del parachispas están tupidas u obstruidas para garantizar los niveles máximos de rendimiento Página...

Страница 52: ...tes de bobinar separe la línea alrededor de 6 pulgadas 11 Bobine la línea en capas parejas y ajustadas en la dirección indicada en el carrete interior NOTA Si no bobina la línea en la dirección indicada el accesorio de corte no funcionará en forma correcta 12 Inserte los extremos de la línea en las dos ranuras de fijación Fig 19 7 Bobine las líneas en capas parejas y ajustadas sobre el carrete Fig...

Страница 53: ...obina exterior y coloque el carrete interior con el resorte dentro de la bobina exterior Fig 20 Empuje el carrete interior y la bobina exterior entre sí Mientras sostiene el carrete interior y la bobina exterior tome los extremos y tire con firmeza para soltar la línea de las ranuras de fijación de la bobina NOTA El resorte debe estar ensamblado en el carrete interior antes de volver a ensamblar e...

Страница 54: ...ero no lo quite Busque el tornillo en la parte inferior del silenciador Fig 26 Quite el tornillo usando una llave torx No 20 o un destornillador plano 3 Levante cuidadosamente haciendo palanca el lado izquierdo de la cubierta del parachispas Dos lengüetas actúan como bisagras en el lado derecho de la cubierta Abra con un golpe rápido la cubierta del parachispas como si fuera una puerta y después h...

Страница 55: ...ia la izquierda 1 8 de giro a la vez como sea necesario para reducir la velocidad NOTA Si hay un tacómetro disponible ajuste la velocidad de marcha en vacío conforme a las especificaciones de RPM El control de la mezcla de combustible la limpieza del filtro de aire y el ajuste del tornillo de marcha lenta deben resolver la mayoría de los problemas del motor De no ser así y si El motor no funciona ...

Страница 56: ...ás de 60 días Deseche la mezcla vieja de combustible y aceite de acuerdo a las regulaciones federales estatales y locales 2 Arranque el motor y déjelo funcionar hasta que se ahogue Esto asegura que todo el combustible ha sido drenado del carburador 3 Espere que el motor se enfríe Retire la bujía de encendido y coloque alrededor de 1 onza 30 ml de cualquier aceite para motor de 2 ciclos buena calid...

Страница 57: ...nueva La bujía de encendido está arruinada Cambie o limpie la bujía de encendido Parachispas obstruido Limpie o cambie el parachispas La palanca EZ Start no estaba en la posición correcta Mueva la palanca a la posición de arranque La temperatura exterior es por debajo de 4º C 40º F Hale el cordón de arranque hasta un máximo de 10 15 veces La temperatura exterior es de más de 32º C 90º F Oprima el ...

Страница 58: ... oscilante Separación de la bujía de encendido 0 5 mm 0 020 pulg Lubricación Mezcla de combustible y aceite Proporción de combustible aceite 40 1 Carburador Diafragma multiposicional Arranque Rebobinado automático Silenciador Desviado con protección Regulador Retroceso manual a resorte Capacidad del tanque de combustible 444 ml 15 onzas Bastidor del eje impulsor Tubo de acero Control del regulador...

Страница 59: ...E19 NOTAS ...

Страница 60: ...cludes 8 13 41 45 48 not shown Item Part No Description 1 753 04510 Air Cleaner Cover Assembly includes 2 33 2 791 180350B Air Cleaner Filter 3 791 180351 Carburetor Mounting Screws 4 753 1194 Choke Plate 5 753 04227 Choke Lever 6 753 04807 Carburetor Assembly includes 7 17 7 791 610675 Carburetor Gasket 8 791 181860 Carb Mount Screw 9 791 683974B Primer and Hose Assembly 10 753 1196 Carburetor Mo...

Страница 61: ...ng 3 791 181556 Throttle Trigger 4 753 04901 Throttle Cable 5 753 04280 Flexible Drive Shaft 6 753 05041 Drive Shaft Housing 7 791 153064 D Handle Assembly includes 8 8 791 153317 D Handle Hardware 9 753 04282 Guard Mounting Hardware 10 753 04283 Guard includes 11 11 791 180553 Blade Assembly 12 753 04284 Outer Reel includes 13 13 791 610660 Retainer 14 791 610317B Spring 15 753 1155 Inner Reel 16...

Страница 62: ...8 13 41 45 48 not shown Item Part No Description 1 753 04810 Air Cleaner Cover Assembly includes 2 33 2 791 180350B Air Cleaner Filter 3 791 180351 Carburetor Mounting Screws 4 753 1194 Choke Plate 5 753 04227 Choke Lever 6 753 04807 Carburetor Assembly includes 7 17 7 791 610675 Carburetor Gasket 8 791 181860 Carb Mount Screw 9 791 683974B Primer and Hose Assembly 10 753 1196 Carburetor Mount Ass...

Страница 63: ...sing 8 753 05211 Flexible Drive Shaft 9 791 180547 Guard Mounting Screw Assembly 10 791 180548 Guard Assembly includes 11 11 791 180553 Blade Assembly 12 791 145569 Anti Rotation Screw 13 753 05185 Gearbox Assembly includes 14 18 14 791 153619 Outer Spool Assembly includes 15 15 791 610660 Retainer 16 791 610317B Spring 17 753 1155 Inner Reel 18 791 153066B Bump Head Knob Assembly 1 1 2 3 4 5 6 7 ...

Страница 64: ...imitada establecida a continuación es dada por MTD LLC MTD con respecto a mercancía nueva que sea comprada y usada en los Estados Unidos sus posesiones y territorios MTD garantiza este producto contra defectos en el material y la mano de obra durante un período de dos 2 años a partir de la fecha de compra original y a su entera opción arreglará o substituirá sin costo alguno cualquier pieza cuyo m...

Отзывы: