background image

NOTA: 

El único ensamblaje requerido para su recortadora

es la instalación del protector de desechos y para ajustar
el manubrio auxiliar.

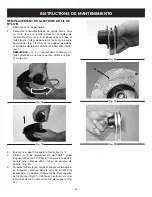
INSTACION DEL PROTECTOR DE
DESECHOS

1. Coloque el bastidor del motor con el transportador de

la cabeza de hilo viendo hacia arriba (Figura 3-1A).

2. Deslice el protector de desechos sobre el bastidor del

motor como se muestra en la (Figura 3-1A).

3. Alinee la guía para desorillar emparejando las ranuras

y empujando firmemente en la dirección señalade
hasta que oiga un chasquido perceptible (Figura 3-1B).

NOTA:

Asegúrese que la guía para desorillar esté orienta-

da como se ilustra. Una vez que la guía para desorillar, el
bastidor del motor y el protector de desechos estén
acoplados, la conexión será permanente y no podrá ser
removida sin una herramienta especial.

COLOCACIÓN DEL MANERAL (FIG. 4 AND
FIG. 5)

1. Inserte el maneral en una posición confortable y apri-

ete un poco el tornillo.

2. Antes de apretar el tornillo firmemente, ajuste el man-

eral a la altura deseada deslizando hacia arriba o
abajo del tubo . cuando el maneral este a la altura
deseada, apriete tornillo firmemente.

42

41

INSTRUCCIONES DE ENSAMBLE

Fig. 1

Fig. 2

INSTRUCCIONES DE AJUSTE

Fig. 3

Fig. 4

Maneral

Tuereca

Tornillo

Fig. 5

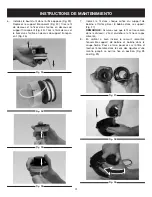
AJUSTE DE LONGITUD DE FLECHA

1. Sujete la flecha firmemente
2. Empuje el botón del seguro de flecha hacia adelante y

mueva el maneral hacia atrás o adelante para ajustar
londitud deseada. (Fig. 6) 

NOTA:

La flecha podrá ser ajustada en el modo de corta-

dor u orillador..

CONVERSIÓN A ORILLADOR

1. Sostenga la flecha firmemente.
2. Empuje el botón del seguro de flecha hacia delante y

gire el maneral hasta que escuche un clic. (Fig. 7 & Fig.
8)

ENCENDIDO

1. Antes de encender el orillador de pasto la primera vez

, asegúrese que el hilo de naylon toque o exceda la
longitud hacia la navaja que cortara el hilo en la guar-
da protectora. Si el hilo no es suficientemente largo,
presione el botón del cabezal y al mismo tiempo jale el
hilo de naylon ( Fig. 9).

2. Conecte la clavija eléctrica a la extensión eléctrica y

sujete esta en el maneral.

3. Asegúrese de que la altura de la unidad y el maneral

este a la medida adecuada antes de usar su Orillador,
ajuste la longitud de la unidad presionando el botón de
ajuste de flecha, y ajuste el maneral aflojando la manil-
la del maneral y posicione el maneral a la altura desea-
da después apriete la manilla.

4. Sujete firmemente el orillador, y sin tocar el suelo o

pasto quite el seguro del interruptor, presione el inter-
ruptor y permita que la unidad se encienda por unos
segundos y golpee el suelo con el cabezal para permi-
tir que el hilo de Naylon salga y se corte automática-
mente con la navaja colocada en la guarda.

5. Para apagar la unidad simplemente deje de presionar

el interruptor de encendido.

Esta operación debe repetirse algunas veces antes de
iniciar el trabajo con el fin de asegurarse que todo esta
funcionando correctamente y para que usted se famil-
iarice con el orillador de pasto. Inicie lentamente , cuan-
do obtenga experiencia podrá usar su orillador de pasto
a su máxima capacidad.

Fig. 6

Fig. 7

Fig. 8

Una línea
corta o

usada corta de manera menos eficiente, así
que para mejorar su operación en ocasiones
posteriores, golpee ligeramente el botón del
rotor en el suelo mientras está funcionando la
podadora. Esto soltará automáticamente más
línea. (Fig 10)

ADVERTENCIA:

Fig. 9

Fig. 10

B

A


Содержание MTD27P

Страница 1: ...Electric Grass Trimmer Model MTD27P IMPORTANT READ SAFETY RULES AND INSTRUCTIONS CAREFULLY P N 6096 202705 2005 PRINTED IN CHINA Operator s Manual English...

Страница 2: ...MER For two years from the date of purchase when this grass trimmer is used and maintained according to the operator s manual Yard Machines will repair any defect in material for workmanship free of c...

Страница 3: ...y a safety warning may result in property damage or personal injury to yourself or to others Always follow the safety precautions to reduce the risk of fire electric shock and personal injury CAUTION...

Страница 4: ...is double insulated If in doubt of proper wire size use the next heavier gauge Please note that the smaller the gauge number the heavier the cord 1 When using the appliance an extension cord of ade qu...

Страница 5: ...r locked up place out of the reach of children 18 Don t grasp the exposed cutting blades or cutting edges when picking up or holding the appliance 19 Don t force appliance it will do the job better an...

Страница 6: ...lure to do so can result in serious injury to the operator and or bystanders WEAR HEAD EYE AND HEARING PROTECTION WARNING Thrown objects and loud noise can cause severe eye injury and hearing loss Wea...

Страница 7: ...FE OPERATIOIN KNOW YOUR UNIT EDGE GUIDE INCLUDED DEBRIS SHIELD STRING HEAD SHAFT EXENSION BUTTON ADJUSTABLE SHAFT CORD RETAINER ON OFF TRIGGER ASSIST HANDLE REAR HANDLE AIR OPENINGS TWIST TO EDGE BUTT...

Страница 8: ...snap is heard Figure 3 NOTE Be certain that edging guide is oriented as shown Once edging guide motor housing and debris shield are mated the connection is permanent and cannot be removed without a s...

Страница 9: ...r by pressing the shaft locking button adjust the height of assist handle by releasing the loosening the wingnut 4 Take a secure hold of the grass trimmer and without letting it touch the grass to be...

Страница 10: ...pull trimmer in toward operator 3 FENCE FOUNDATION TRIMMING Approach trim ming around chain link fences picket fences rock walls and foundations slowly to cut close without whip ping string against t...

Страница 11: ...er hold it so the motor is to your left side so that debris is thrown to the rear Always use eye protection 7 SWEEPING DO NOT SWEEP WITH TRIMMER Fig 16 8 DO NOT BUMP TRIMMER ON CONCRETE This can damag...

Страница 12: ...lace 3 Remove the clear plastic line retaining ring Remove any existing line from the spool 4 Using 0 065 replacement line measure off approxi mately 14 of line Double over the cutter line into two eq...

Страница 13: ...rt the line through each eyelet in the spool carrier and slide the spool into the carrier Fig 27 NOTE Ensure that the line is within the clear plastic line retainer If it s outside of the clear plasti...

Страница 14: ...r the debris shield 3 During operation keep the air slots clean and free of grass 4 Only use a cloth soaked with hot water and a soft brush to clean the string trimmer 5 Do not spray or wet the applia...

Страница 15: ...WIRE CUTTING 22 6024 202605 SPRING 3 4 6008 202001A SPOOL CARRIER 23 6056 202607 BUTTON 3 5 6059 202004 SPOOL COVER 24 6024 202603 SPRING 4 6038 202606 HOUSING R 25 26 6099 202702 MOTOR 120V 5 6SDABB...

Страница 16: ...NOTES 15...

Страница 17: ...old through MTD s authorized channels of export distribution MTD reserves the right to change or improve the design of any MTD Product without assuming any obligation to modify any product previously...

Страница 18: ...D sherbeuse lectrique Mod le MTD27P IMPORTANT LISEZ LES R GLES ET CONSIGNES DE S CURIT SOIGNEUSEMENT P N 6096 202705 2005 FABRIQU CHINA Manuel de Utilisation Fran ais...

Страница 19: ...es partir de la date d achat quand ce coupe herbe est utilis et maintenu selon le manuel de l op rateur Yard Machines r parera n importe quel vice de mat riau pour la main d u vre gratuitement Si ce...

Страница 20: ...ez lire les instructions avec soin Familiarisez vous avec les commandes et l utilisation correcte de cet appareil N utilisez pas l appareil si vous tes fatigu malade ou sous l effet de l alcool de dro...

Страница 21: ...t utilis La double isolation constitue seulement une protection suppl mentaire en cas de d faillance de l isolant interne 5 CORDON PROLONGATEUR Ne brancher cet appareil que dans un cordon prolongateur...

Страница 22: ...ER D ACCESSOIRES autres que ceux recommand s et fournis par Yard Machines Ne pas utiliser de fils de coupe m talliques 14 NE PAS TENIR L APPAREIL BOUT DE BRAS Toujours garder bon pied et un bon quilib...

Страница 23: ...e s curit Vous pourriez d faut entra ner des blessures graves pour vous ou d autres personnes PORTEZ DES PROTECTIONS T TE YEUX ET OREILLES AVERTISSEMENT les objets pro jet s et les bruits forts peuven...

Страница 24: ...PPAREIL GUIDE DE BORDURE INCLUS PARE DEBRIS TETE DE COUPE BOUTON DE R GLAGE DE L AXE ARBRE DE TRANSMISSION AJUSTABLE RETENUE DU CORDON MANETTE MARCHE ARRET POIGNEE DE MAINTIEN POIGNEE ARRIERE TROUS DE...

Страница 25: ...Figure 3 NOTA S assurer que le guide bordure est bien orient comme il est illustr Une fois que le giude border que le carter du moteur et que le pare d bris sont accoupl s leur accouplement est perma...

Страница 26: ...t applicable before use adjust the length of grass trimmer by pressing the shaft locking button adjust the height of assist handle by releasing the loosening the wingnut 4 Take a secure hold of the gr...

Страница 27: ...la t te de coupe ne touche le sol Toujours tondre loin de soi ne jamais amener le coupe herbe soi 3 POUR COUPER L HERBE AUTOUR DES CL TURES ET DES FONDATIONS Pour couper l herbe autour des cl tures g...

Страница 28: ...ue le moteur soit gauche pour que les d bris soient projet s vers l ar ri re Toujours porter des lunettes de s curit 7 BALAYAGE NE PAS UTILISER LE COUPE HERBE POUR BALAYER Fig 16 8 NE PAS HEURTER LE B...

Страница 29: ...il faites attention de ne pas le perdre Veillez le plac er en lieu s r 3 Enlevez le support transparent Sortez tout le fil 4 Utilisez un fil de remplacement de 0 065 d une longueur d environ 14 Pliez...

Страница 30: ...du support de bobine et faites glisser la bobine dans ce support Fig 27 REMARQUE Assurez vous que le fil se trouve bien dans le diviseur s il est en dehors le fil ne sera pas aliment 8 En veillant bie...

Страница 31: ...l utilisation garder les ouvertures propres et sans herbe 4 Pour nettoyer le coupe herbe utiliser exclusivement un chiffon tremp dans de l eau chaude et une brosse poils doux 5 Ne pas asperger ou moui...

Страница 32: ...IQUET 3 3 6194 202001 DECOUPE PAR FIL 22 6024 202605 RESSORT 3 4 6008 202001A PORTE BOBINE 23 6056 202607 BOUTON 3 5 6059 202004 COUVRE BOBINE 24 6024 202603 RESSORT 4 6038 202606 BOITIER R 25 26 6099...

Страница 33: ...NOTES 32...

Страница 34: ...liorer la conception de tout produit MTD sans assumer l obligation de modifier tout produit d une fabrication plus ancienne Aucune garantie implicite y compris toute garantie de valeur marchande ou d...

Страница 35: ...Podadora El ctrica Modelo MTD27P IMPORTANTE LEA LAS REGLAS DE SEGURIDAD Y INSTRUCCIONES DETENIDAMENTE P N 6096 202705 2005 HECHO EN CHINA Manuel del Due o Operador Espa ol...

Страница 36: ...ACHINE Yard Machine reparar cualquier defecto material o de fabricaci n de forma gratuita durante un plazo de dos a os desde la fecha de compra siempre y cuando la bordeadora haya sido usada y manteni...

Страница 37: ...ECAUCI N INSTRUCCIONES IMPORTANTES DE SEGURIDAD LEA TODAS LAS INSTRUCCIONES DE ANTEMANO Lea las instrucciones detenidamente Familiar cese con los controles y el uso adecuado de la unidad No opere esta...

Страница 38: ...una posible falla de aislamiento el ctrico interno 5 CABLE DE EXTENSION Uselo exclusivamente con un cable de extensi n dise ado para exteriores Vea la tabla de abajo Puede usar un cable de dos alam br...

Страница 39: ...ENDIDO INVOLUNTARIO No transporte la recortadora conectada con el dedo en el interruptor 16 DESCONECTE la recortadora de la corriente el ctri ca cuando no la use o antes de realizar el servicio de la...

Страница 40: ...rtencias e instrucciones Si no lo hace puede provocar serios da os al operador o los que lo rodean UTILICE PROTECCI N PARA OJOS O DOS Y CABEZA ADVERTENCIA Los objetos lanzados y los ruidos potentes pu...

Страница 41: ...CA SU BORDEADORA DE C SPED GU A DE BOR DEO INCLUIDA PROTECTOR DESECHOS BOT N PARA ASEGURAR FLECHA AJUSTABLE RETENEDOR DEL CABLE GATILLO DE ENCENDIDO APAGADO MANUBRIO AUXILIAR MANUBRIO TRASERO APERTURA...

Страница 42: ...ga un chasquido perceptible Figura 3 1B NOTA Aseg rese que la gu a para desorillar est orienta da como se ilustra Una vez que la gu a para desorillar el bastidor del motor y el protector de desechos e...

Страница 43: ...de la unidad presionando el bot n de ajuste de flecha y ajuste el maneral aflojando la manil la del maneral y posicione el maneral a la altura desea da despu s apriete la manilla 4 Sujete firmemente...

Страница 44: ...sicione el cabezal un poco inclinado siempre corte alejado de personas y del operador 3 CORTE EN ORILLAS Acerque el cabezal a las oril las que desea cortar inicie el proceso de corte acer cando poco a...

Страница 45: ...erda de tal forma que las part culas sean lanzadas hacia atr s Siempre utilice protector para los ojos 7 BARREDOR NUNCA UTILICE SU UNIDAD PARA ESTE TRABAJO Fig 16 8 NO HAGA FUNCIONAR EL RECORTADOR SOB...

Страница 46: ...ar seguro 3 Retire el anillo de retencion de plastico transparente Retire cualquier linea existente del rotor 4 Usando la linea de reemplazo 0 065 mida aproxi madamente 14 de l nea Doble sobre la l ne...

Страница 47: ...7 Inserte la l nea a trav s de cara ojal en el portador del rotor y deslice el rotor en el portador Fig 27 NOTA Aseg rese que la l nea est dentro del retene dor de pl stico transparente Si est fuera...

Страница 48: ...uarda 3 Mientras opera la unidad aseg rese de que las ranuras d ventilaci n est n limpias y libres de tierra y pasto 4 Unicamente utilice un trapo h medo con agua caliente y un cepillo delgado para li...

Страница 49: ...202001 ALAMBRA CORTANDO 22 6024 202605 MUELLE 3 4 6008 202001A PORTABOBINAS 23 6056 202607 BOTON 3 5 6059 202004 TAPA DE LA BOBINA 24 6024 202603 MUELLE 4 6038 202606 CARCASA R 25 26 6099 202702 MOTO...

Страница 50: ...NOTAS 49...

Страница 51: ...r el dise o de cualquier producto MTD sin adoptar ninguna obligaci n para modificar cualquier producto fabricado con anteriori dad Ninguna garant a impl cita es aplicable despu s del per odo de aplica...

Страница 52: ...rn thisproducttothestore Contactyour CustomerServiceAgent Encasdeprobl mesoupourdesquestions NEPASretournerceproduitaupointdevente S adresser aupr pos duService laclient leencomposant Paraproblemasopr...

Отзывы: