background image

YZ-X2

16

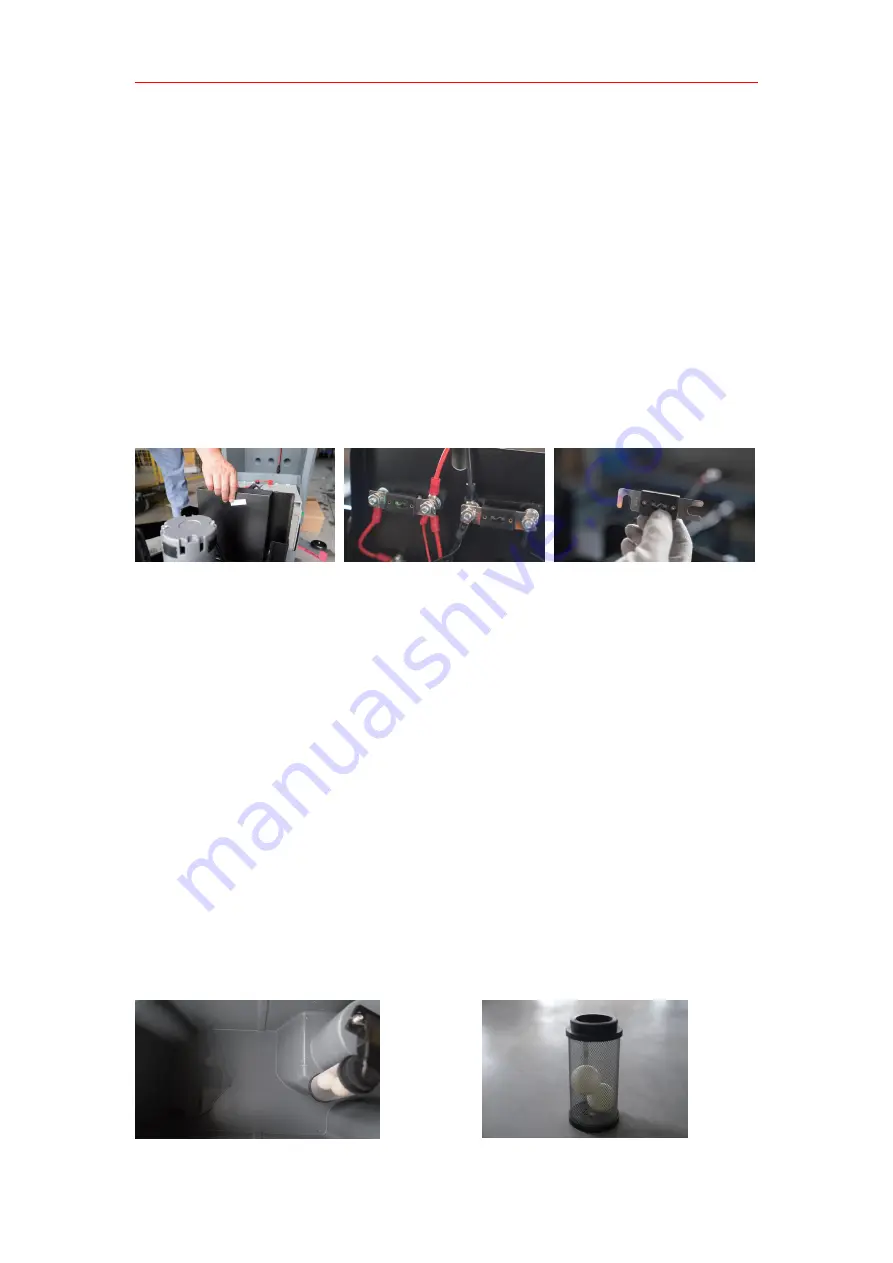
3.6 Fuse removal

In the daily use of the machine, if the fuse is burned out, or the

fuse needs to be checked due to machine failure, refer to the

following steps to operate:

The first step is to open the water tank, drain the sewage and

clean water, and open the outer cover of the electrical box.

In the second step, use a wrench to unscrew the fuse fastening

screw and remove the fuse.

The third step is to confirm the fuse model and replace the

damaged fuse.

3.7 Disassembly of the float cage

In the daily use of the machine, because the floating ball cage

exists in the sewage tank, and when the sewage is too full, the

floating ball will be sucked at the air outlet by the suction of the

suction motor, and the customer needs regular maintenance. You

can refer to the following steps to operate.

Before dismantling the float cage, drain the sewage and open

the cover of the sewage tank. The floating ball cage is an

embedded rubber structure, and the customer can tilt it to one side

and pull it out with force. Refer to the image below.

Содержание YZ-X2

Страница 1: ...YZ X2 Floor Scrubber operation instructions ...

Страница 2: ...YZ X2 Yangzi Make cleaning easier ...

Страница 3: ...cautions for machine operation 10 Chapter 3 Routine Maintenance and Disassembly and Replacement of Wearing Parts 11 3 1 Periodic Inspection 11 3 2 Brush disk replacement installation and adjustment 12 3 3 Replacement and installation of the absorbent strip 13 3 4 Battery Maintenance 14 3 5 Maintenance and disassembly of suction motor 15 3 6 Fuse removal 16 3 7 Disassembly of the float cage 16 Chap...

Страница 4: ...YZ X2 2 Warranty 19 ...

Страница 5: ...rameters Category Maintenan ce free Liquid fil ling Type Wire drawing Type Cleaning efficiency 2800 h Brush width 18 inch Squeegee width 800 mm Brush speed 195 rpm Brush motor power 550 w Suction motor power 550 w Category Maintenan ce free Liquid fil ling Type Wire drawing Type Cleaning efficiency 50 L Brush width 50 L Squeegee width 24V 100Ah Brush speed 2 3h Brush motor power 151 kg 150 kg 111 ...

Страница 6: ...tart switch to the off position and please remove the key from the main power switch The machine must be used by qualified and authorized personnel Children and disabled persons are not allowed to use the machine Keep the battery away from sparks flames and smoke Do not use it in a place where dangerous flammable or explosive gas liquid or water vapor is present This machine can clean general garb...

Страница 7: ...er Confirming that the machine is in proper operation and safe condition professionals or service center must work in accordance with the maintenance section of this manual Even if the machine is to be dismantled and scrapped someone should be there to pay attention Because some harmful substances such as batteries waste oil etc have met the standards they should be sent to a specific center for p...

Страница 8: ...be observed Even if you have used a similar sweeper before please read the instructions carefully Reading the instructions beforehand will save you a lot of time in the future It is vital that you become familiar with all accessories and controls and their functions before you start using them Read through this manual so you don t get scrambled when you turn it on Chapter 2 Use of the Machine 2 1 ...

Страница 9: ...e with the needle plate and add a cleaning pad for cleaning which can effectively protect the ground The charging socket cable requires at least a power cable with a diameter of 4mm Note The charger is placed on a stable platform pay attention to moisture proof anti moisture Water and drop resistant The charging time must be guaranteed for 6 10 hours per charge Guaranteed electricity The battery i...

Страница 10: ...serted into the suction port Step 1 Unscrew the water absorbing cross knob Pull the handle down and put down the water absorption swaying tail bracket Step 2 Thread the Absorbent Fixing Screw through the Tripod Step 3 Install the sewage suction pipe The squeegee has been debugged at the factory and can be used after installation Power display After turning on the main power switch the voltmeter wi...

Страница 11: ...ndlebars and keep driving at a constant speed start the brush switch button and the water absorption motor switch button Stop of the machine Close the brush switch button first Close the drain valve Close the switch button of the water suction motor Turn off the main power switch Lightly step on the foot lever to lift the scrubber By pulling the handle lift the squeegee head ...

Страница 12: ...revent the sewage from immersing in the suction motor and causing it to burn To clean the ground with serious oil pollution please put an appropriate amount of detergent into the clean water tank to achieve better cleaning effect and at the same time drop an appropriate amount of defoamer into the sewage tank to prevent the sewage tank foam from immersing in the suction motor and causing burns Aft...

Страница 13: ...ect the positive and negative output wires of the battery and place the machine in a dry and clean place Chapter 3 Routine Maintenance and Disassembly and Replacement of Wearing Parts 3 1 Periodic Inspection Regular maintenance and inspection Intervals h 4 50 100 200 500 1 Battery level detection 2 Motor carbon brush inspection ...

Страница 14: ...ure that the machine is in a power off state Lightly step on the foot lever to keep the brush disc lifted Facing the direction of the brush plate hold the brush rotate it to the right and the brush plate can be removed rotate it to the left to complete the installation Note When installing make sure the flange is aligned with the brush plate button holes Replacement of the dial The dial can be pur...

Страница 15: ...be properly tightened Principle Dynamic Balance 3 3 Replacement and installation of the absorbent strip Place the machine on a flat ground turn off the main power switch and ensure that the machine is powered off Put down the squeegee through the handle after rotating the plastic handle in the opposite direction take out the squeegee assembly Unscrew the squeegee assembly nut remove the bottom pla...

Страница 16: ...mely unfavorable to the battery and will burn the battery in severe cases Step 1 Align the holes of the front rubber strip with the protrusions of the plastic assembly of the squeegee Step 2 Fix the plastic components on the cast aluminum base plate of the squeegee Step 3 Align the holes of the rear rubber strip with the plastic components of the squeegee to the protrusions Step 4 Use both ends of...

Страница 17: ...ntering the filter screen and into the suction motor causing the motor to burn Removal of suction motor The suction motor is fixed at the bottom of the clean water tank Before removing 1 First empty the machine with clean water turn off the main power switch and keep the machine powered off 2 Turn the clean water tank back and pull out the suction motor pair socket 3 Loosen the fixing nut of the s...

Страница 18: ...rm the fuse model and replace the damaged fuse 3 7 Disassembly of the float cage In the daily use of the machine because the floating ball cage exists in the sewage tank and when the sewage is too full the floating ball will be sucked at the air outlet by the suction of the suction motor and the customer needs regular maintenance You can refer to the following steps to operate Before dismantling t...

Страница 19: ...rvice center Fan not working Suction motor noise is too loud Please contact the service center Suction motor burned out Replace the suction motor Carbon brush wear Please contact the service center Little or no water flow out Clogged water tank drain valve or water pipe Clean or replace the solution tank drain valve Drain valve closed Open the drain valve Inefficient recycling of sewage Recovery t...

Страница 20: ...se Ambient temperature 10 40 c The relative humidity of the air 5 70 No conductive dust no explosion hazard environment An environment that does not contain gases or vapors that corrode metals Indoor use ventilated non vibration environment front and rear space at least 300mm Maintenance schedule Maintenance operation On handover Every 10h Every 50h Every 100h Every 200h Every 500h Brush Disc Heig...

Страница 21: ...e to weather or force majeure More than 1 year of warranty or more than 1500 hours of use Warranty card Warranty Conditions 1 Within the day when the user purchases this product the motor is guaranteed for one year more than 7 days from the date of purchase no replacement only warranty 2 Before using the equipment you must understand the instructions and safety instructions 3 Man made damage to th...

Страница 22: ...le and repair by themselves will not be covered by the warranty if repair is required a cost will be charged 5 The buyer can go to the designated point of the seller for maintenance with the invoice or send the machine back to our company for repair return freight and insurance premiums are paid by themselves ...

Отзывы: