background image

Yamato Scientific America, Inc.

User's Manual and Troubleshooting Guide
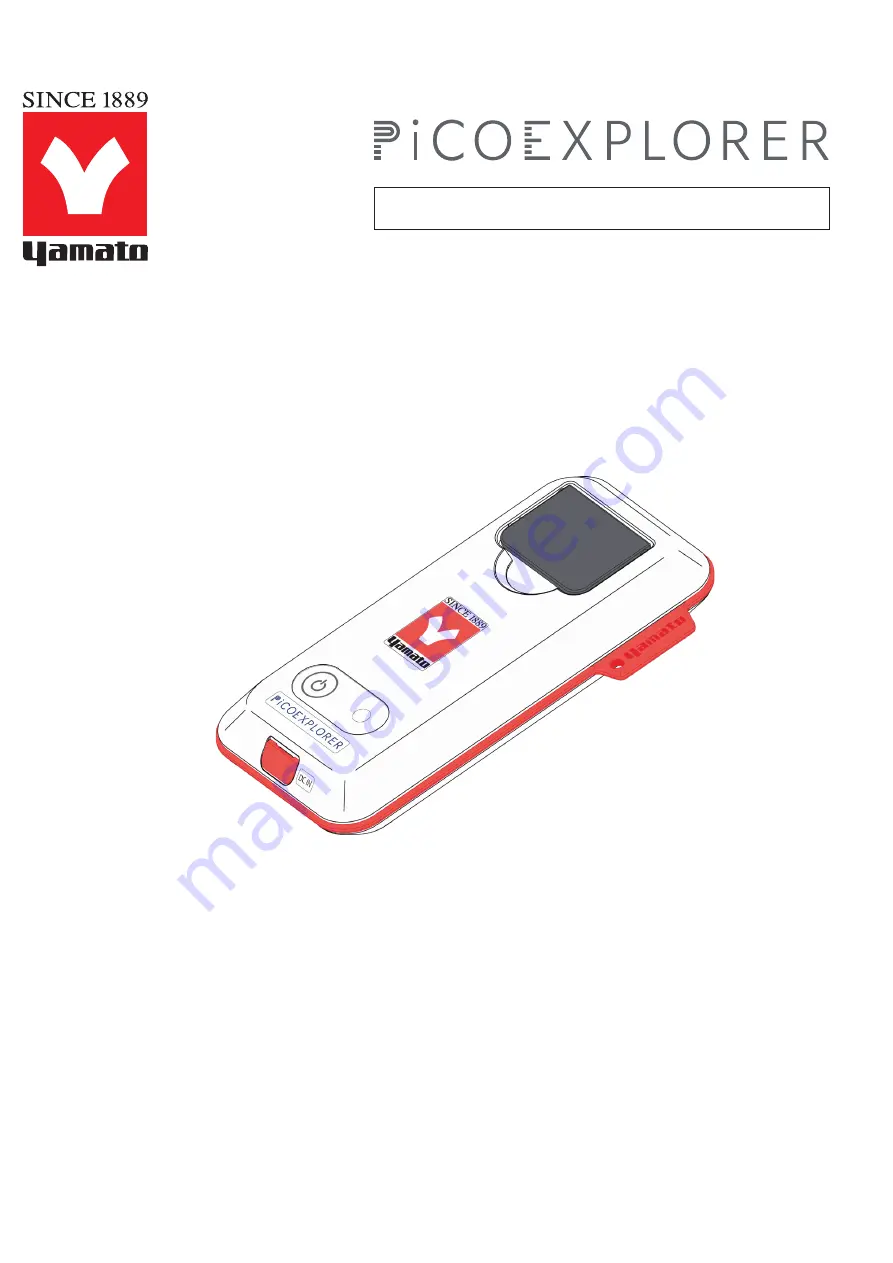
PAS-110-YU

Supported Version

Android: 3.1.1

iOS: 2.0.8

Photo Absorbance Sensor

Contents of this User’s Manual may change without notice.
Due to design improvements, and/or specification and app changes,  
PiCOEXPLORER

TM

 configuration may change without notice.

All company names and products names in this manual are the property of their 
respective trademark holders.
Patent Pending

Содержание PiCOEXPLORER PAS-110-YU

Страница 1: ...8 Photo Absorbance Sensor Contents of this User s Manual may change without notice Due to design improvements and or specification and app changes PiCOEXPLORERTM configuration may change without notice All company names and products names in this manual are the property of their respective trademark holders Patent Pending ...

Страница 2: ...vice thru a USB connector use a PC with a limited energy circuit USB out put or an AC adapter with a limited energy circuit used to power PCs CAUTION HANDLING OF PHOTO ABSORBANCE SENSOR This device is for general analytic use It was not designed for nor should it be used for medical diagnostic purposes requiring very high levels of reliability and or accuracy Yamato Scientific Co Ltd cannot be hel...

Страница 3: ...ng object on factory lines which require licensing low power wireless transmitters which do not require licensing and amateur wireless transmitters all of the above designated herein as other wireless transmitters Before using make sure there is no such wireless transmitter in the vicinity which could cause interference If you find that the operation of this device near another wireless transmitte...

Страница 4: ...ment Wavelength Range Selection 13 3 2 Blank Measurement 14 3 3 Measuring Known Concentrations 16 3 4 Graphing the Standard Curve 18 3 5 Standard Curve Loading Function 19 3 6 Unit Maintenance Function 20 3 7 Other Functions 23 4 Taking Measurements 25 4 1 Manual Measurement 26 4 2 Timed Measurement Simplified Kinetic Measurement 27 5 Turbidity Measurements 29 6 Displaying Previous Measurements 32...

Страница 5: ... LED as its light source You can verify PICOEXPLORERTM measurement results on your Smartphone or tablet PC by downloading a special application that uses Bluetooth communication to check the results of measurement The high sensitivity yet extremely compact design of this device is the result of breakthrough Silicone Optical Technology SOTTM Battery driven and portable Measurements can be taken dir...

Страница 6: ... measurement Power Switch Turn unit on and off Battery Cover Open to insert batteries Status Light Steady Red check battery level Steady Purple powered and connected via Bluetooth Low Energy Blinking Red Low voltage Blinking Blue measurement in progress Some batteries may fail without first blinking USB Interface Connector micro USB For connection with a USB cable Can be used to supply power inste...

Страница 7: ...tteries with the plus and minus markings on the inside of the battery case 3 Close the battery cover APP INSTALL BATTERY INSERTION CAUTION Make sure battery cover is securely fastened A loose cover may allow water to seep into the unit and cause damage Before opening the cover wipe off any liquid on the outside to prevent see page and possible damage APP INSTALL Please download and install the fre...

Страница 8: ...battery level falls too low the red light will begin blinking 2 Open the measurement chamber lid and set PCR tube into the measurement chamber Firmly close the lid 3 Launch the tablet application PAS 110 by tapping the icon Page10 1 Using the Top Screen 4 Make BLE connection Page11 2 Wireless Connection Note that the tube lid connector should fit snugly between the two guide projections at the bac...

Страница 9: ...TIONS Drawing Standard Curve Screen Concentration Measurement Screen Measurement History Screen Standard Curve Graph Screen 6 Measure concentration of the unknown sample Page25 4 Taking Measurements 7 Check previous measurements Page32 6 Displaying Previous Measurements 5 Draw a standard curve Page13 3 Graphing the Standard Curve TAKING MEASUREMENTS TAKING MEASUREMENTS 9 Copyright 2019 USHIO INC A...

Страница 10: ... unit goes to the connection setting screen P11 Return Button Go back to previous screen Android only With iOS on iPhone or iPad a Back button is located in the upper left corner of the screen Home Button Returns to the Home Screen Android only Maintenance Button Moves to the Maintenance Screen P36 On this screen you can also switch display languages between English and Japanese Bluetooth Connecti...

Страница 11: ...ss to connect Device Search Button Search for devices to connect to TAKING MEASUREMENTS 2 Wireless Connection Tap the Connection Setting Button on the top screen to move to this screen Illustration 2 1 Make sure that Bluetooth functionality is enabled on your Smartphone or tablet PC CAUTION If you are using an Android device it is necessary to turn on access permission to the location of the app a...

Страница 12: ... indicating selection Illustration 2 4 3 Tap the Connect Button to begin connecting 4 Once the connection is established tap the Return Button to return to the top screen TAKING MEASUREMENTS 1 Tap Device Search Button to search for photo absorbance sensor unit If not detected turn the photo absorb ance sensor off and on then tap the Device Search Button again If the photo absorbance sensor is foun...

Страница 13: ...sure known concentration sample data 4 Verify the standard curve graph CAUTION Before beginning the procedure be sure to tap the Clear Button 3 7 1 to clear previous data Tap the Standard Curve Button on the top screen to move to the Draw Standard Curve Screen Illustration 3 1 Wavelength Range Confirm Button 3 1 Measurement Wavelength Range Selection 1 Select the wavelength range for the sample to...

Страница 14: ...lank concentration into the measurement chamber 2 The LED output level is 10 by default but other levels can be selected Select the LED output level as appropriate according to blank measurement timing We recommend first taking a measurement at the 10 default level and then making adjustments later Page 15 5 Tap the the scrolling list Illustration 3 2 is displayed Then select the number and tap th...

Страница 15: ...ph of the curve Page 18 The measured intensity indicates the amount of light passing through the sample Absorption is calculated based on the blank measurement intensity and the measured intensity of the sample 5 The blank measurement intensity should fall in the range of 30000 to 60000 If the value is lower raise the LED output level Page 14 2 Also tap the RGB Switch Buttons and make sure that th...

Страница 16: ...s of samples of known concen trations 1 Set a sample into the measurement chamber of the photo absorbance sensor Concentration Units Select Button Known Concentration Input Area Always enter concentration values in ascending order in Input Areas 1 5 Known Concentration Sample Measurement Intensity Display Up to 3 measurements can be made on the sample displayed inside the dotted red line Standard ...

Страница 17: ... frame 5 Tap the Measure Button to begin measurement The measured value will be displayed in white font 6 The Absorbance Value Display will show the actual calculated absorbance 7 When this measurement is finished remove the cur rent sample in the photo absorbance sensor place the next sample in return to step 1 and repeat the process 8 When all the samples have been measured tap the Standard Curv...

Страница 18: ...ration 3 10 Also the coefficient of determination R2 is displayed at This value indicates the linearity of the data how well the least squares line fits the data is indicated by this value Standard Curve Graph Switch Button TAKING MEASUREMENTS 3 4 Graphing the Standard Curve Here we explain how to check the graph of created calibration curve 1 When you tap the Standard Curve Graph Display Button a...

Страница 19: ...ata to display the standard curve data selection screen 2 Select the standard curve data and tap the Load button The data loaded from the CSV file is displayed on the standard curve creation screen If the added unit is unavailable after saving the standard curve data mg mL will be selected If you add the unit again on the unit maintenance screen the unit will be available If you load a standard cu...

Страница 20: ...Function Here we show how to add new units in addition to the ones that are registered by initial setting mg mL μg mL ng mL and How to add a unit 1 Tap the Unit Maintenance Button on the standard curve creation screen to display the unit maintenance screen 2 Tap the Add Line Button on the unit maintenance screen to display the input line maximum 10 lines Unit Maintenance Button Add Line Button TAK...

Страница 21: ...HOOTING WARRANTY AND AFTER SERVICE SPECIFICATIONS LAWS AND REGULATIONS TAKING MEASUREMENTS 3 When you enter a unit it is added to the unit selection list on the standard curve creation screen Special characters such as μ cannot be entered 4 You can select the added unit by tapping it TAKING MEASUREMENTS 21 Copyright 2019 USHIO INC All Rights Reserved ...

Страница 22: ...S AND REGULATIONS TAKING MEASUREMENTS How to delete a unit 1 Tap the Unit Delete Select Button on the unit maintenance screen to display the Delete Button 2 When you tap the Delete Button the line is deleted and it is also removed from the unit selection list on the standard curve creation screen Unit Delete Select Button Delete Button TAKING MEASUREMENTS 22 Copyright 2019 USHIO INC All Rights Res...

Страница 23: ... Editing Data Values TAKING MEASUREMENTS 3 7 Other Functions This section describes miscellaneous functions of the app 1 Data Clear Function Tap the Clear Button to clear all data 2 Data Edit Button Tap the Known Concentration Input Area then the Edit Button to directly edit the data values Illustration 3 12 Clear Button Edit Button Graph Data Column Select Buttons Measurement Intensity Display Gr...

Страница 24: ...apping the Graph Data Column Select Buttons Illustration 3 13 With the initial setting absorbance based on average measured intensity is displayed Using this function absorbance can be calculated based on individual values of measured intensity 4 Graph Data Row Selection You can select the row of data to be applied to the standard curve graph by tapping the Graph Data Row Select Buttons Illustrati...

Страница 25: ...rd curve Unknown samples can be measured after creating a standard curve Pages 13 18 or recalling a previously prepared standard curve Page 19 Tap the Measure Button on the top screen to move to the Measurement Screen Illustration 4 1 Measure Button Standard Curve Graph Button Standard Curve Switch Buttons RGB Switch Buttons Title Input Box CSV File Button Concentration Units Selection Button Time...

Страница 26: ...ut upon tapping the Standard Curve Switch Buttons display switches to the measurement value green based on the least squares fit line 5 You can check the standard curve graph by tapping the Standard Curve Graph Button Measured values of unknown samples are plotted on the standard curve graph as open circles 6 Tap the CSV File Button to output the data values to a CSV file Page 34 7 Saving Data to ...

Страница 27: ...or measure the same sample more than once while automatically increase the measurement number n Measurement unit is limited to intensity value RGB How to start 1 Set timed measurement ON Pages 36 37 and enable the Timed Measurement Button 2 Tap Timed Measurement button Timed Measurement set ting screen pops up 3 In the Timed Measurement setting screen set the measurement interval and the measureme...

Страница 28: ...EASUREMENTS 4 Timed measurement starts immediately when you tap the Start Button Do not tap Back Home button or push the power button during the Timed Measurement The measurement will be stopped How to stop Tap the Timed Measurement Button while timed measurement is in progress opens the Timed Measurements screen Tap the Stop Button interrupts timed measurement TAKING MEASUREMENTS 28 Copyright 201...

Страница 29: ... blank solution Culture solution without E coli run blank measurement 3 Set the cultured E coli and measure Tap the Turbidity Measure Button on the top screen to move to the Turbidity Measurement Screen Illustration 5 1 Illustration 5 1 Turbidity Measurement Screen Measurement Button Operation is possible after the Blank Measurement Clear Button Conversion Factor Input Sectinon P31 Blank Measureme...

Страница 30: ...n Illustration 5 4 Measurable State Illustration 5 3 Blank Measurement Illustration 5 2 Calibration 3 Set the blank solution to the reference tap the Blank Measurement Start Illustration 5 3 4 Set the sample and tap the Measure Button Illustration 5 4 The O D of the sample is displayed If you have multile samples you can repeat measuremant in the same way 5 Tap the CSV File Button to output the da...

Страница 31: ...using the conversion value as a factor it can be converted to the O D of another device This factor is independent of the Absorbance Multiplier P37 8 Maintenance Screen The O D is calculated based on the following equation O D Measured Value Conversion Factor The Conversion Factor is not common to all the devics because the measurement value differs depending on the device Illustration 5 5 Convers...

Страница 32: ...ents Tap the Measurement History Button on the top screen to move to the Measurement History Screen Illustration 6 1 1 Previously saved measurement data can be checked by tapping the Saved Files Selection Area and selecting the saved data At the case of concentration measurement illustration 6 2 is displayed At the case of turbidity measurement illustration 6 3 is displayed Saved Files Selection A...

Страница 33: ...nits for the measurement value can be selected from among three options concentration inten sity RGB or absorbance ABS by tapping the Concentration Unit Selection Button shown in Illustration 6 4 3 Display switches to the unknown sample measurement value based on the least squares line when you tap the Standard Curve Switch Buttons 4 Display can be switched between measurement results for each of ...

Страница 34: ...Output Level Measurement Date Sensor Accumulation Time Sensor Accumulation Time Optical Density Temp Abs Conc 1 Conc 2 Absorbance Multiplier Conversion Factor Calibration Time 3 3 TRUE appears if a measurement has been taken FALSE if no measurement taken TRUE is displayed in all columns here because three measurement were taken For Android Devices Connect your Smartphone or tablet PC to your compu...

Страница 35: ...RRANTY AND AFTER SERVICE SPECIFICATIONS LAWS AND REGULATIONS Illustration 8 1 Info Screen OTHER SCREENS 8 Info Screen Tap the Info Button on the top screen to move to the Info Screen Illustration 8 1 The Info Screen displays information on both the hardware photo absorbance sensor and the mobile app OTHER SCREENS 35 Copyright 2019 USHIO INC All Rights Reserved ...

Страница 36: ...tion 9 1 Maintenance Screen OTHER SCREENS 9 Maintenance Screen Tap the Maintenance Button on the top screen to move to the Maintenance Screen Illustration 9 1 The Maintenance Screen displays the Diagnostics Button and Function Settings Buttons Diagnostics Button Tap to move to the Diagnostics Screen Function Settings Button Tap to move to the Function Settings Screen OTHER SCREENS 36 Copyright 201...

Страница 37: ...ange the time for light volume accumulation The initial setting is 50 ms If you change this setting set an appropriate LED output level as explained on pages 14 15 Timer Function Set the Timed Measurement function pages 27 28 Setting timed measurement ON enables the Timed Measurement Button Absorbance Multiplier Set the multiplier for absorbance display For example correlation with a previously us...

Страница 38: ...S LAWS AND REGULATIONS Illustration 10 Help Screen OTHER SCREENS 10 Help Screen Tap the Help Button on the top screen to move to the Help Screen Illustration 10 This screen provides a weblink to the user s manual troubleshooting guide and other relevant documentation Contact the Support Desk if you have any further questions or concerns OTHER SCREENS 38 Copyright 2019 USHIO INC All Rights Reserved...

Страница 39: ...lean then wipe again with a clean dry cloth to remove all excess moisture Measurement Chamber Do not use a stiff cloth to wipe the optical unit inside the chamber Doing so can easily damage this sensitive component Remove dust and other contaminants from the optical unit by carefully wiping with a clean soft cloth or cotton swab Long Term Storage If the device will not be used for a long time secu...

Страница 40: ...ur due to transmission by wireless LAN microwave or other Bluetooth devices in the vicinity Move device and receiver away from such devices Too many possible receivers nearby Turn off power to other nearby receivers Physical object blocking signal between device and receiver Relocate device and receiver or remove object Device address not displayed on Connection Setting Screen Please re scan Refer...

Страница 41: ... surface less than a 10 tilt from horizontal Sample concentration too strong Adjust output strength of LEDs Make sure you have used correct volume and type of sample and diluted correctly Sample concentration too weak Make sure you have used correct volume and type of sample and diluted correctly Device cannot operate in current environment Check operating parameters of device and use only in envi...

Страница 42: ... device tampering or disassembly failure due to improper device storage failure due to accidental dropping or hard impact or subjecting the device to undue pressure failure due to improper battery use or battery leakage failure due to device usage in a country not authorizing it If Something Seems Wrong If you suspect a problem with the device first follow these 3 simple steps Turn off power to th...

Страница 43: ...Detector Color Sensor Maximum absorption wavelength Wavelength range Red 615 nm 575 660 nm Green 530 nm 455 630 nm Blue 460 nm 400 540 nm Communication Interface Bluetooth low energy Bluetooth smart Frequency of operation 2402 2480 MHz Type of modulation GFSK Channel spacing 2 MHz Channel number 40 Peak output power Less than 0 dBm Antenna gain 2 41 dBi Antenna type PCB Antenna Compatible Device A...

Страница 44: ...arantee that interference will not occur in a particular installation If this equipment does cause harmful interference to radio or television reception which can be determined by turning the equipment off and on the user is encouraged to try to correct the interference by one or more of the following measures Reorient or relocate the receiving antenna Increase the separation between the equipment...

Отзывы: