background image

19 

4. Operating procedures


Operating procedures (auto stop operation)


Procedures for auto 
stop operation


Used when you want to “set automatic stop after set time has elapsed 
from the start of the fixed temperature operation.”


MEASURED TEMP.


HEATER

ALARM

AUTO STOP

AUTO START

ENTER


SET

TEMP.

OVER TEMP.

PROTECTOR

FIXED TEMP.

RUN


STOP


SUB  

MENU


TIMER


FIXED


TEMP.


PROGRAM 

PROGRAM


MEASURED TEMP.


HEATER

ALARM

AUTO STOP

AUTO START

ENTER


SET

TEMP.

OVER TEMP.

PROTECTOR

FIXED TEMP.

RUN


STOP


SUB  

MENU


TIMER


FIXED


TEMP.


PROGRAM 

PROGRAM


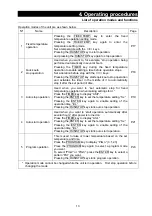
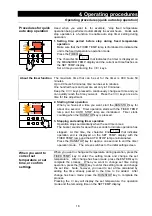
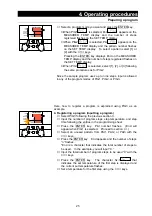
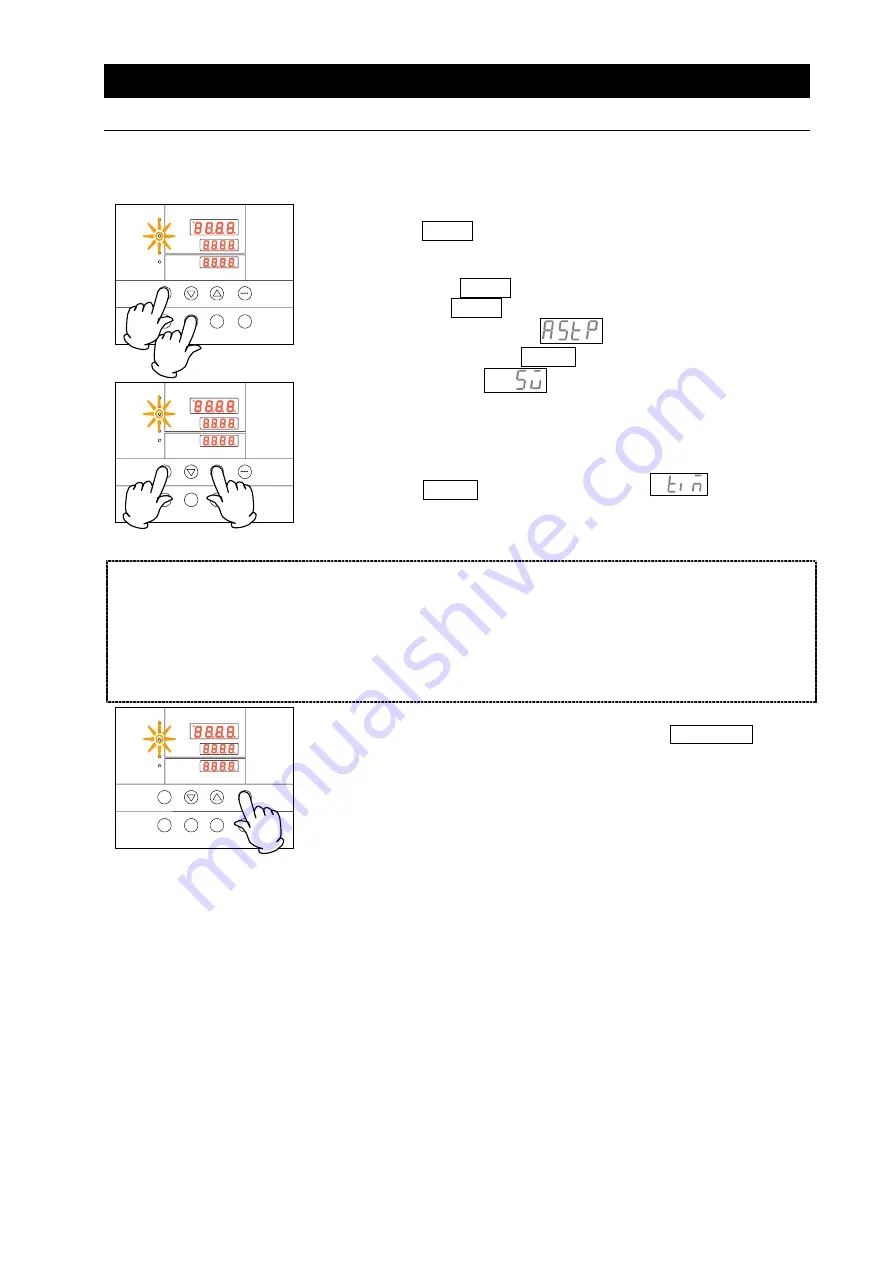
1.  Setting a stop time


Press the TIMER key in the initial screen.


The timer mode you used in the previous session is displayed on 
the SET TEMP. display.


Pressing the TIMER key again to flash the timer mode. 
Pressing the TIMER key again to flash the next timer mode. 

Select the character AStP

 that indicates the auto stop 

operation and press the ENTER key.


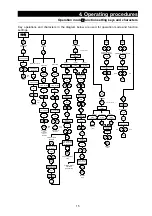
The character Sv

 that indicate a set temperature is 

displayed on the MEASURED TEMP. display on which the 
current set temperature flashes and the AUTO STOP lamp 
flashes.


Set a temperature you want using the 

▼▲

 keys.


Press the ENTER key.    The character tim

 that indicates 

the timer is displayed on the MEASURED TEMP. display and the 
current set time flashes on the SET TEMP. display.


Set a time you want using the 

▼▲

 keys.


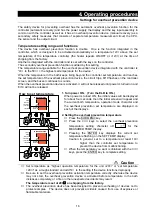
About the timer 

function


The maximum time that can be set for the timer is 999 hours 50 
minutes.


Up to 99 hours 59 minutes, time can be set in minutes.


One hundred hours and over are set only in 10 minutes.


Keep the 

▼▲

  keys pressed to continuously change set time and you 

can quickly reach the time you want.    Press the 

▼▲

  keys once at a 

time for fine adjustment.


MEASURED TEMP.


HEATER

ALARM

AUTO STOP

AUTO START

ENTER


SET

TEMP.

OVER TEMP.

PROTECTOR

FIXED TEMP.

RUN


STOP


SUB  

MENU


TIMER


FIXED


TEMP.


PROGRAM 

PROGRAM


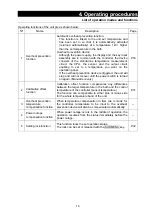
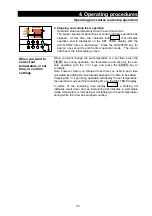
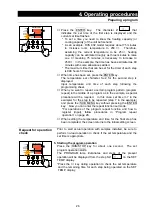
2.  Starting timer operation 

When you have set a time you want, start the RUN/STOP key for 
about one second. 
Timer operation starts with the AUTO STOP lamp is illuminated. 
Timer starts counting when the temperature in the bath (measured 
temperature) reaches the set temperature.   


Содержание DVS402

Страница 1: ...he Operating Instructions and Warranty before operating this unit to assure proper operation After reading these documents be sure to store them securely together with the Warranty at a handy place for future reference Warning Before operating the unit be sure to read carefully and fully understand important warnings in the operating instructions Yamato Scientific Co Ltd ...

Страница 2: ...op operation 19 Operating procedures auto start operation 21 Preparing a program 23 Program repeat operation 28 Programming sheet 29 Useful functions calibration offset function 31 Useful function lock function 32 5 Cautions on handling 33 6 Maintenance procedures 35 Daily inspection maintenance 35 7 When the unit is not to be used for a long time or when disposing 36 When the unit is not to be us...

Страница 3: ...a bone fracture or intoxication that may leave after effects or require hospitalization or outpatient visits for a long time Note 2 Minor injury means a wound or an electrical shock that does not require hospitalization or outpatient visits for a long time Note 3 Property damage means damage to facilities devices and buildings or other properties This pictogram indicates a matter that encourages t...

Страница 4: ... Hazard of explosion Caution General cautions Electrical shock Burning Caution for no liquid heating Caution for water leak For water only Poisonous material Prohibitions General bans Fire ban Do not disassemble Do not touch Compulsions General compulsions Connect ground wire Install levelly Pull out the power plug Regular inspection ...

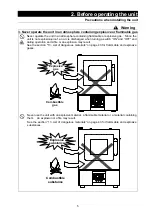
Страница 5: ...electrical power cords bundled When these are used bundled they might overheat causing a fire Take care not to damage electrical power cords Avoid tightly bend pull with a strong force or twist to prevent electrical power cords from damaging A fire or an electrical shock may result Never use an explosive or a flammable material with this unit Never use an explosive material a flammable material or...

Страница 6: ... grounding work is necessary and please consult your dealer or our nearest sales office When a bipolar type outlet tap is used Insert the ground adaptor included as an option into a power plug confirming the polarity of the outlet Connect the grounding wire green of the ground adaptor to the ground terminal on the power supply equipment 2 Carefully select an installation site Take special care not...

Страница 7: ...rged when turning a switch ON and OFF and during operation and a fire or an explosion may result See the section 13 List of dangerous materials on page 43 for flammable and explosive gases Never use the unit with an explosive material a flammable material or a material containing them An explosion or a fire may result See the section 13 List of dangerous materials on page 43 for flammable and expl...

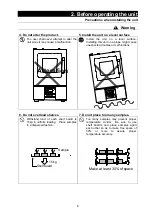
Страница 8: ...unit on a slope might cause unexpected troubles or malfunctions 6 Do not overload shelves 7 Do not place too many samples Withstand load of each shelf board is 15kg in uniform loading Place samples in a dispersed fashion Too many samples may prevent proper temperature control Be sure to use shelf boards and place samples apart each other so as to make free space of 30 or more to assure proper temp...

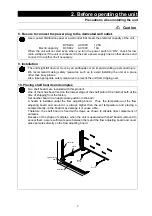
Страница 9: ...e safety measures to prevent the unit from tripping over 10 Placing shelf boards and samples Two shelf boards are included with this product One of them has been fixed on the lowest stage of the shelf pillar of the internal bath at the time of shipping from the factory Set another board to an appropriate position in the bath A heater is installed under the flow adjusting board Thus the temperature...

Страница 10: ... may burn and result in a fire or an electrical shock If the power cord should be damaged exposure of core wire or disconnection immediately turn the main unit off pull out the power cord plug out of the power supply and ask your dealer to replace the cord Otherwise a fire or an electrical shock may result Connect the power cord to an appropriate wall outlet 12 When you operate the unit for the fi...

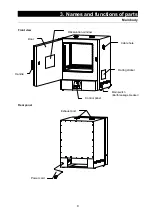
Страница 11: ...9 3 Names and functions of parts Main body Front view Rear panel Control panel Door Handle Main switch Earth leakage breaker Rating sticker Power cord Exhaust port Cable hole Observation window ...

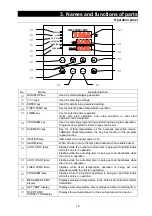
Страница 12: ...lock function or the program repeat function HEATER lamp Illuminates while heater power is on ALARM lamp When an error occurs the lamp illuminates with an audible buzzer AUTO STOP lamp Flashes while the quick auto stop timer is being set and illuminates while the unit is in operation Flashes while the auto stop timer is being set and illuminates while the unit is in operation AUTO START lamp Flash...

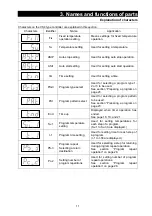
Страница 13: ...ion Preparing a program on page 23 PAt Program pattern select Used for selecting a program pattern to be used See section Preparing a program on page 23 End Time up Displayed when timer operation has ended See page 18 19 and 21 Sv 1 Program temperature setting Used for setting temperatures for each step of a program Sv 1 to Sv 30 are displayed t 1 Program time setting Used for setting time for eac...

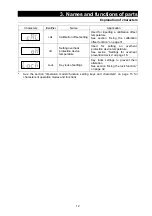
Страница 14: ...n on page 31 oH Setting overheat protection device temperature Used for setting an overheat protection device temperature See section Settings for overheat prevention device on page 16 Lock Key lock of settings Key locks settings to prevent their alteration See section Using the lock function on page 32 See the section Operation mode function setting keys and characters on page 15 for characters o...

Страница 15: ...d when you want to set automatic stop for fixed temperature operation when making settings for it Press the TIMER key to display AStP Pressing the ENTER key to set the temperature setting Sv Pressing the ENTER key again to enable setting of the operation time tim Pressing the RUN STOP key starts auto stop operation P 19 4 Auto start operation Used when you want to start operation automatically aft...

Страница 16: ... device is triggered the unit will stop and will not recover until the power switch is turned on again Manual recovery P 16 2 Calibration offset function Calibration offset function compensates any differences between the target temperature in the bath and the control temperature of the controller sensor temperature The function can compensate to either plus or minus side for the whole temperature...

Страница 17: ... 1 pattern PrG3 10 steps x 3 patterns PrG2 15 steps x 2 patterns Setting no of program steps End Sv 1 Program mode setting Step 1 Temp setting t 1 Step 1 Time setting Press to switch Temp and time are set in turn for each step ENTER Program operation start SUB MENU SUB MENU PS n Setting step No to return SUB MENU Pc n Setting no of step repetitions Program repeat operation PAt Program pattern sele...

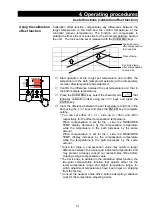
Страница 18: ...LB to ON When power is turned ON the initial values will be displayed for about four seconds then the initial screen will appear and the current bath temperature operation mode character and the overheat prevention set temperature are displayed on each of the displays MEASURED TEMP HEATER ALARM AUTO STOP AUTO START ENTER SET TEMP OVER TEMP PROTECTOR FIXED TEMP RUN STOP SUB MENU TIMER FIXED TEMP PR...

Страница 19: ...R FIXED TEMP PROGRAM PROGRAM MEASURED TEMP HEATER ALARM AUTO STOP AUTO START ENTER SET TEMP OVER TEMP PROTECTOR FIXED TEMP RUN STOP SUB MENU TIMER FIXED TEMP PROGRAM PROGRAM 2 Selecting an operation mode Press the FIXED TEMP key to display the fixed temperature operation mode on the SET TEMP display Display the character Fix 3 Setting the temperature Press the FIXED TEMP key again The character SV...

Страница 20: ...OTECTOR FIXED TEMP RUN STOP SUB MENU TIMER FIXED TEMP PROGRAM PROGRAM 2 Starting timer operation When you have set a time you want start the RUN STOP key for about one second Timer operation starts with the FIXED TEMP lamp and the AUTO STOP lamp are illuminated Timer starts counting when the RUN STOP key is pressed 3 Stopping and ending timer operation Operation stops automatically when the set ti...

Страница 21: ...layed on the MEASURED TEMP display on which the current set temperature flashes and the AUTO STOP lamp flashes Set a temperature you want using the keys Press the ENTER key The character tim that indicates the timer is displayed on the MEASURED TEMP display and the current set time flashes on the SET TEMP display Set a time you want using the keys About the timer function The maximum time that can...

Страница 22: ...itches to the initial setting screen When you want to correct set temperature or set time or confirm settings When you want change the set temperature or a set time press the TIMER key during operation set temperature and time for the auto stop operation with the keys and press the ENTER key to complete Note however when you change the set time you need to set a time calculated by adding the time ...

Страница 23: ...temperature is displayed on the MEASURED TEMP display on which the current set temperature flashes and the AUTO START lamp flashes Set a temperature you want using the keys Press the ENTER key The character tim that indicates the timer is displayed on the MEASURED TEMP display and the current set time flashes on the SET TEMP display and the AUTO START lamp flashes Set a time you want using the key...

Страница 24: ...ature or set time or confirm settings When you want change the set temperature or a set time press the TIMER key during operation set temperature and time for the auto start operation with the keys and press the ENTER key to complete Note however when you change the set time you need to set a time calculated by adding the time already passed to the time to be added Pressing the key during operatio...

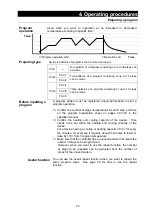
Страница 25: ...n Confirm the number of steps temperatures for each step and time on the program preparation sheet on pages 29 30 in the operation manual Confirm the heating and cooling capacity of the device Time needs to be set within the heating and cooling capacity of the device For a device having a cooling or heating capacity of 3 for every ten minutes for example it requires about 35 minutes to lower or ra...

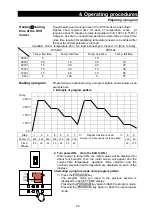
Страница 26: ...n below as an example here 1 Example of program pattern Temp 250 200 150 100 0 Step 1 2 3 4 5 6 7 8 9 Temp 250 250 200 200 150 150 100 100 50 Time Minute 80 30 20 30 30 30 40 Repeat function is used Number of steps needs not to be added 30 100 2 Turn power ON Turn the ELB to ON When power is turned ON the initial values will be displayed for about four seconds then the initial screen will appear a...

Страница 27: ...gram modes of PrG1 PrG2 or PrG3 Here how to register a program is explained using PrG3 as an example MEASURED TEMP HEATER ALARM AUTO STOP AUTO START ENTER SET TEMP OVER TEMP PROTECTOR FIXED TEMP RUN STOP SUB MENU TIMER FIXED TEMP PROGRAM PROGRAM 4 Registering a program inputting a program Select PrG3 following the previous section 3 Input the number of program steps step temperature and step time ...

Страница 28: ...in program pattern program repeat in the middle of a program as in the example a special procedure will be required In this case set time t 7 in the example for the step to be repeated step 7 in the example and press the SUB MENU key without pressing the ENTER key Now you can enter the repeat function set mode For operations of the program repeat function and how to register input follow procedure...

Страница 29: ...tes Keep the keys pressed to continuously change set time and you can quickly reach the time you want Press the keys once at a time for fine adjustment When you want to correct setting errors or confirm settings When you want to go back to previous steps for example to correct programming errors or to confirm settings press the FIXED TEMP key to return the setting screen to the previous screen Eve...

Страница 30: ...EMP display In the example the repeat function is input in the seventh step and PS 7 is displayed on the MEASURED TEMP display You can input a number 1 to 7 of a step to return to on the SET TEMP display and input the number of step 1 in the example using the keys Then press the SUB MENU key Character Pc n that indicates number of repetitions is displayed on the MEASURED TEMP display Input the num...

Страница 31: ...perating procedures Programming sheet Make duplicates as necessary Registration destination PrG1 PrG2 PrG3 PAt1 PAt2 PAt3 Control No Y M D Title of test Prepared by Program pattern 250 200 150 100 50 Step No ...

Страница 32: ...st Prepared by Program input values Set temperature Set time unit minutes Repeat function input Return destination No of times Step 1 Step 2 Step 3 Step 4 Step 5 Step 6 Step 7 Step 8 Step 9 Step 10 Step 11 Step 12 Step 13 Step 14 Step 15 Step 16 Step 17 Step 18 Step 19 Step 20 Step 21 Step 22 Step 23 Step 24 Step 25 Step 26 Step 27 Step 28 Step 29 Step 30 ...

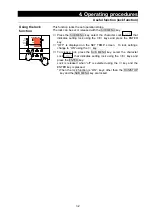
Страница 33: ...ture and that in the bath using the keys and press the ENTER key to complete setting You can set either of or side up to 99 and 99 respectively for the offset compensation temperature When compensation is set for the side the MEASURED TEMP display decreases by the compensation temperature while the temperature in the bath increases by the same amount When compensation is set for the side the MEASU...

Страница 34: ... MENU key Press the SUB MENU key select the character Lock that indicates setting lock using the keys and press the ENTER key OFF is displayed on the SET TEMP screen To lock settings change to ON using the key To release lock press the SUB MENU key select the character Lock that indicates setting lock using the keys and press the ENTER key Lock is released when off is selected using the key and th...

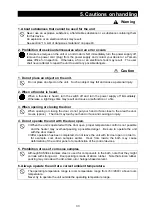
Страница 35: ...tion or a fire 3 When opening or closing the door When opening or closing the door do not put your hand or face close to the area the door moves space The door may touch your hand or face and causing an injury 4 Do not operate the unit with the door open When the unit is operated with the door open proper temperature control is not possible and the heater may overheat pausing a possible danger Be ...

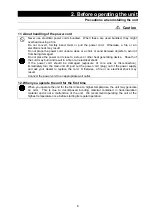
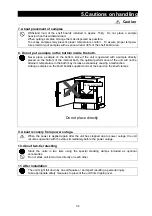
Страница 36: ...performance of the unit will not be attained temperature in the bath may increase excessively causing a malfunction Arrange samples on the shelf boards supplied and set the board on the shelf clamps Placing a shelf board 9 About recovery from power outage When the power is applied again after the unit has stopped due to power outage the unit resumes operation with the status immediately before the...

Страница 37: ...n z Wipe off any dirt with a tightly wrung soft cloth Never try to clean the unit with benzene thinner or scouring powder or rub with a scrubbing brush Deformation degradation or discoloration may result Every month z Inspect the functions of the ELB Test shall be performed with the power cord connected and power is being supplied to the unit First turn the ELB to ON Then press the test button on ...

Страница 38: ...ays pay attention to the preservation of the global environment We highly recommend taking the unit apart as far as possible for separation or recycling to contribute to the preservation of the global environment Major components and materials for the unit are as follows Names of major components Material Major mechanism part components Exterior Steel plate Melamine resin baking finish Interior St...

Страница 39: ...n the temperature sensor Contact our service department SSR short circuit detected Alarm lamp on appears z SSR short circuit Contact our service department Heater disconnection detected Alarm lamp on appears z Heater disconnection Contact our service department Memory error Alarm lamp on appears z Memory setting error Contact our service department Internal communication error Alarm lamp on appear...

Страница 40: ...ad for inside the bath is too large Temperature fluctuates during operation z Check if the set temperature is appropriate z Check if the power supply voltage has declined z Check if ambient temperature fluctuates widely z Check if cooling load for inside the bath is too large Displayed temperature differs from the measurement z Check if the calibration offset setting is other than 0 Set it to 0 Co...

Страница 41: ... please fill in your dealer date of purchase and other information and store securely Warranty period is one full year from the date of purchase Repair service for free is available according to the conditions written on the warranty card For repairs after the warranty period consult your dealer or one of our sales offices Paid repair service is available on your request when the product s functio...

Страница 42: ...ion Sensor K thermocouple Control part Auxiliary functions Lock function calibration offset function power outage compensation function Self diagnostic function Temperature sensor error heater error memory error SSR short circuit auto overheat prevention measured temperature error Safety device Protection device ELB with an over current protector overheat prevention device electronic type with an ...

Страница 43: ...8 CN1 1 18 1 18 PIO CN9 CN2 1 18 1 18 1 2 3 4 CN4 5 6 1 3 CN5 2 Symbol Part name Symbol Part name ELB ELB with an over current protector CONT Control circuit board T Terminal block PIO Display circuit board H Heater TH1 Control sensor X Main relay TH2 Overheat prevention sensor SSR No contact relay CT Current detection element ...

Страница 44: ...20000053 3 VS3 4 Display circuit boards VS3 4 Yamato 1020000051 4 Tough card 300 mm Yamato 1130000008 5 Main relay AHE1254 100V Matsushita 2050000019 6 SSR TRS5225 Toho 2160000035 7 Power cord kit 2 0sq 3P Plug Yamato LT00008924 8 ELB with an over current protector BJS153 15A DVS402 BJS203 20A DVS602 Matsushita 2060050001 2060050002 9 Current detection element CTL 6 S H URD 2170010005 ...

Страница 45: ... ammonium perchlorate and other inorganic perchlorates Potassium nitrate sodium nitrate ammonium nitrate and other nitrates Sodium chlorite and other chlorites Oxidizing substances Calcium hypochlorite and other hypochlorites Ethyl ether gasoline acetaldehyde propylene chloride carbon disulfide and other substances with ignition point at a degree 30 or more degrees below zero n hexane ethylene oxi...

Страница 46: ...Specification power supply P 4 P 7 P 40 2 Operation start Starts operation Performs fixed temperature operation auto stop operation auto start operation or program operation 2 Before operating the unit Installation procedures 4 Operating procedures P 4 8 P 13 32 Description 1 Operational descriptions Explain operations of each com ponent according to the operational instructions 4 Operating proced...

Страница 47: ...er attempt to perform matters prohibited in this operation instruction Otherwise an unexpected accident may result Notice Descriptions in this operating instruction are subject to change without notice We will replace a manual with a missing page or paging disorder Operating instruction Constant Temperature Drying Oven DVS402 602 First edition 17 September 2004 Yamato Scientific Co Ltd 103 8432 2 ...

Отзывы: