CABLE ROUTING
2-64
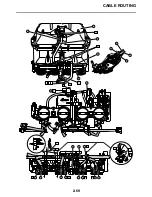
1. Right handlebar switch lead
2. Headlight sub-wire harness
3. Right radiator fan motor lead
4. AC magneto lead
5. Atmospheric pressure sensor
6. Throttle position sensor (for throttle cable
pulley)
7. Throttle servo motor
8. O
2
sensor lead
9. Rear brake light switch lead
10.Ignition coil lead
11.Crankshaft position sensor lead
12.Coolant reservoir hose
13.Starter motor lead
14.Battery negative lead
15.Canister purge hose (California only)
16.Sidestand switch
17.Oil level switch lead
18.Gear position sensor lead
19.Speed sensor lead
20.Sidestand switch lead
21.Secondary injector sub-wire harness
22.Throttle sub-wire harness
23.Intake funnel servo motor lead
24.Throttle position sensor (for throttle valves)
25.Intake air pressure sensor
26.Radiator stay
27.Frame boss
28.Clutch cable
29.Stay 1
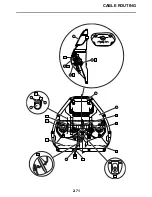
30.Main harness
31.Main switch lead
32.Steering damper lead
33.Left handlebar switch lead
A. Clamp the clutch cable and right handlebar
switch lead to inside of the radiator stay
with the clamp aligning to their white tape
marks.
B. After connecting the main harness and
headlight sub-wire harness, insert them
into the rectifier/regulator bracket stay.
C. To the radiator
D. Route the coolant reservoir hose, main
harness and AC magneto lead in this order
from the top. Each of them can either be
right or left.
E. Route the ignition coil lead through the
heat protector hole and to right of the
engine.
F. Route the coolant reservoir hose in front of
the crankcase breather hose and to the
coolant reservoir tank. Route it as shown in
the illustration and it should not touch the
air bleed hose clip.
G. Route the main harness behind the crank-
case breather hose.
H. Route the starter motor lead and fuel pump
lead under the fuel tank breather hose and
fuel tank overflow hose, behind the fuel
hose and above the ground lead and bat-
tery negative lead.
I. Clamp at position of the starter motor lead
(white) and fuel pump branch lead (purple).
Do not cut the end and face the clamp to
the back.
J. Install with the ground lead at the bottom
and the battery negative lead on the top.
Install the rivet of the each lead facing up.
Angle of installing each lead is shown in
the illustration.
K. Route the canister purge hose under the
wire harness and air bleeding hose and
above the coolant reservoir hose.
L. Route the sidestand switch lead outside of
the installation dotted line at the back of the
coolant reservoir tank.
M. Connect the oil level switch lead, gear posi-
tion sensor lead, speed sensor lead and
sidestand switch lead (order insignificant)
and put the connector cover on.
N. To the AC magneto
O. To the coolant reservoir tank
P. The intake funnel servo motor lead can
either be on top or bottom of the branched
secondary injector sub-wire harness and
throttle sub-wire harness.
Q. To the throttle body
R. To the air filter case
S. To the intake funnel servo motor
T. Clamp the main switch lead, left handlebar
switch lead and steering damper lead
between the radiator stay and main har-
ness. Ratchet of the clamp can face in any
direction.
U. To the intake air temperature sensor and
headlight
V. Clamp the main switch lead, left handlebar
switch lead and steering damper lead to
inside of the radiator stay with the clamp
aligning to their white and blue tape marks.
W. End of the clamp should be at front and
facing down.
X. Clamp the coolant reservoir hose and
water pump bypass hose.
Y. Install the coolant reservoir hose with the
clamp opening facing up.
Z. Fit the connector cover including the oil
level switch lead, gear position sensor
lead, speed sensor lead and sidestand
switch lead (order insignificant) between
the thermostat bypass hose 2 and main
harness.
AA.Install the water pump bypass hose with its
clamp opening facing right of the vehicle.
AB.Clamp the secondary injector sub-wire
harness and throttle sub-wire harness at
the protector. Face the end of the clamp
downward.
Содержание YZFR1Y(C) 2009
Страница 1: ...SERVICE MANUAL YZFR1Y C 14B 28197 10 LIT 11616 22 78 2009 ...
Страница 6: ......
Страница 8: ......
Страница 36: ...SPECIAL TOOLS 1 27 ...
Страница 66: ...LUBRICATION SYSTEM CHART AND DIAGRAMS 2 29 EAS20410 LUBRICATION DIAGRAMS ...
Страница 68: ...LUBRICATION SYSTEM CHART AND DIAGRAMS 2 31 ...
Страница 70: ...LUBRICATION SYSTEM CHART AND DIAGRAMS 2 33 ...
Страница 72: ...LUBRICATION SYSTEM CHART AND DIAGRAMS 2 35 ...
Страница 73: ...LUBRICATION SYSTEM CHART AND DIAGRAMS 2 36 1 Main axle 2 Oil water pump assembly ...
Страница 74: ...LUBRICATION SYSTEM CHART AND DIAGRAMS 2 37 ...
Страница 75: ...LUBRICATION SYSTEM CHART AND DIAGRAMS 2 38 1 Main axle 2 Oil delivery pipe 2 3 Drive axle ...
Страница 76: ...LUBRICATION SYSTEM CHART AND DIAGRAMS 2 39 ...
Страница 78: ...LUBRICATION SYSTEM CHART AND DIAGRAMS 2 41 ...
Страница 80: ...LUBRICATION SYSTEM CHART AND DIAGRAMS 2 43 ...
Страница 81: ...LUBRICATION SYSTEM CHART AND DIAGRAMS 2 44 1 Balancer shaft 2 Crankshaft ...
Страница 82: ...COOLING SYSTEM DIAGRAMS 2 45 EAS20420 COOLING SYSTEM DIAGRAMS ...
Страница 83: ...COOLING SYSTEM DIAGRAMS 2 46 1 Oil water pump assembly 2 Radiator 3 Radiator fan 4 Thermostat 5 Oil cooler ...
Страница 84: ...COOLING SYSTEM DIAGRAMS 2 47 ...
Страница 85: ...COOLING SYSTEM DIAGRAMS 2 48 1 Radiator cap 2 Radiator 3 Radiator fan 4 Oil cooler ...
Страница 86: ...CABLE ROUTING 2 49 EAS20430 CABLE ROUTING ...
Страница 88: ...CABLE ROUTING 2 51 ...
Страница 90: ...CABLE ROUTING 2 53 ...
Страница 92: ...CABLE ROUTING 2 55 ...
Страница 94: ...CABLE ROUTING 2 57 ...
Страница 96: ...CABLE ROUTING 2 59 ...
Страница 98: ...CABLE ROUTING 2 61 ...
Страница 100: ...CABLE ROUTING 2 63 ...
Страница 102: ...CABLE ROUTING 2 65 ...
Страница 104: ...CABLE ROUTING 2 67 ...
Страница 106: ...CABLE ROUTING 2 69 ...
Страница 108: ...CABLE ROUTING 2 71 ...
Страница 110: ...CABLE ROUTING 2 73 ...
Страница 113: ......
Страница 148: ...PERIODIC MAINTENANCE 3 35 ...
Страница 253: ...ENGINE REMOVAL 5 12 Installed depth of gasket c 3 5 mm 0 14 in ...
Страница 280: ...GENERATOR 5 39 4 Apply Sealant onto the stator coil lead grommet 1 Yamaha bond No 1215 Three Bond No 1215 90890 85505 ...
Страница 286: ...PICKUP ROTOR 5 45 Yamaha bond No 1215 Three Bond No 1215 90890 85505 ...
Страница 291: ...ELECTRIC STARTER 5 50 ...
Страница 340: ...TRANSMISSION 5 99 ...
Страница 356: ...WATER PUMP 6 15 ...
Страница 378: ...AIR INDUCTION SYSTEM 7 21 EAS27040 AIR INDUCTION SYSTEM ...
Страница 384: ...AIR INDUCTION SYSTEM 7 27 ...
Страница 387: ......
Страница 388: ...IGNITION SYSTEM 8 1 EAS27090 IGNITION SYSTEM EAS27110 CIRCUIT DIAGRAM ...
Страница 394: ...ELECTRIC STARTING SYSTEM 8 7 EAS27160 ELECTRIC STARTING SYSTEM EAS27170 CIRCUIT DIAGRAM ...
Страница 400: ...CHARGING SYSTEM 8 13 EAS27200 CHARGING SYSTEM EAS27210 CIRCUIT DIAGRAM ...
Страница 401: ...CHARGING SYSTEM 8 14 2 AC magneto 3 Rectifier regulator 4 Main fuse 7 Battery 95 Engine ground 96 Battery negative lead ...
Страница 403: ...CHARGING SYSTEM 8 16 ...
Страница 404: ...LIGHTING SYSTEM 8 17 EAS27240 LIGHTING SYSTEM EAS27250 CIRCUIT DIAGRAM ...
Страница 408: ...SIGNALING SYSTEM 8 21 EAS27270 SIGNALING SYSTEM EAS27280 CIRCUIT DIAGRAM ...
Страница 415: ...SIGNALING SYSTEM 8 28 ...
Страница 416: ...COOLING SYSTEM 8 29 EAS27300 COOLING SYSTEM EAS27310 CIRCUIT DIAGRAM ...
Страница 419: ...COOLING SYSTEM 8 32 ...
Страница 420: ...FUEL INJECTION SYSTEM 8 33 EAS27330 FUEL INJECTION SYSTEM EAS27340 CIRCUIT DIAGRAM ...
Страница 484: ...FUEL PUMP SYSTEM 8 97 EAS27550 FUEL PUMP SYSTEM EAS27560 CIRCUIT DIAGRAM ...
Страница 488: ...ELECTRICAL COMPONENTS 8 101 EAS27972 ELECTRICAL COMPONENTS ...
Страница 490: ...ELECTRICAL COMPONENTS 8 103 ...
Страница 492: ...ELECTRICAL COMPONENTS 8 105 EAS27980 CHECKING THE SWITCHES ...
Страница 516: ...ELECTRICAL COMPONENTS 8 129 ...
Страница 523: ......
Страница 524: ...YAMAHA MOTOR CO LTD 2500 SHINGAI IWATA SHIZUOKA JAPAN ...
Страница 525: ...WIRING DIAGRAM YZFR1Y C ...
Страница 526: ...WIRING DIAGRAM YZFR1Y C ...


