


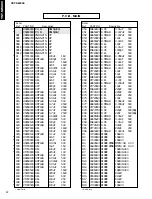
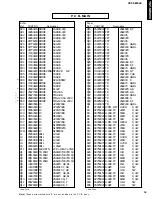

YST-SW800
YST-SW800
3
■
DISASSEMBLY PROCEDURES
(Remove parts in the order as numbered.)
1. Removal of Front Panel Ass'y
Remove 4 screws (
q
) and then remove the Front
Panel Ass'y in Fig. 1.
* Use an Allen wrench (3mm) to unscrew the Front
Panel Ass'y.
Fig. 2
Fig. 1
*
When assembling the Rear Panel, check to ensure that
the gasket is not damaged so as to prevent air leakage
from occurring.
Fig. 3
2. Removal of Loud Speaker
a. Remove 8 screws (
w
) and then remove the Base
Ass'y in Fig. 2.
b. Remove 8 screws (
e
) and then remove the Loud
Speaker in Fig. 2.
3. Removal of Rear Panel Ass'y
Remove 16 screws (
r
) in Fig. 3.
*
Arrow marks ( ) are printed to identify the screws to be
removed.
●
Installation of emblem
1. Put the emblem into the cabinet at the specified posi-
tion.
2. Place a piece of cloth/wood on top of the emblem.
3. Using a mallet, hammer the emblem in place through
the cloth/wood.
* Use special care not to cause damage to the emblem or
cabinet while hammering the emblem.
q
q
Front Panel Ass'y
Main (5) P.C.B.
w
w
w
w
e
e
Loud Speaker
Base Ass'y
r
Rear Panel Ass'y
r
Содержание YST-SW800
Страница 3: ...YST SW800 YST SW800 REAR PANEL 2 U C models A model B G models ...
Страница 26: ...YST SW800 YST SW800 ...