AUTO SETUP (IntelliBeam)
33
En
SETUP
English
5
Press
/
to select BEAM+SOUND
OPTIMZ, BEAM OPTIMZ only, or SOUND
OPTIMZ only and then press ENTER.
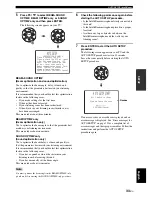
The following screen appears on your TV.
BEAM+SOUND OPTIMZ
(Beam optimization and sound optimization)
Use to optimize the beam angle, delay, volume, and
quality so that the parameters best match your listening
environment.
It is recommended that you should select this optimization
feature in the following cases:
• If you make settings for the first time.
• If the unit has been relocated.
• If your listening room has been restructured.
• If the objects in your listening room (furniture, etc.)
have been rearranged.
This menu takes about three minutes.
BEAM OPTIMZ only
(Beam optimization only)
Use to optimize the beam angle so that the parameter best
matches your listening environment.
This menu takes about one minute.
SOUND OPTIMZ only
(Sound optimization only)
Use to optimize the beam delay, volume, and quality so
that the parameters best match your listening environment.
It is recommended that you should select this optimization
feature in the following cases:
• If you have opened or closed the curtains in your
listening room before using this unit.
• If you have manually set the beam angle.
This menu takes about two minutes.
You must optimize the beam angle in the BEAM OPTIMZ only
procedure before starting the SOUND OPTIMZ only procedure.
6
Check the following points once again before
starting the AUTO SETUP procedure.
• Is the IntelliBeam microphone firmly connected to
this unit?
• Is the IntelliBeam microphone placed in a proper
location?
• Are there any large obstacles in between the
IntelliBeam microphone and the walls in your
listening room?
7
Press ENTER to start the AUTO SETUP
procedure.
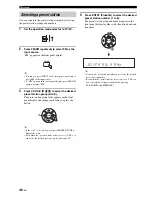
The following screen appears on your TV and the
AUTO SETUP procedure starts in 10 seconds.
Leave the room quietly before starting the AUTO
SETUP procedure.
If an error occurs, an error buzzer is played and an
error message is displayed. See “Error messages for
AUTO SETUP” on page 35 for a complete list of
error messages and their proper remedies. Follow the
instructions and perform the AUTO SETUP
procedure again.
Note
ENTER
ENTER
PREPARATION & CHECK
Please connect the MIC.
Please place the MIC at least
1.8m/6ft away from the YSP
unit. The MIC should be set
at ear level when seated.
Measurement takes about 3min.
After [ENTER] is pressed,
please leave the room.
[ENTER]:Start [RETURN]:Cancel
AUTO SETUP
Will begin in 10sec
Please leave the room
**--------
[RETURN]:Cancel
AUTO SETUP START
ENTER
←
Flashes
Содержание YSP-3050 - Digital Sound Projector Home Theater...
Страница 1: ...YSP 3050 YSP 3050 Digital Sound ProjectorTM OWNER S MANUAL U ...
Страница 114: ......
Страница 115: ......


