background image

16

 En

Initial Setup

8

Check the confirmation screen, then select 
“Test”.

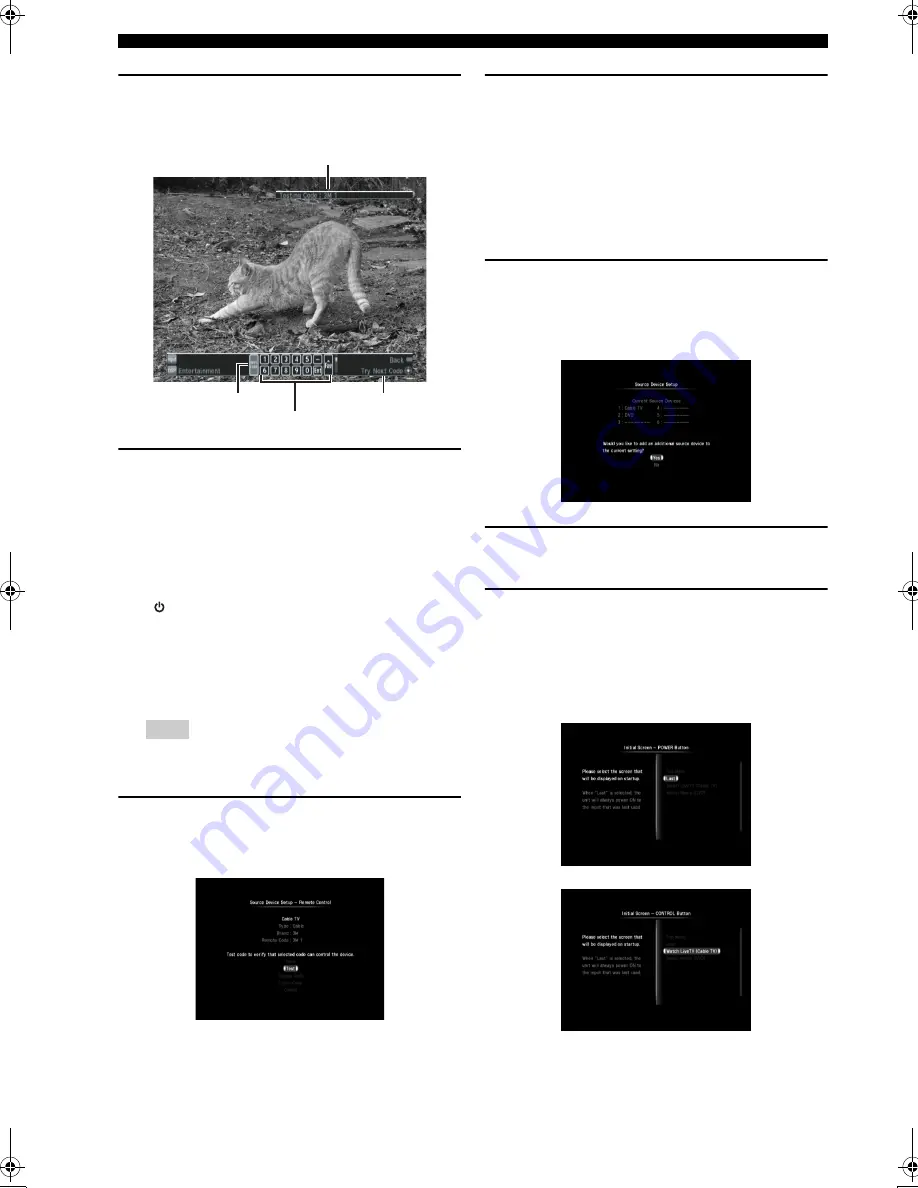
The following test screen appears:

9

Test some of the controls on the virtual 
remote control which is displayed on the 
screen to check whether the controls 
function correctly.

u

 / 

d

 / 

j

 / 

i

: Moves the highlight.

ENTER

: Tests the function.

We recommend that you select some buttons besides 

 (Power On/Off)” to test the function.

If controls do not function properly, select “NEXT 
CODE” at the left edge of the virtual remote control. 
The remote control code switches and you can try the 
next remote control code. (Example: from Yamaha1 
to Yamaha2)

If the brand has only one set of remote control codes, 
“NEXT CODE” does not function.

10

When you find the remote control code 
works (or not), press 

BACK

 on the remote 

control to return to the confirmation screen.

11

When you find a proper remote control code, 
select “Save” to complete the registration.

y

• If you want to discard the setting and make a new setting, 

select “Change Code”.

• If this unit does not control the device with any of the 

codes provided for the brand, select “Learn Code” to recall 
the Remote Code Learning screen (

P. 40) and program 

the remote control code manually.

12

Select “Yes” to register another input source 
device and repeat steps 2 to 11 until all 
devices listed in the Quick Start Guide are 
set.

13

Select “No” to complete the input source 
device registration.

14

Select the first screen to be displayed when 
you turn on this unit by pressing 

POWER

 or 

CONTROL

.

For example, you can set this unit to display the cable 
box (STB) screen when you turn on this unit by 
pressing 

CONTROL

.

Note

The remote control code being tested

NEXT CODE

Virtual remote control

Function of the 
selected button

01EN_00_YMC-700_500_U.book  Page 16  Wednesday, April 8, 2009  11:46 AM

Содержание YMC S21 - neoHD AV System

Страница 1: ...OWNER S MANUAL Media Controller YMC 700 YMC 500 U ...

Страница 2: ...ng 27 Using the photos as a screen saver 27 Enjoying contents stored on your iPod 28 Listening to music contents 29 Watching video contents 29 Repeat play and shuffle play 29 Listening to Internet Radio YMC 700 only 30 Listening to the Rhapsody service YMC 700 only 32 Useful functions 33 Enjoying Bluetooth components 35 Pairing 35 Setup menu 36 Setup menu tree 36 Initial Setup 37 Speaker menu 37 S...

Страница 3: ...ssion capability x v Color video signal transmission capability High resolution video signal capability High definition digital audio format signal capability HDCP High bandwidth Digital Content Protection System licensed by Digital Content Protection LLC Analog to HDMI video up conversion Digital audio decoders Dolby TrueHD Dolby Digital Plus Dolby Digital decoder DTS 96 24 DTS decoder Radio tune...

Страница 4: ... v Color is a trademark of Sony Corporation Rhapsody and the Rhapsody logo are registered trademarks of RealNetworks Inc The Wi Fi CERTIFIED Logo is a certification mark of the Wi Fi Alliance Windows XP Windows Vista Windows Media Audio Windows Media Connect and Windows Media Player are either registered trademarks or trademarks of Microsoft corporation in the United States and or other countries ...

Страница 5: ...ndby mode In the standby mode this unit consumes a small amount of power in order to receive infrared signals from the remote control Note Volume knob Controls the volume level WIRELESS antenna YMC 700 only Within 6 m 20 ft 30 30 CONTROL u d j i ENTER BACK These buttons work in the same way as the corresponding buttons on the remote control P 5 Power indicator Lights up when this unit is turned on...

Страница 6: ... to the standby mode P 19 43 TV POWER Turns on the TV or sets it to the standby mode individually while this unit is turned on MENU GUIDE EXIT PREV CH u d These buttons work differently depending on the currently selected source component P 21 j i u d ENTER When the GUI screen or the virtual remote control is displayed Move the highlight with j i u d and select it with ENTER When the playback scre...

Страница 7: ...R flashers to the REMOTE CONTROL OUT 1 and 2 jacks y You can attach the IR flashers to any of the components used in conjunction with this unit because the same signal is output from the REMOTE CONTROL OUT 1 2 and 3 jacks P 8 Setup P 25 40 Caution Be sure to use speakers with 6 ohm or higher impedance Do not let the bare speaker wires touch each other or do not let them touch any metal part of thi...

Страница 8: ... as the YDS 11 sold separately or Bluetooth wireless audio receiver such as the YBA 10 sold separately using its dedicated cable If you experience poor reception quality install an outdoor antenna Consult the nearest authorized Yamaha dealer or service center about outdoor antennas FM antenna TV Modem PC Router TV HDMI IN Indoor FM antenna supplied Wireless network Audio Video components iPod dock...

Страница 9: ...in remote control codes for most functions of many audio video components The remote control codes can be learned assigning them to the remote control of this unit or to the virtual remote control P 21 The unit transmits the proper codes to the different devices through the IR flasher USB FRONT REMOTE CONTROL SPE OUT IN AC IN 1 2 R 3 SENSOR SENSOR Peel off the wax paper before attaching the flashe...

Страница 10: ...TREME function of this unit P 38 51 Placing speakers FR FL SL SR SW C 60 30 FL FR C SL SR SR 80 SL FL Front left speaker FR Front right speaker C Center speaker SR Surround right speaker SL Surround left speaker SW Subwoofer FR FL SW 30 to 60 FL FR FL Front left speaker FR Front right speaker SW Subwoofer For other speaker combinations You can enjoy multi channel sources by using a speaker combina...

Страница 11: ...noise the results may not be satisfactory Auto Speaker Setup YPAO uses unique technology to optimally calibrate the frequency response and level according to the speaker configuration characteristics and their distance 1 Turn on the TV then set the video input source selector of the TV to HDMI 1 etc Refer to the owner s manual of the TV for details 2 Turn on the connected source devices and subwoo...

Страница 12: ...an perform it later P 37 6 Connect the supplied YPAO Mic to the YPAO MIC jack 7 Place the YPAO Mic at your normal listening position y It is recommended that you use a tripod the backrest of the sofa etc to affix the YPAO Mic at the same height as your ears would be when you are seated in your listening position You can use the attached screw of a tripod etc to fix the YPAO Mic to the tripod etc C...

Страница 13: ...eaker cable is disconnected Too Loud Subwoofer SWFR only The level of the subwoofer is too high Too Low Subwoofer SWFR only The level of the subwoofer is too low If you are not satisfied with the result check the speaker connections and or subwoofer level then select Retry y If you want to proceed with the Initial Setup process without using the result of the measurements select Cancel 10 Disconne...

Страница 14: ...ol code When multiple remote control codes are displayed select the first one Registration confirmation appears Save Confirm the displayed setting Test Perform the function test Change Code Select another code Learn Code Jump to the TV Remote Code Learning screen P 42 Select this if you want to program the remote control code manually Cancel Skip the TV remote control settings You can set them lat...

Страница 15: ...immediately This unit does not contain all possible codes for commercially available TVs If this unit does not turn the TV off on with the codes provided for that brand select Learn Code to recall the TV Remote Code Learning screen P 42 and program the remote control code manually 8 Select Save to finish the TV remote control code setting and proceed with the Initial Setup process y When you want ...

Страница 16: ... confirmation screen then select Yes The device type connection method and names of the input displayed in the Watch Listen Play source menu screens P 18 are shown y When you want to change the setting select Retry If you want to discard the setting select Cancel 5 Select Yes to set the remote control code of the device The Source Device Setup Remote Control screen appears If you select Other in s...

Страница 17: ...n the remote control to return to the confirmation screen 11 When you find a proper remote control code select Save to complete the registration y If you want to discard the setting and make a new setting select Change Code If this unit does not control the device with any of the codes provided for the brand select Learn Code to recall the Remote Code Learning screen P 40 and program the remote co...

Страница 18: ...17 En Initial Setup SETUP 15 Select OK to complete the Initial Setup procedure y You can change the first screen to be displayed later P 43 ...

Страница 19: ...age Disc Disc Reorder Now playing DSP Program Audio Adjustment Example Example etc Select an activity Select Select Setup Setup Pop up menu Setup menu P 36 Virtual remote control for external source devices P 21 Pop up menu Select the Pop up menu icon Top menu Top menu Source menu Source menu Examples Source screen CONTROL CONTROL CONTROL CONTROL BACK ENTER ENTER Select a source BACK ENTER ENTER B...

Страница 20: ...ctly the TV turns on automatically You can change the behavior of the TV power control function Connection P 8 IR setting P 42 TV Power Control P 42 2 Select an input source Select an input source using the GUI screen on the TV Refer to the previous page and the instructions above The source component turns on automatically You can change the behavior of the power control function Connection P 8 I...

Страница 21: ...p up menu Virtual remote control next page Next page MUTE PAGE CH VOL EXIT ENTER PREV MENU GUIDE POWER TV POWER CONTROL ENTER BACK CONTROL CONTROL ENTER Disc Disc 100 10 Ent 0 9 8 7 6 5 4 3 2 1 L 1 L 8 L 2 L 9 L 3 L 10 L 4 L 11 L 5 L 12 L 6 L 13 L 7 L 14 Angle Display Subtitle Setup Audio 1 Select the desired source on the source menu screen The source device turns on automatically You can change ...

Страница 22: ...r your favorite TV stations and recall them easily TV Favorite P 42 Exclusive learning buttons L1 L14 Use these exclusive learning buttons L1 L14 on the virtual remote control to recall the programmed function of the other remote control You can name the buttons freely P 40 y The displayed buttons vary depending on the type of the component being played back Some buttons may not work depending on ...

Страница 23: ... screen Manual search screen Preset list DSP Program Audio Adjustment P 19 P 19 Jump to preset list Next page Pop up menu Preset List Add to Preset Remove from Preset Auto Preset Add to Preset Jump to Preset search screen or Manual search screen Now Playing CONTROL CONTROL ENTER BACK Next page Rename Pop up menu Next page Next page Next page Next page Reorder Displayed only on the manual search sc...

Страница 24: ...into the desired station as follows Press and hold i to search for a higher frequency station Press and hold j to search for a lower frequency station Press i to repeatedly to tune in to a higher frequency manually Press j to repeatedly to tune in to a lower frequency manually y When this unit is tuned in to a station TUNED appears If the station is not registered on the preset list select from th...

Страница 25: ... Cover art Title Artist Album Input name Playback mode indicator Selected DSP program Repeat all Repeat one Shuffle Playback screen Refresh Refresh the server list Available at the server list screen Now Playing Jump to playback screen Pop up menu DSP Program Audio Adjustment P 19 P 19 Repeat Shuffle Next page Next page Pop up menu ENTER 1 Select a file to start playback BACK ENTER CONTROL CONTROL...

Страница 26: ...n such cases configure the security software appropriately You can connect this unit to up to 16 PC servers and each server must be connected to the same subnet as this unit 1 Select a music file on the contents list screen 2 Perform the playback operations by remote control Operation on the playback screen Some audio files may not be playable or may be noisy when played Repeat play Select from th...

Страница 27: ...ub folder Contents List screen Picture Control guide Input source Picture screen Slide Show Interval Set as Screen Saver Next page Next page Shuffle Start Slide Show Next page Next page Now Playing Jump to playback screen Select folder ENTER Select a file BACK ENTER CONTROL CONTROL Pop up menu Refresh Refresh the server list Available at the server list screen Now Playing Jump to playback screen P...

Страница 28: ... the playback screen and select the interval time Depending on the size of the photos and the playback status of this unit the actual interval may be longer than the specified one Photos are displayed at random This setting is valid for the slide show function Select from the pop up menu on the picture screen and select a shuffle mode option You can set your favorite photos as a screen saver Scree...

Страница 29: ...del of your Yamaha iPod universal dock Depending on the type of iPod to be connected the area for cover art may be narrowed Enjoying contents stored on your iPod Notes Top menu Select Watch or Listen Source menu Select iPod Root directory Sub directories Select directory Contents list screen Cover art Input name Playback mode indicator Selected DSP program Repeat all Repeat one Shuffle Playback sc...

Страница 30: ...le play Select from the pop up menu on the playback screen then select a repeat mode option Listening to music contents Watching video contents EXIT ENTER PREV MENU GUIDE CONTROL BACK Play Pause Skip forward Search forward press hold Skip backward Search backward press hold Back to the song list EXIT ENTER PREV MENU GUIDE CONTROL BACK Play Pause Skip forward Search forward press hold Skip backward...

Страница 31: ...lect Listen Source menu Select Net Radio Root directory Sub directories Select directory Contents list screen Internet Radio station Input name Playback mode indicator Selected DSP program Playback screen Remove from Bookmark Next page Now Playing Jump to playback screen Pop up menu DSP Program Audio Adjustment P 19 P 19 Add to Bookmark Next page Pop up menu ENTER Select a station to start playbac...

Страница 32: ...quickly Select the desired Internet Radio station then select from the pop up menu The stored Internet Radio station is added to the Bookmarks list in Net Radio y To remove the stored station from the Bookmarks list select the station under Bookmarks then select from the pop up menu You can also register your favorite Internet Radio stations on this unit by accessing the website with the web brows...

Страница 33: ...ary Next page Show Album Page Next page Remove from My Library Next page Play Next page Now Playing Jump to playback screen Pop up menu Menu items vary depending on directory DSP Program Audio Adjustment P 19 P 19 Repeat Next page Add Track to My Library Next page Shuffle Next page Add Album to My Library Next page Pop up menu ENTER Select a song to start playback BACK ENTER CONTROL CONTROL Playba...

Страница 34: ... appears y Select from the pop up menu to play back the selected item directly You can move to the album of the selected item in the list directly Select a song then select from the pop up menu Operations on the playback screen Library You can gather your favorite tracks and albums into a library called My Library Use the following pop up menu items to edit My Library Add the currently selected tr...

Страница 35: ...y individual computer your music is infinitely portable Much of what you see in the Display area comes from Rhapsody service What you can do with Rhapsody service depends on your subscription You can use Rhapsody service for free or get even more from a paid membership The Rhapsody service also brings you Rhapsody Online a streamlined internet version of Rhapsody that you can access from almost an...

Страница 36: ... component then set the Bluetooth component to the pairing mode 2 Select from the pop up menu and check that the Bluetooth component detects the Bluetooth receiver If the Bluetooth component detects the Bluetooth receiver YBA 10 YAMAHA example appears on the Bluetooth device list 3 Select the Bluetooth receiver on the Bluetooth device list then enter the pass key 0000 on the Bluetooth component Wh...

Страница 37: ... Information P 41 Account Status P 41 Sign In P 41 Rhapsody Free Trial P 41 Remove Account P 41 TV Remote Code Learning P 42 TV Favorite Source Power Control P 42 TV Power Control P 42 TV Remote Code P 42 Initial Screen POWER Button P 43 Initial Screen CONTROL Button P 43 GUI position P 43 HDMI Standby Through P 43 Network Standby P 44 Screen Saver Factory Reset P 44 USB Update P 44 Network Update...

Страница 38: ...urn Discard the change and return Note that some changes are applied immediately Setup menu Sub menu Setting screen BACK ENTER BACK ENTER or ENTER Initial Setup Speaker menu Determining the speaker size If the speaker s woofer section is 16 cm 6 5 in or larger large smaller than 16 cm 6 5 in small Choice Descriptions Large Select this setting when the front speakers are large Small Select this set...

Страница 39: ...case When DSP Program is set to Off or Music Enhancer the AIR SURROUND XTREME function is deactivated When Air Surround Xtreme is set to Yes the connected external sources output Dolby Digital or PCM signals instead of Dolby TrueHD or Dolby Digital Plus signals For details refer to the owner s manual of the component Choice Subwoofer and speakers Subwoofers Front speakers Other speakers Both Outpu...

Страница 40: ...nit or on the TV connected to this unit If HDMI Audio Out is set to TV the available audio signals vary depending on the specifications of the connected TV When HDMI Audio Out is set to TV and the audio signals are output from the HDMI OUT jack the speakers connected to this unit output no sound Even if HDMI Audio Out is set to TV the sound signals of some sources are not output from the HDMI OUT ...

Страница 41: ...ntrol or the virtual remote control You can program the functions of other remote controls to the following buttons GUIDE MENU PREV EXIT u d j i ENTER CH u d and PAGE u d on the remote control Any of the virtual remote control buttons including buttons L1 to L14 P 22 3 Select Learn and immediately press and hold the button you want to program on the remote control until Code learning was successfu...

Страница 42: ...onfirm the setting MAC Address Filter Use this feature to filter the access to this unit via LAN to control this unit by the MAC address of the accessing PC Control range 00 to FF for each field Mac Address Filter On Off Information You can display the following network system information MAC Address assigned to this unit IP Address Subnet Mask Default Gateway DNS Server P DNS Server S Link Status...

Страница 43: ...to which the IR flasher is attached This function works as follows When you turn on this unit this unit turns on the TV When you set this unit to the standby mode this unit turns off the TV You need to attach the IR flasher to the TV and configure the remote control setting in advance TV Remote Code Use this menu to change the remote control code of the connected TV Follow steps from 2 to 8 of Ste...

Страница 44: ... y Press ENTER when the adjustment is finished HDMI Standby Through Use this feature to decide whether or not to allow the HDMI signals input to the HDMI IN jacks to pass through this unit when this unit is in the standby mode When HDMI Standby Through is set to options other than Off the amount of power consumed in the standby mode increases Note Option menu Choice Functions Top Menu The top menu...

Страница 45: ...date the firmware refer to the information supplied with updates y To start updating the firmware select USB Update or Network Update Do not use this feature unless you need to update the firmware Be sure to read the information supplied with updates before performing firmware updates DO NOT unplug the power cord during updating Choice Descriptions Off Does not accept operations via LAN network wh...

Страница 46: ...volume is turned down or muted Turn up the volume 19 Signals this unit cannot reproduce are being input from a source component such as a CD ROM Play a source whose signals can be reproduced by this unit The HDMI Audio Out setting is set to TV Set the HDMI Audio Out setting to Amp to output sounds from speakers connected to this unit 39 The number of connected HDMI components is over the limit Red...

Страница 47: ...input sources cannot be played in the desired digital audio signal format The connected component is not set to output the desired digital audio signals Make an appropriate setting following the owner s manual of your component A humming sound is heard Incorrect cable connections Connect the audio cables firmly If the problem persists the cables may be defective This unit does not operate properly...

Страница 48: ...f this unit Reposition this unit The batteries are weak Replace all the batteries 5 The batteries do not last long Using alkaline batteries is strongly recommended The remote control code is not correctly set Set the remote control code correctly 40 42 Try setting another code of the same manufacturer 40 42 The IR flashers are not connected attached correctly Connect attach the IR flashers properl...

Страница 49: ...nnect it properly 6 The music on the PC server cannot be played back The PC does not have Windows Media Player 11 installed on it Install Windows Media Player 11 on the PC The music is recorded in a format that cannot be played on this unit This unit cannot play music formats other than WAV PCM format only MP3 WMA MPEG 4 AAC or FLAC Also note that it cannot play certain music files even if these a...

Страница 50: ... heavy traffic and playback is interrupted Try preparing a network exclusively for use with this unit to separate it from general network traffic License Unavailable You are attempting to play back expired digital rights management DRM encrypted content Select a file that is not protected by DRM Windows Media Player 11 does not acquire the DRM license for the file Acquire the license to play back ...

Страница 51: ...essage Cause Remedy See page E 1 NO FRONT SP Front L R channel signals are not detected Check the front L R speaker connections 6 E 2 NO SUR SP No surround channel signals are detected Check the surround L R speaker connections 6 E 3 NOISY Background noise is too loud Perform the Auto Speaker Setup in a quiet environment Turn off noisy electric equipment like air conditioners or move them away fro...

Страница 52: ...ssing provide listeners with unprecedented excitement and realism With this unit any sound environment from monaural up to a 5 1 channel configuration can be freely selected for your enjoyment Dolby Digital Plus Dolby Digital Plus is an advanced audio technology developed for high definition programming and media including HD broadcasts and Blu ray Disc Selected as an optional audio standard for B...

Страница 53: ... under which an analog audio signal is digitized recorded and transmitted without using any compression The PCM system uses a technique for sampling the size of the analog signal per very small unit of time Standing for Pulse Code Modulation the analog signal is encoded as pulses and then modulated for recording Sampling frequency and number of quantized bits When digitizing an analog audio signal...

Страница 54: ...DIO IN 3 jacks to input PCM Dolby Digital and DTS bitstreams Video jacks VIDEO IN 1 2 jacks For component video signals separated into the luminance Y and chrominance PB PR video signals transmitted on separate wires of component video cables VIDEO IN 3 jack For conventional composite video signals transmitted via composite video cable y This unit is equipped with a video up conversion function as...

Страница 55: ...f the input source component and set the component appropriately When CPPM copy protected DVD audio is played back video and audio signals may not be output depending on the type of DVD player being used This unit is not compatible with non HDCP compliant HDMI or DVI components To decode bitstream audio signals on this unit you may need to change some settings on the source component Video signals...

Страница 56: ...device complies with Part 15 of the FCC Rules Operation is subject to the following conditions This device may not cause harmful interference This device must accept any interference received including interference that may cause undesired operation See the Troubleshooting section of this manual if interference to radio reception is suspected We Want You Listening For A Lifetime Yamaha and the Ele...

Страница 57: ...Connecting a USB storage device P 6 Connecting a USB storage device P 6 Connecting to a router P 7 and Setting up the network P 40 Listening to music using Bluetooth Listening to FM radio stations Listening to music stored on USB storage devices Listening to Rhapsody music YMC 700 only Listening to Internet radio YMC 700 only Listening to music stored on PCs YMC 700 only Playing back photos stored...

Страница 58: ...ntrolling playback P 20 Controlling playback P 24 Controlling playback P 24 Controlling playback P 20 Viewing photos P 26 Using photos as a screen saver P 27 Customizing the remote control P 40 Customizing the remote control P 40 Customizing the remote control P 40 Select DSP Programs Adjusting the tone P 19 Select DSP Programs Adjusting tone P 19 Registering your favorite TV stations P 42 Presett...

Страница 59: ... 2009 All rights reserved Printed in China WR17640 ...

Страница 60: ... pt Device 4 15 pt 14 pt 13 pt 9 pt 6 pt 3 pt 3 pt 2 pt 1 pt Device 3 15 pt 14 pt 9 pt 6 pt 3 pt 3 pt 2 pt 1 pt Device 2 15 pt 9 pt 3 pt 3 pt 2 pt 1 pt Device 1 Use this chart to find the best possible connections A Connection Planning Chart y The numbers of pts are used in the Initial Setup procedure Total pt of the circled items HDMI Video Audio Standard Standard Better Better Better Best Cable ...

Страница 61: ... this list of conditions and the following disclaimer 2 Redistributions in binary form must reproduce the above copyright notice this list of conditions and the following disclaimer in the documentation and or other materials provided with the distribution 3 All advertising materials mentioning features or use of this software must display the following acknowledgement This product includes crypto...

Отзывы: